The Stress-Free Guide to John Muir Trail Permits in 2024: 5 Simple Steps to Rocking the JMT Permit Process & All of Its Quirks
It’s easy to get caught up in the hype that getting John Muir Trail Permits is overly complicated and stressful, but when it comes down to it there’s really only a few things you need to know and plan for in advance, and everything else can be planned after you’ve gotten confirmation of your permits.
In other words: baby steps, my friend.
Don’t freak out about all the other things involved with planning the JMT hike just yet, first, let’s get those permits secured!
Once you get those permits, THEN you can freak out. (Just kidding, obviously! Come back here to our Ultimate John Muir Trail Planning Guide for all the next steps to get ready to hike the JMT). The John Muir Trail is one of the best hikes in the world, so this permit process is definitely worth all the fuss.

This JMT permit process boils down to 5 simple steps, and I’m going to walk you through everything you need to know.
Decide How Long You Want to Spend Hiking the JMT (are you a speed-demon, or are you taking this as a leisurely experience, either way is your choice.)
Pick Your Date (kind of obvious, but this affects when you apply)
Determine If You Want to Hike Northbound (NOBO) or Southbound (SOBO)
Pick Your Trailhead & Night 1 Campsite (you’ve got some options, and I’ll walk you through them)
Apply for Your Permit Online (a super-simple online application system)
We are going to take this step-by-step, and at the end of each step I’ll prompt you to write down your answers so you can get clear on your choice. Let’s do this!
Note: Permit specifics often change from year to year, and while we do update this post each year, always make sure to double-check the National Park Service JMT website for any changes.
GRAB MY [FREE] OUTDOOR BACKPACKER STARTER KIT
I created the Ultimate Outdoor Backpacker Starter Kit for you (and it's FREE)! This starter kit is filled with 14 pages of my best hiking and backpacking tips to help you learn what it takes to become a safe, confident, and self-sufficient outdoor backpacker!
5 SIMPLE STEPS TO ROCKING THE JOHN MUIR TRAIL PERMIT PROCESS

I am a PERMIT NERD. Living in California for a good part of my life meant that I became really accustomed to advanced planning and prep for the backpacking trails and the California backpacking permit process for popular trails and campsites.
Wilderness permits are required to hike the JMT, which I’m guessing you know or else you wouldn’t be here. Over the years this trail has gotten more and more popular which means that getting a JMT permit is getting harder, and the lottery system is super competitive. John Muir Trail permits are so popular that according to the National Park Service, 97% of JMT permit applications get denied.
But don’t let that statistic scare you off... that’s like failing ahead of time. Instead, give it a shot, and I promise I’ll help make this process as pain-free as possible. Like with anything in life, good things come at risk of failure – JMT permits included.
STEP 1: DECIDE HOW LONG YOU WANT TO SPEND HIKING THE JMT

This is a crucial first decision because it affects your choice on “when” to go, so let’s tackle this first shall we.
The John Muir Trail is roughly 211 mile long (if you’re following the true JMT trail the whole way), and people typically hike this in anywhere between 10 days (speed freaks) to 30 days (leisurely). While it’s tempting to look at the 10-days and think, “Wow, I wouldn’t need as much vacation time for that,” I wouldn’t recommend that for most people.
For the students inside of my signature backpacking program, Become an Outdoor Backpacking Badass, I typically recommend aiming for 7-10 miles backpacking per day (if they are newer or if they want a more relaxed pace), and up to 15 miles per day if they are more experienced.
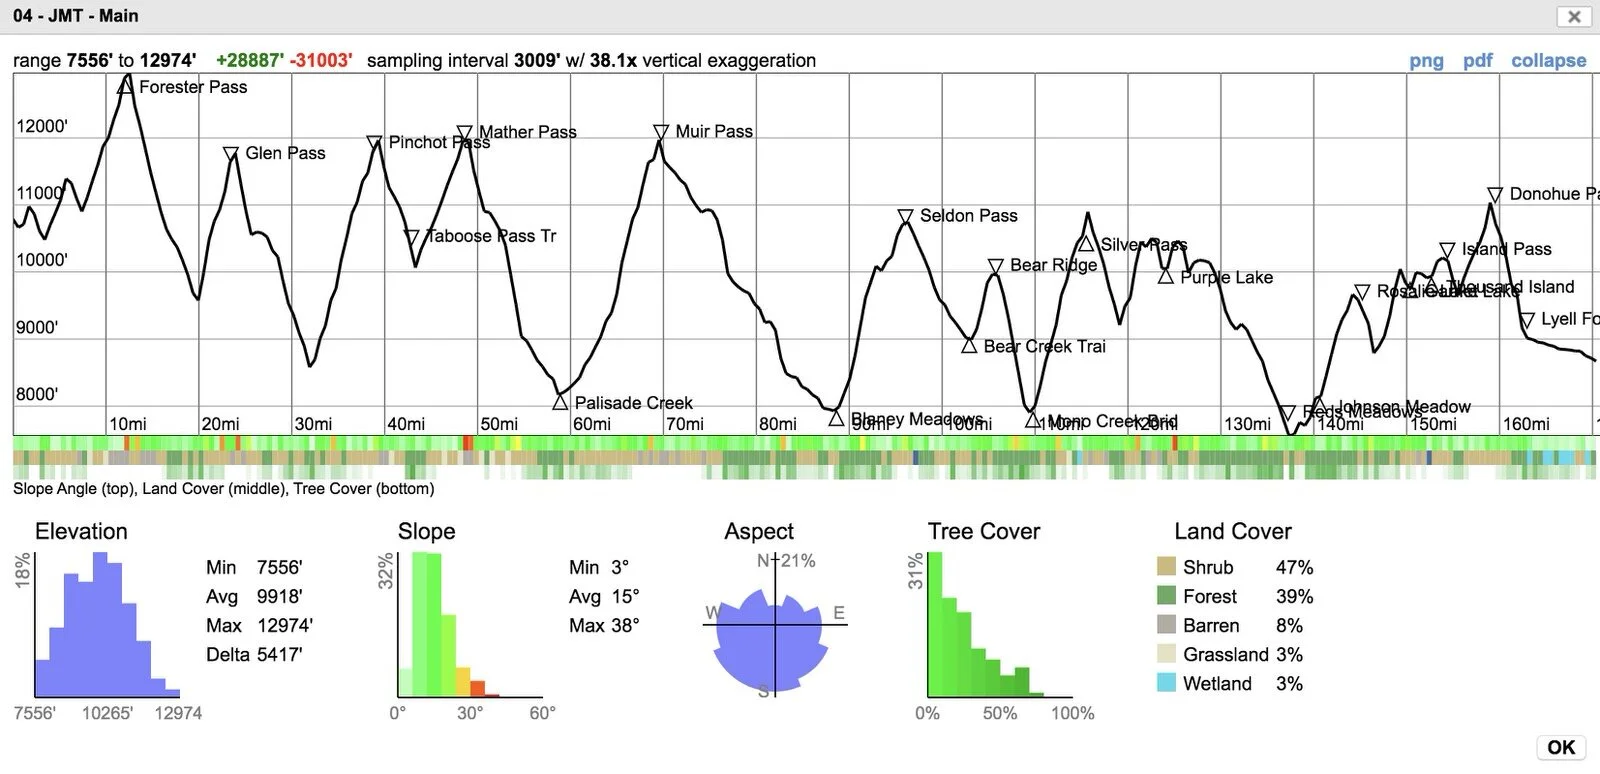
The terrain in the Sierra Nevada range is anything but flat. In fact, there is a total of 45,000 feet of elevation gain along the 211 mile long JMT trail. It’s beautifully rugged, steep, and leg-busting, no matter if you’re hiking NOBO or SOBO.
This photo below isn’t the entire JMT profile, but gives you an idea of the up-and-down nature of the JMT trail from Whitney Portal to Lyell Canyon.
When I hiked the John Muir Trail, I planned for 22 days on the trail. In my opinion, anywhere from 20-25 days is a pretty good pace for the JMT (and is still pretty challenging!)
Without any hardcore planning upfront, this gives you about 8-10 mile days. While of course some days you’ll feel up to tackling more mileage, you’ll probably also want some more “chill” days in there too.
For example, our friends Megan and Michael over at Fresh Off the Grid had to take a few “zero” days (no hiking) to let a really, really bad blister heal before they finished the trail.
Important note: It’s ok to put in more days for buffer, even if you expect to hike it in less. The important thing to know is that you can’t be on the trail longer than your John Muir Trail reservation states, so best bet is to give yourself some wiggle room in the application process.
When I applied for the JMT, I posted my trip length at 25 days.
>> Now it’s your turn: Decide how long you want to hike the trail in, and write it down. Don’t take too long on this, honestly just put 25-30 days down if you can’t decide. Remember you can fine-tune your plans later.
STEP 2: PICK YOUR DATE
There are really only 2 factors that will go into your decision of when to hike the JMT. One factor is, when is it actually NICE to hike it (i.e. not winter), and the second factor is when do you have time off?

Let’s dig into both of these a bit more shall we?
BEST TIME OF THE YEAR TO HIKE THE JMT
In order to avoid potential snow conditions in the Sierra Nevada Mountains (which can make your thru-hike a bit more tricky), the best months to attempt the John Muir Trail is early July through late September.
You might be able to get by in June and October, but just know it’s a bit more “shoulder season” if you’re trying to avoid snow. It all depends on the year and how much snow California gets during the season.
My favorite month in the Sierra Nevada is September. Less bugs, less crowds, better weather. However, since this is a lottery system, I opted to apply for mid-August, because if my John Muir Wilderness permit wasn’t accepted I could apply again early September for one more shot. I’ll explain that more about that later.
Note: Wildfire Considerations - In the past few years, wildfires have often closed down the National Forests for several weeks starting around Labor Day and into September. The National Forest is a huge portion of the John Muir Trail, and so many hikers (including Michael & I) have been kicked off the trail due to these closures.
It’s hard to say for sure if this will happen again in future years, but wildfires are becoming a more and more frequent threat to this area and the thru-hiking community. This should be something to at least consider when planning dates for your hike.

WHEN DO YOU HAVE TIME OFF?
My job as a backpacking and outdoor empowerment coach means that I actually have quite a bit of flexibility in my schedule. For most people, however, your time could be more dependent on the vacation time you have from work, or if your work will allow you a leave of absence.
Maybe you want to combine your trip with certain holidays so you can reduce the vacation time you have to take (i.e. hello, 4th of July). I’ve been there. I was a hardcore weekend warrior long before I ever became my own boss, and I knew all the tricks to stretching my vacation time to the max.
This is an entirely personal question that only you can answer – maybe you have to plan with your boss at work, or coordinate things with your family. In fact, this step might be the one that gets most people stuck.

>> Now it’s your turn: Write down your ideal “start date” for hiking the JMT. Also make a note of your start date flexibility.
GRAB MY [FREE] FULL BEGINNER BACKPACKING PACKING CHECKLIST!
Want a full list of everything I recommend to take backpacking with you? Download our free backpacking packing checklist below!

STEP 3: ARE YOU HIKING NOBO OR SOBO?
Before we move forward, let’s clarify the lingo real quick.
NOBO = North Bound (Hiking from Whitney Portal to Yosemite Valley)
SOBO = South Bound (Hiking from Yosemite Valley to Whitney Portal)
Either option is great to be honest, but SOBO tends to be more popular for a few reasons which I’ll get into below.
NOTES ON CHOOSING NOBO

While the JMT technically starts at Whitney Portal, getting a Whitney Portal permit is arguably even more competitive than the SOBO John Muir Trail permit. Instead of dealing with the Whitney permit system (also a lottery), you can instead opt to start farther south, on the Cottonwood Lakes Trail or the Cottonwood Pass Trail. Both trails allow you to connect to the JMT and still hike its entire length. It’s not a bad option or back-up option.
When I hiked the John Muir Trail, I ended up starting at the Cottonwood Pass Trail and hiked northbound.
If you need to start earlier in the season (say late June), then this might not be the best starting point option because you’ll likely have to deal with more snow.
Another key thing to note here is that starting in Whitney Portal means that you’ll have to adapt to altitude pretty quickly. You’ll be at high elevations very early on the trail, and depending on how you adapt to altitude, this could be frustrating to deal with.
Many of your first few nights on the trail will be camping at 10,000 feet or more. It’s not the worst thing ever, but you’ll want to add some altitude adaptation days in prior to starting your trip.

Starting at Whitney Portal can be brutal both from a steepness and altitude perspective, but that’s not a total deal breaker. However, if you’re new at all this, SOBO might be a better way to ease into the whole thing.
Many people claim preferring NOBO because the sun is typically on their back instead of in their eyes, but I’m not sure either would bother me too much.
It’s arguably “easier’ to grab NOBO permits, so that’s probably one of the biggest upsides. Every time I applied for southbound permits, I was denied. I always got my northbound permits though.
NOTES ON CHOOSING SOBO

Going SOBO starts you at a lower elevation (allowing you to adapt to altitude with time) and can be considered a tad easier of a start (allowing your legs time to adapt). It’s also sort of fun to hike SOBO so you can run into NOBO PCT hikers and chat with them about passes coming up.
In the end, either option is great, really, and if you’re like me, you might use NOBO as your backup plan to your SOBO lottery application. I’m the kind of gal who likes to hedge her bets.
>> Now it’s your turn: Figure out if you have a preference. Are you set on going NOBO vs SOBO? What’s your plan?
STEP 4: PICK YOUR TRAILHEAD AND NIGHT 1 CAMPSITE
Depending on what you chose in Step 3, you will have different starting trailhead options, which affect when you apply and what type of permit you apply for. Again, I’ll break this down for you.

SOBO TRAILHEADS
There are two trailheads you can take at the SOBO terminus which are Donohue Pass eligible (necessary to complete the JMT), and there are pros and cons to each of them. When you choose your trailhead, you’re also going to need to define your “first night’s” camp for your application as well.
These are your 2 SOBO trailheads:
Happy Isles > Past Little Yosemite Valley
Lyell Canyon
You can see them on the map below:
Happy Isles (#1) & Lyell (#4)

Happy Isles is always a crowd favorite starting point because it’s the “true” terminus of the JMT. This also makes it more competitive, as well as the fact that it shares a path toward the very popular Half Dome day hiking trail. Starting here will be ideal, and makes it easy to grab a summit of Half Dome, which is a worthwhile experience if you’ve never done so before.
You must choose a first night campsite past at least 2 miles past Little Yosemite Valley in order to be eligible for a Donohue Pass exit. Your options for this are Moraine Dome or the JMT/Half Dome Junction (this is the best choice if you have a permit to hike Half Dome).
Night 1 Camp Option: Moraine Dome
Night 1 Camp Option: JMT/Half Dome Junction
Optional Side Trip: Half Dome

Lyell Canyon is the other SOBO trailhead option, but my least favorite pick because you miss out on some really beautiful sections of the JMT, including the Cathedral Lakes Area, Half Dome, and Clouds Rest. Still, it’s an option, and possibly less competitive (though I doubt it). I sectioned hiked Lyell Canyon to Devils Postpile once before and absolutely loved it, but still I think it would be a shame to miss out on the Yosemite Valley area of the JMT.
Night 1 Camp Option: Upper Lyell Canyon
So there you go. When you apply for a Yosemite Wilderness permit, you get to list your preferences in order.

NOBO TRAILHEADS
There are 2 primary NOBO trailhead options:
Whitney Portal
Horseshoe Meadow
You can see them on the map below:
Whitney Portal (#1), Cottonwood Lakes (#2), Cottonwood Pass (#3)

Whitney Portal is the typical terminus for the JMT, and many people like to hike to the top of Mount Whitney while they’re at it. As I mentioned in our NOBO vs SOBO discussion, there are some downsides to starting at the portal, mostly being adapting to altitude, lots of elevation gain on day 1, AND it’s very competitive to get permits to as well.
If you start here, it also kind of sucks because you’ll most likely carry all of your backpacking gear up the switchbacks, which is brutal, but it doesn’t really make sense to leave them back at camp because then you’d have to do the switchbacks twice.

Horseshoe Meadow is the better NOBO option (in my opinion) because you technically still won’t miss out on any sections of the JMT. You’ll start a little further South, but if you plan accordingly, you can still go summit Whitney (AND you can leave you pack behind at camp! Winning!).
Honestly, starting from Horseshoe Meadows seems like the better NOBO option to me, plus that area is just gorgeous. You could even plan for a summit of Mount Langley (another California 14er) as well if you were up for the challenge. There are two main trails that will lead you from the Horseshoe Meadow Trailhead to the JMT: Cottonwood Lakes Trail (SO GOOD!) and Cottonwood Pass Trail (also very good!). I’ve hiked both of these trails and love them. For my JMT hike we started at Cottonwood Pass.
One thing to note here, is if you apply for NOBO permits, you’ll have to list each day’s campsite (which is super annoying, especially because it doesn’t really matter). Use this website as a guide for campsites to put down during your application process. This made it super easy for me. I’ll make my more detailed plan later, but for the sake of the application process, I appreciated this resource.
>> Now it’s your turn: Write down your preferences. Pick your preference for SOBO trailheads, or determine your NOBO trailhead preference.
STEP 5: APPLY FOR YOUR PERMIT ONLINE
Depending on whether you’re going NOBO or SOBO, there are slightly different permit processes for both, but don’t worry, I’ll walk you through each of them:

SOBO: Yosemite National Park Wilderness Permit Reservation
The SOBO John Muir Trail permit application, called a Yosemite National Park Wilderness Permit, is run via a lottery system due to the hike/area’s popularity.
The lottery system is based on quotas where the park limits the total number of JMT thru-hikers entering all trailheads to 60% being able to be reserved through the lottery 24 weeks ahead of time and 40% saved for first-come/first-served permits released 7 days ahead of time.
Only 45 wilderness permits per day for exiting Yosemite via the John Muir Trail over Donohue Pass are issued per day. 20 of these are available for the Happy Isles to Past LYV trailhead, while 25 are available for the Lyell Canyon trailhead. Quotas are subject to change each year.
Click here to learn more about how the lottery system works.
When to Apply: For those hiking southbound, Yosemite National Park Wilderness Permits can be obtained up to 24 weeks (168 days) in advance. Check out this useful table on the National Park Service website for when to apply for your permits. Use the date you picked in Step 2 plus the table above to figure out when you’ll need to submit your application.
Where to Apply: The entire JMT lottery and permit system is on recreation.gov, including Yosemite National Park Wilderness Permits.

How to Apply: The process couldn’t be easier, and after nailing down the questions I walked you through above, you’ll fly through this process. Based on the reservation window discussed above (for when to apply for your permit), head to the permit website and follow the steps below to finish your lottery application. Here’s what it looks like:
1) Go to JMT permit lottery website, read the rules (most of which I’ve already touched on here), login to your account (or create one if you don’t have one) and then proceed forward with your application: https://www.recreation.gov/permits/445859
2) Register for Open Lottery. On the Yosemite National Parks Wilderness Permit Page you’ll see information about what lottery is running and when results will be available. If you’re ready to apply, click “Register for Open Lottery”

3. Make sure your permit holder information is correct
Name
Email
Phone Number
Address
4. Add any alternative permit holders (if desired). You may select a max of 3 other people to act as alternate permit holders on your trip.

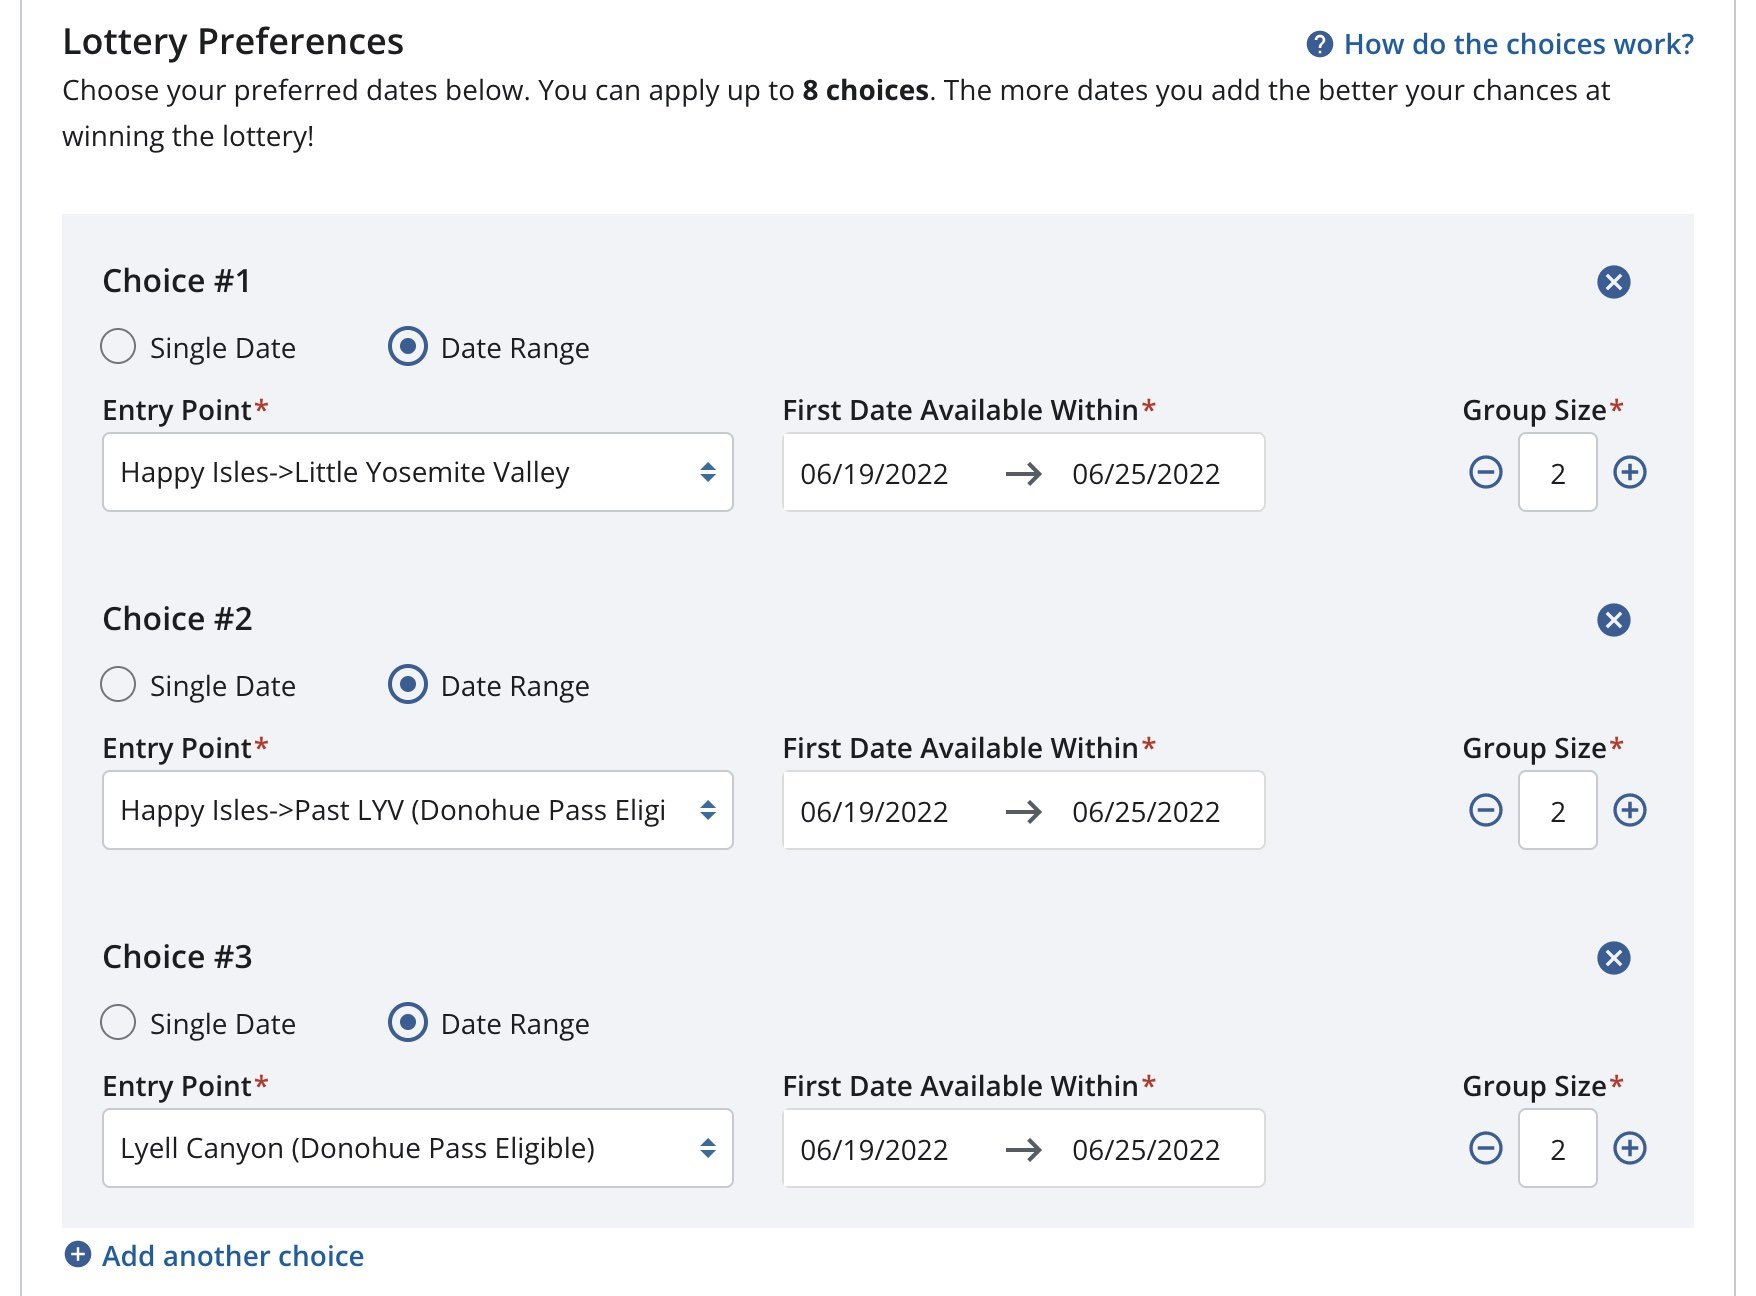
5. Choose your lottery date preferences & group size. You can apply for up to 8 choices. The more dates you add the better your chances at winning the lottery! If you have flexibility on WHEN you apply, you can pick a date range for start dates here instead of a single date. Here is more information about the different trailheads in Yosemite National Park.
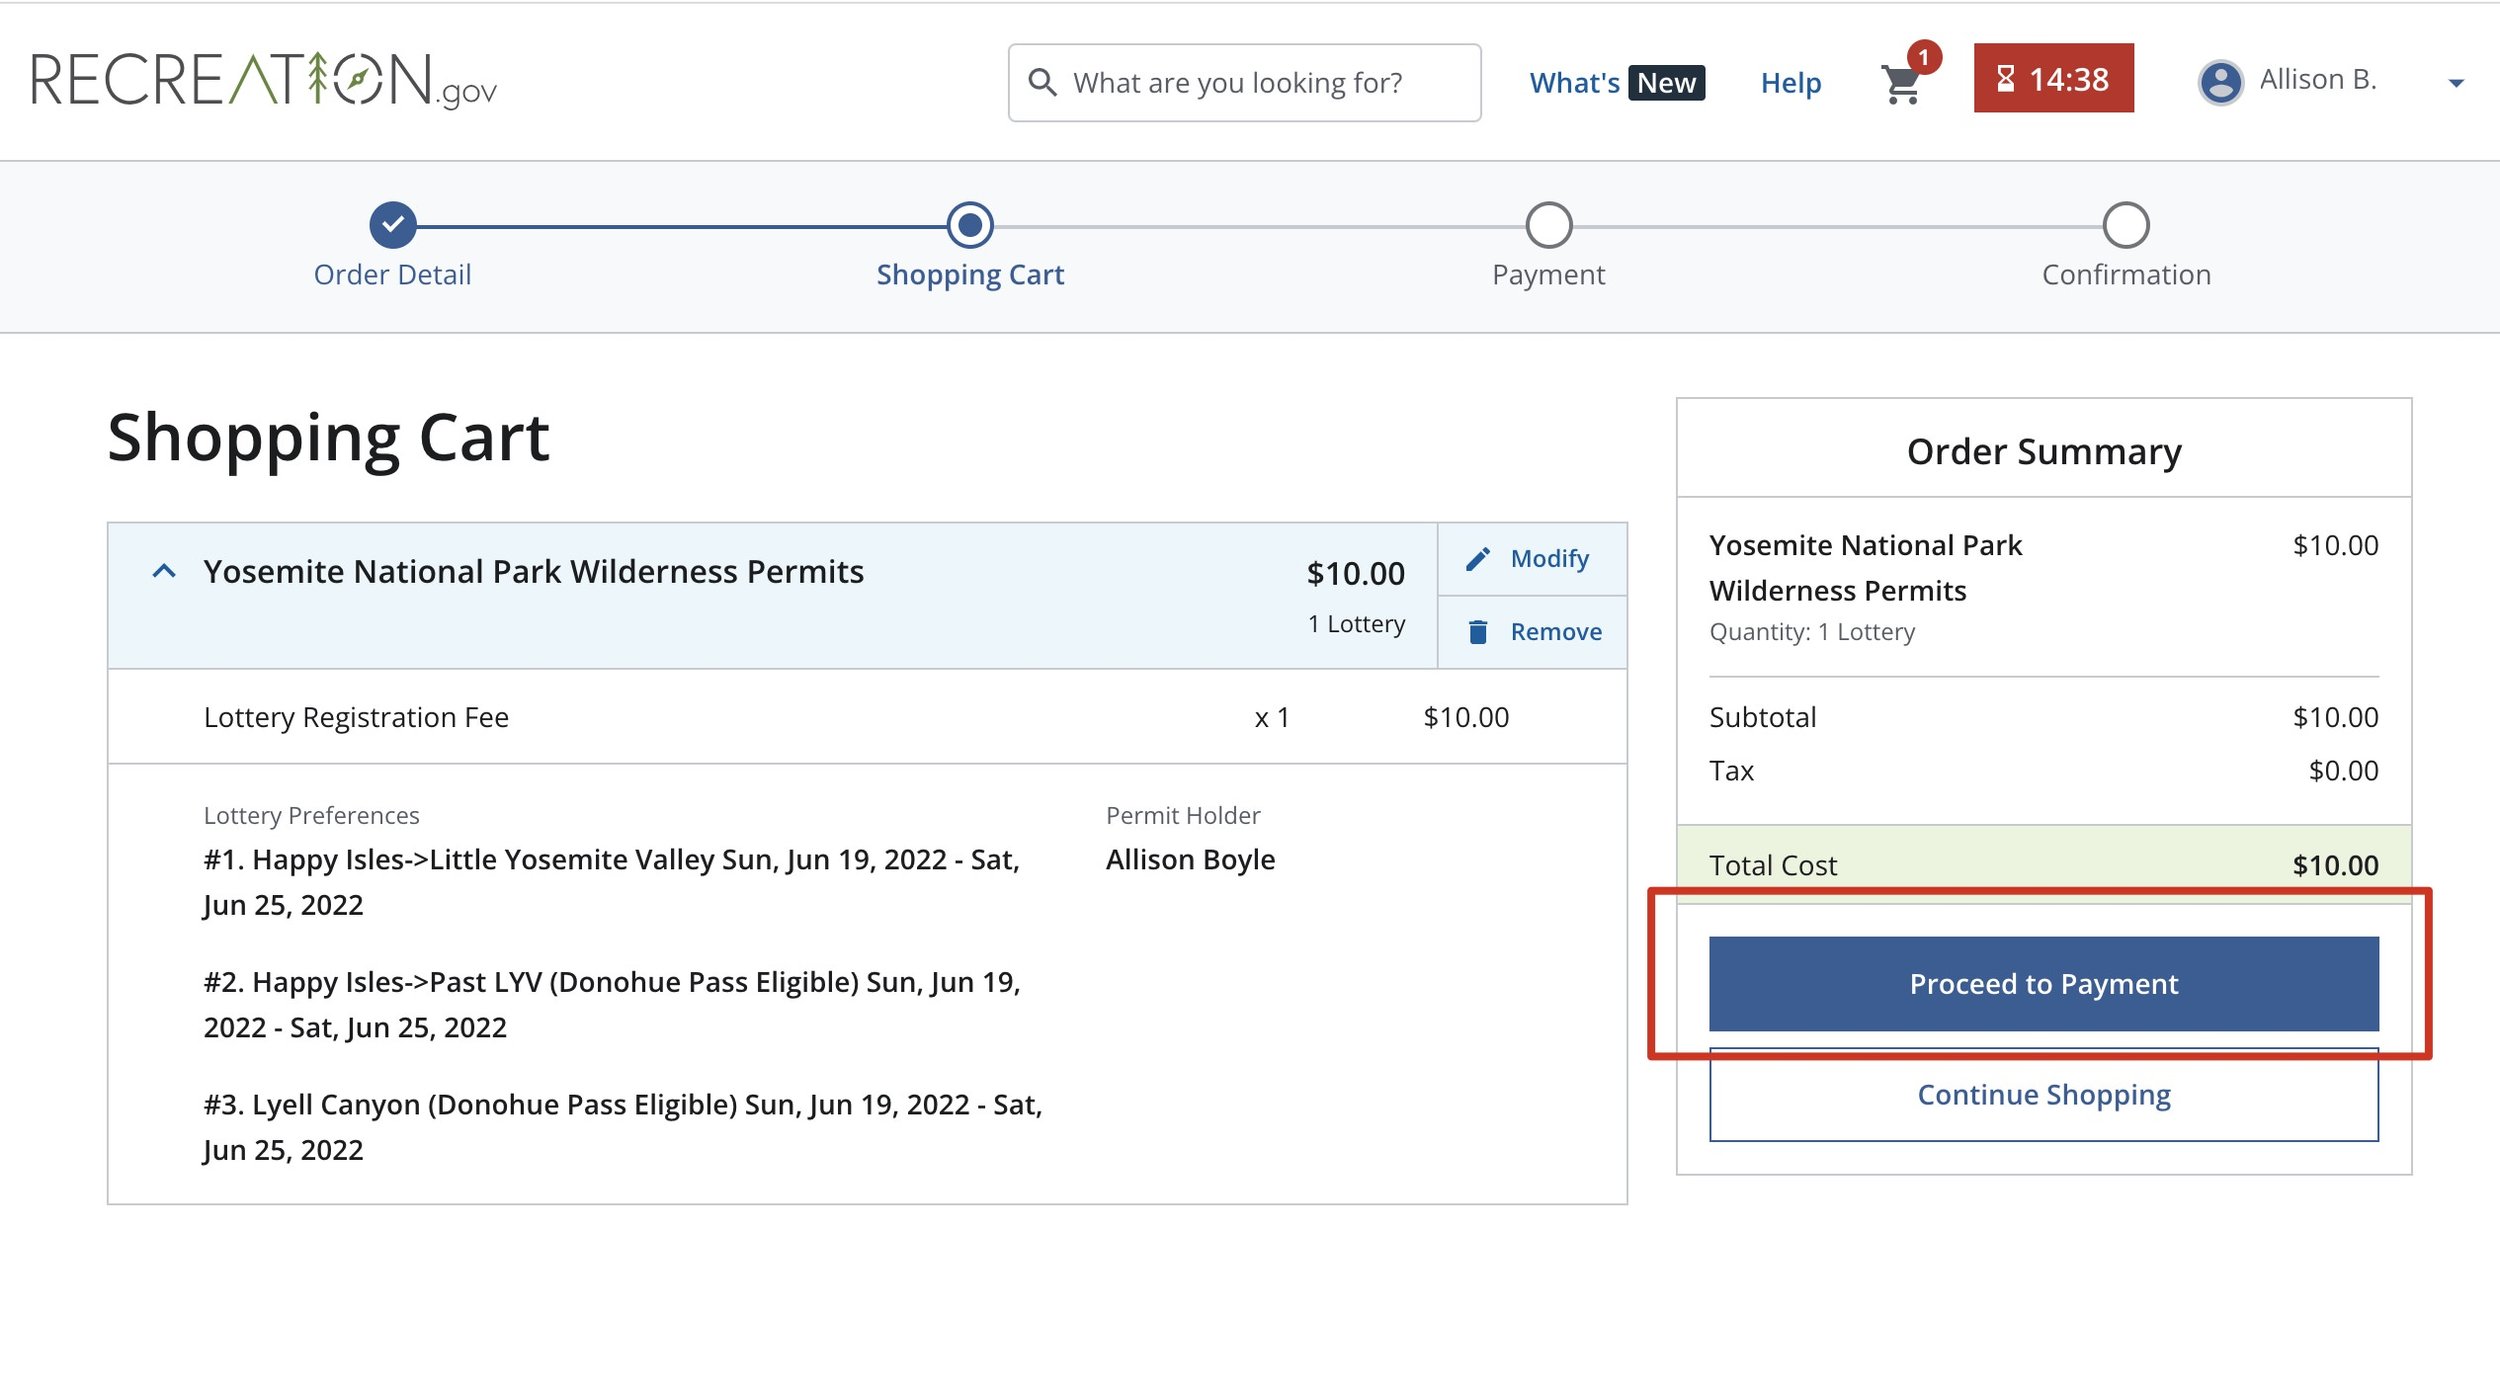
6. Proceed to Cart. Read through the “Need to know” information and if everything looks good, click “Proceed to Cart.”

7. Proceed to Payment. Double check your information and click proceed to payment if everything looks good. Permit lottery fees are non-refundable.
Note: If you plan to hike the entire JMT and exit the Whitney Portal, you do not need an additional permit to summit Mt. Whitney. It is “included” in your Yosemite National Park Wilderness permit as part of your JMT Hike. This is different than Half Dome, however. To hike Half Dome, you’ll need a separate Half Dome permit.
After you’ve finished this process, then you wait to see what happens! You should get an email within a week or two if you won the lottery for your desired dates.
Here’s what a “denied” JMT permit email looked like in the past when the system was on Yosemite National Park Website (it might look different now that Recreation.gov is managing it now):

How much do SOBO JMT permits cost? Your lottery application requires a non-refundable $10 fee. If you are approved for a permit, you will have to pay an additional $5 non-refundable per person fee. If you also got Half Dome permits, there will be an additional fee of $10 per person.
NOBO: Inyo National Forest Wilderness Permit Reservation
If you’re applying for Mount Whitney as your starting point for the JMT hike, you’ll want to follow the Mount Whitney Permit Lottery process. Read my important permit deadlines in California post to learn more about the Mount Whitney lottery process.

If you’re applying for Horseshoe Meadows as your start for the NOBO JMT hike (this is what I would recommend), then the JMT wilderness permit you’ll want to get is called an Inyo National Forest Wilderness Permit. Follow these steps below for this permit.
When to Apply: Most trails can be reserved up to 6 months in advance. So for reservations in the summer months (July through October), you will be looking to make reservations starting in January to April. This part is sort of confusing because it’s like an “exactly 6 month out” sort of thing.
For example, if you want to apply for August 20th start date, you’d apply February 20th. But what about a weird situation like, you want to start August 30th, but there is no “February 30th”? In these situations, you apply on the first day of the next month, whatever that is. For instance, in 2020, February ended on the 29th. So if you wanted to apply for a start date of August 30th or 31st then you’d apply March 1st. On March 1st the August 30th, 31st, and September 1st days all opened up. I had to hop on a chat with the reservation site to figure that out because it wasn’t intuitive

Where to Apply: Again, for NOBO permits you’ll be getting Inyo National Forest Wilderness permits, which can be found here: https://www.recreation.gov/ . You’ll want to sign up for an account if you don’t already have one, and then search for “Inyo National Forest – Wilderness Permits”, and click on it. This is where you’ll start the process.
How to Apply: The process is also fairly straightforward. Here’s what it looks like:
1) Go to recreation.gov website and search for Inyo National Forest Wilderness permits.
2) Click “Explore Available Permits”

3) Then you will be taken to a huge list of trailheads, availability, and quotas. To narrow your search, use the top to filter. Input your start date, group size, and you can filter further by typing in “Cottonwood” into the filter search box. Also mark if this is a guided trip or not. Then you’ll be shown a list of available permits. If there are permits available, they will show up as “numbers”, otherwise they usually show W meaning “walk-in” only.

4) If you find some are available, click on the date, and then “Book Now”
5) At this point you’ll be taken to a long order form like page where you fill in “all the things” like:
Name, address, email, phone number
Click “yes” for visiting Mt. Whitney
Entry date and exit date
Fill out your campsites for each day (remember, use this resource to help for the permit application, your first night camp is the one that really matters, the rest can be adjusted later)
Fill in your Entry and Exit Point (your exit point is likely to be the Happy Isle exit if you’re hiking the entire JMT)
Your group size
Your travel method (aka “foot”)
Are you bringing any animals (“no”)
Choose a permit issuing station (aka, where you will pick up your permits). Eastern Sierra Inter-agency Visitor Center is the closest to Lone Pine and Horseshoe Meadow.
Check out and pay for your permit

The great part about a NOBO John Muir Trail permit is that there’s no lottery system to wait on. You know right away if you’re getting permits or not.
How much do NOBO JMT permits cost? For final reservations, you’ll pay a $15 non-refundable per person fee (for the Whitney Zone) plus an additional $6 reservation fee paid upfront when you apply.
GRAB MY [FREE] OUTDOOR BACKPACKER STARTER KIT
I created the Ultimate Outdoor Backpacker Starter Kit for you (and it's FREE)! This starter kit is filled with 14 pages of my best hiking and backpacking tips to help you learn what it takes to become a safe, confident, and self-sufficient outdoor backpacker!
WHAT NOW?

Phew! You made it through this post! And if you followed along with each of the 5 steps and answered the questions, then you should be all set and armed with a plan for grabbing your JMT permits with little to no stress. It’s not likely that you’re applying for your permit today (unless you’re a last-minute planner kind of person), so the next step is:
MARK YOUR CALENDAR.
Seriously, go into your calendar and give yourself a nice reminder to do you online application, attach a picture of your notes from this session.
WHAT ARE MY OPTIONS IF I DON’T GET A PERMIT FOR THE DATE I WANTED?
If it were me, I’d apply for both a NOBO permit and a SOBO permit, even if my preference was to go SOBO. You can secure your NOBO JMT permit right away, and then enter the lottery for the Southbound JMT lottery process and see what happens. It’s harder to get those southbound permits, so that’s what I would do. Then if you get SOBO permits, just release your NOBO ones.

You can also watch out for cancellations or see if there are any dates that aren’t full yet. You might just get lucky.
There is also a “walk-in” permit option for entering at Lyell Canyon Trailhead at the Tuolumne Meadows Wilderness Center. Walk in permits open up at 11am the day before your hike, but plan to get there and camp out way before 11am to increase your chances. For me, walk in permits would be more annoying, logistically, because you can’t plan ahead as well, but it’s always an option.

I hope you found this JMT permit guide helpful and found that it reduced your permit-grabbing anxiety. Please let me know if you have any questions below – or let me know if this guide helped you grab permits successfully!
NEW TO BACKPACKING?
Also, if you ARE new to backpacking, and are feeling overwhelmed a bit by ALL THE THINGS, I highly recommend you check out my backpacking program. Join me and one badass group of women on a transformational adventure, where you will learn how to confidently go on your first ever (or perhaps your first solo) outdoor backpacking trip without the constant fear of getting lost, the debilitating worry of being unprepared, and the lurking feeling that you lack the "know-how" and skills required to stay safe on the trails. Click here to be the first to know when my one-of-a-kind backpacking program re-opens again for enrollment!,
If you are looking for more California and hiking inspiration, check out our other resources below!
FOR MORE JMT, YOSEMITE, & SIERRA NEVADA RESOURCES BE SURE TO CHECK OUT THE FOLLOWING:
Important Permit & Reservation Deadlines for Popular California Hiking Trails & Campsites
A Full List of All the California 14,000 Foot Peaks
Essential hiking and backpacking resources:
7 Tips to Hiking and Summiting Your First Fourteener Mountain
11 Lesser Known Rules to Learn for Your First Time Backpacking
Essential Backpacking Hygiene Tips & Feminine Care in the Outdoors
How to Wash a Down Jacket Properly So That You Don't Ruin It!
Cheers,
Allison - She Dreams of Alpine


27 of the Absolute Best Hikes in Yosemite National Park to Put on Your Hiking Bucket List | Yosemite National Park is one of the most beautiful national parks in the entire United States, and one of the best ways to explore the park is via one the many amazing hiking trails. In this post, I’ve detailed 27 of Yosemite’s top hiking trails, ranging from difficult to easy, that give you epic views of Yosemite’s grand backcountry and some of Yosemite’s most famous landmarks. You’ll only fall more in love with Yosemite after going on one of these hikes! | shedreamsofalpine.com