Half Dome Hike Trail Guide (2026): A Step-By-Step Guide to Yosemite’s Epic Half Dome Trail

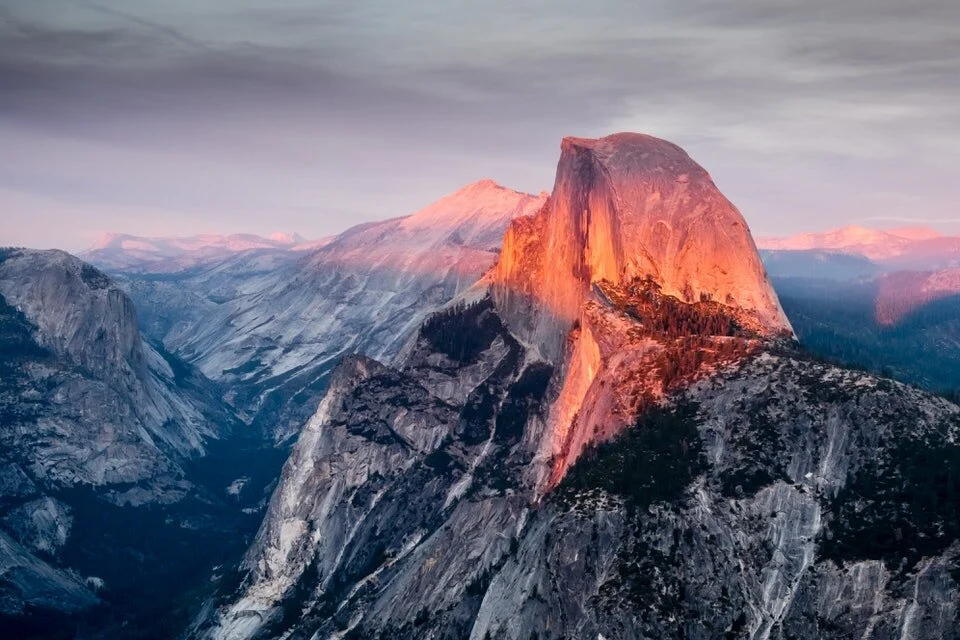
The Half Dome hike is hands down one of the most unique & awe-inspiring hikes in all of Yosemite National Park! Many people aspire to hike Half Dome, for good reason!
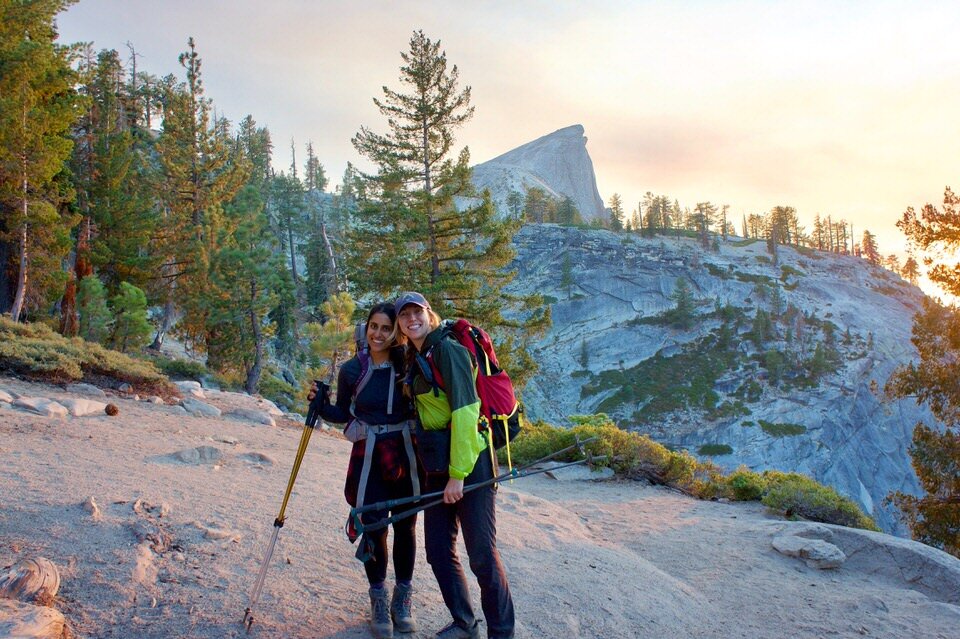
Beyond the hype though, the Half Dome trail has its own special significance to me and my life because it was my very first backpacking trip. In this post, I’ll talk about the different options of day hiking versus backpacking Half Dome, but let me first start off by telling you a quick story, because the Half Dome hike quite literally changed my life.
When I was fresh out of college, I moved from Texas to California and was feeling quite lost at the time. I was recently divorced, had moved far away from friends and family, and generally just felt like life was bland. I was searching for self-worth and acceptance in pretty much all the wrong places.
And then one day, in a coffee break room at work, I overheard one of my coworkers talking to some other coworkers about this upcoming hike, the Half Dome hike in Yosemite National Park.
They all seemed pretty stoked on it, and I literally had never heard about it before (seriously, I had to Google “what is half dome” when I got home – come to find out its one of the most iconic features in California... go figure!)
So I leaned in on the conversation, and next thing I know my friend says to me, “Hey, we have one extra permit spot if you want to go...”
I sort of did a double take, like, “Wait what? Who, me? You know I’m from Texas right??”
I had literally never been backpacking before.
But they convinced me. They believed in me. They wanted me to come.
So I said YES.
I didn’t know it at the time, but that one “yes” marked a huge turning point in my life. One that has led me to where I am today, an outdoor empowerment coach and backpacking educator.
Because of that, I have a LOT of love in my heart for this iconic Yosemite feature, and I visit Half Dome as often as I can. I’m extremely excited to help other people discover Half Dome with this trail guide and to share how this one trail changed everything for me.
So... let’s get started, shall we?
WHAT WE COVER IN THIS HALF DOME HIKE GUIDE
This Half Dome trail guide is filled to the brim with everything you need to know to head out on your very own successful summit of Half Dome…PLUS fun stories, tips, and advice on how to make that experience one of the best in your life!
If you choose to day hike Half Dome, it makes for a pretty epic day of over 14 miles and 5,000 feet elevation gain round trip. If you want to take your time and savor the scenery, you can also backpack Half Dome instead (that’s what I did my first time).
If backpacking is still very new to you (but you’re interested in learning more), I definitely recommend jumping on the waitlist for my signature coaching program, Become an Outdoor Backpacking Badass, where we teach you everything you need to know to become confident and self-sufficient on the trails, so you can lead your peers with confidence, be a coveted backpacking partner, or even go solo. Hop on my waitlist for that program here!

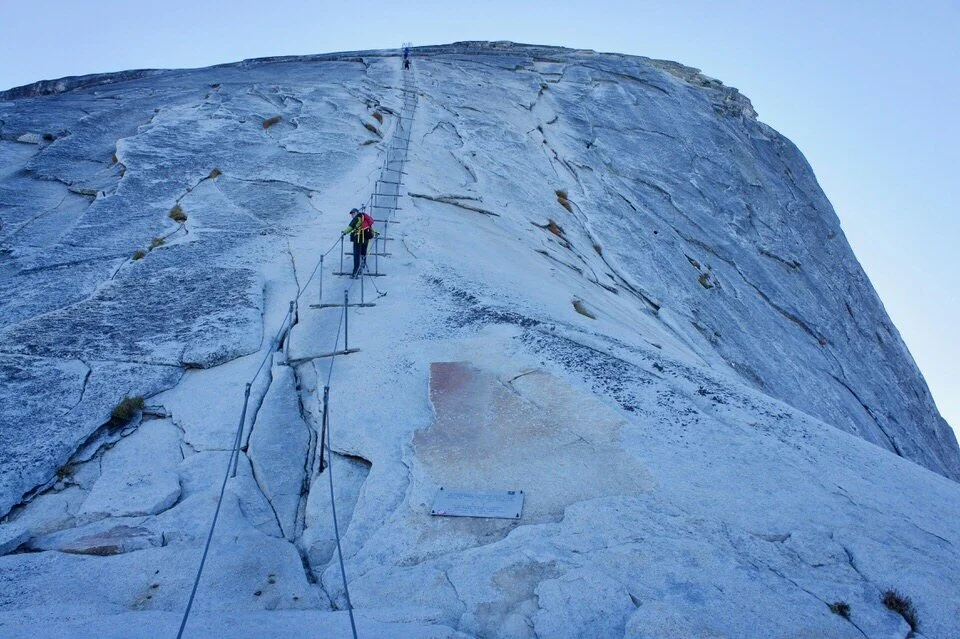
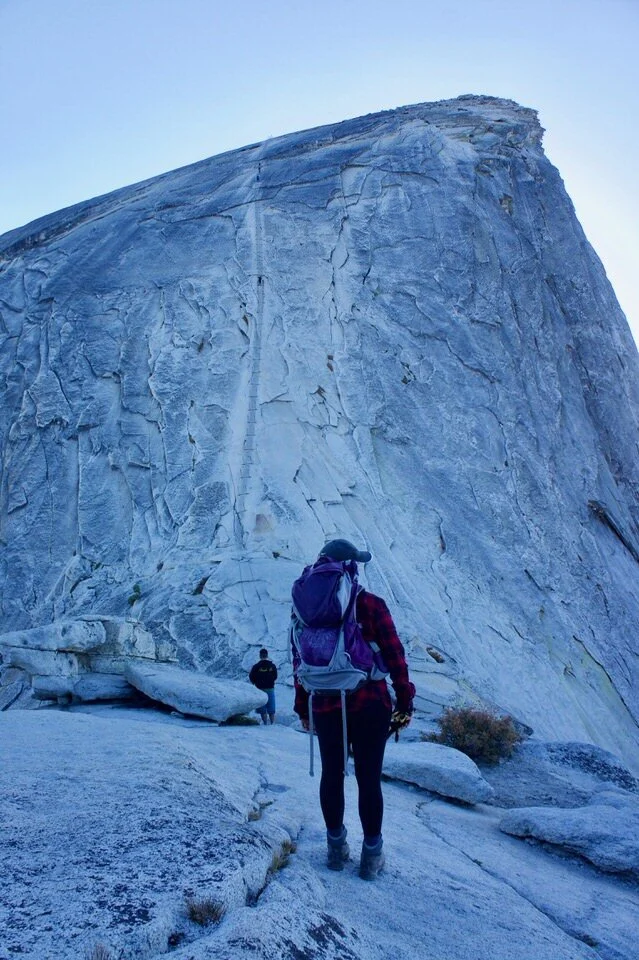
The defining feature of the Half Dome hike is the cables up to the summit. These are put in place to provide a safe way to reach the top of Half Dome without requiring technical rock climbing, but they are still scary! If you are afraid of heights, this might not be the hike for you.
In this post, we will cover the following topics to help you plan and prepare for your very own successful Half Dome hiking adventure:
Half Dome Hike Trail Stats - All the nitty gritty details in one spot.
How to Get a Half Dome Permit - Required for hiking to the summit.
Day Hiking Half Dome vs Backpacking Half Dome – Explore which option is best for you!
When to Hike Half Dome – The best time to plan your hike.
Half Dome Hike Map & GPX Files - I've created a map detailing the whole trail that you can explore, including a look at the elevation gain/profile of the hike. You can also download this file as a GPX file to upload into your own personal GPS device.
How to Get to the Half Dome Trail – Driving and parking recommendations.
Half Dome Camping – Where to camp on and off the trail when hiking Half Dome.
Important Half Dome Safety Tips – Tips about the top hazards to expect along the Half Dome trail.
Tips for Climbing the Half Dome Cables – From what shoes to wear and what gloves to bring to techniques for going up and down the cables.
Half Dome Hike Training – How to properly train for a big hike like Half Dome.
What to Bring on Your Half Dome Hike – The essential packing list for your Half Dome day hike – don’t hit the trail without these things!
If you’re looking for something specific, go ahead and skip ahead to the section you’re looking for!
GRAB MY [FREE] OUTDOOR BACKPACKER STARTER KIT
I created the Ultimate Outdoor Backpacker Starter Kit for you (and it's FREE)! This starter kit is filled with 14 pages of my best hiking and backpacking tips to help you learn what it takes to become a safe, confident, and self-sufficient outdoor backpacker!
1. HALF DOME TRAIL STATS
If you’re anything like me, the first thing you want to know about a trail is the important stats and information so you can quickly figure out what the hike is all about. Well, here you go!
YOSEMITE’S HALF DOME TRAIL QUICK FACTS
Trail to Half Dome: The trail to the top of Half Dome is actually a combination of trails, which I discuss more in the “Map” section. If you start up the Mist Trail, then eventually you connect to the John Muir Trail, and then you veer off from the John Muir Trail once you hit the Half Dome Trail. Alternatively, you can start on the John Muir Trail and hit the Half Dome Trail. There are pros and cons to each option, which I’ll discuss inside the Half Dome Trail Map section.
Type of Trail: Out and Back
Half Dome Hike Trailhead: You start the Half Dome hike at The Mist Trail Trailhead / John Muir Trail Trailhead (you’ll find it near the Happy Isle Bridge on Google Maps.)
How Long is the Half Dome Hike? The Half Dome hike length varies depending on which trail you take, but assuming you take the Mist Trail (like most choose to do), then the trail is about 6.85 miles one way. Round trip you’re looking at around ~14 miles for your full day.
Half Dome Hike Elevation Gain: ~5,300 feet of elevation gain
How Much Time Does It Take to Hike Half Dome? Plan to spend anywhere from 9 to 16 hours (or more) hiking Half Dome if you are day hiking it. This is a very steep hike, and the time it takes will depend on your fitness level going into it. If you’re new to hiking, plan for the high end of that Half Dome hike time range.
Half Dome Hike Difficulty: Very strenuous, so if you’re new to hiking, you’d be wise to train for this hike. It’s no joke for a day hike!
Half Dome Trail Crowds: This is an extremely iconic (and therefore popular) trail, so it’s rare to have a solo moment on this hike.
Do You Need a Permit to Hike Half Dome? Yes, 100%. Whether you are day hiking or backpacking, you CANNOT summit Half Dome without a permit.
HALF DOME FAQS

Where is the Half Dome hike? Half Dome is located inside of Yosemite National Park in California, USA.
How tall is Half Dome? The highest point on this hike is the summit of Half Dome which is about 8,754 feet tall.
What are the Half Dome hike water sources? I’ll talk about this more in both the “Map” section and the “What to Pack” section”, but if you’re day hiking, you want to bring plenty of water with you. There are some options for filtering water along the Merced River that runs near the trail (your best bet is near Little Yosemite Valley Campground), but once you pass Little Yosemite Valley, there aren’t many good refill spots. So plan accordingly! And always filter your water. Do not drink straight from the Merced River. Check out my Half Dome hike packing list below for my recommended water filters.
Is Half Dome dog-friendly? I feel like this goes without saying, but I figured I’d cover my bases. Dogs are NOT allowed on this trail (or any trail within the Yosemite National Park).
2. HOW TO GET A HALF DOME HIKE PERMIT
A permit is required to hike to the top of Half Dome during the season when the cables are up. If you do not have a permit, you will only be allowed to hike as far as the sub dome, and rangers are typically stationed there to check for permits.
You may be tempted to hike Half Dome without a permit, but if you’re caught, you could receive a fine.

Permits for day hiking Half Dome are made available through a lottery system, and there is both a pre-season lottery and a daily lottery during the season.
Pre-season lottery applications begin on March 1 and run until March 31. You will be notified about the status of your application and if you were awarded a permit by mid-April.
During the hiking season, a limited number of permits per day (depending on under-use and known cancellations) will be available through a daily lottery system. You must apply for these 2 days (from midnight to 4PM) before the day you want to hike, and you will be notified later that night whether or not you got permits.
We have a full blog post dedicated to the ins and outs of getting Half Dome Permits, including tips and tricks for snagging one. Learn more about that here >>> the Half Dome Hike Permit process in full detail.
If you’re unable to grab Half Dome permits, check out our full list of Yosemite’s Best Hikes. There are a ton of great hiking options beyond Half Dome!
>>> CAN’T GET HALF DOME PERMITS? I highly recommend hiking the Clouds Rest Trail instead!
3. DAY HIKING VS BACKPACKING HALF DOME
You might be wondering whether you should try to hike Half Dome in a day or if you should opt for backpacking the trail. Both options are great, but come with their own pros and cons which we go over here.
HIKING HALF DOME IN ONE DAY
While many people choose to day hike Half Dome, it is an intense hike for one day, and if you’re new to hiking you should expect a long and hard day on the trail. With a distance of 14 miles and 5,000 feet of elevation gain, most people will consider this a very strenuous day hike and might struggle to make it to the summit.
And getting to the top of Half Dome is only half the battle! You’ll have to make it back down to the trailhead when you’re extremely tired. If you don’t plan and train properly, you could find yourself in a sticky situation.
If you’re still certain you want to day hike Half Dome, then be sure to do the following:
Train for it – Head to the “Training” section of this post for tips to get in shape for Half Dome.
Plan to start early – A day hike of Half Dome will require a super early start, so you can have plenty of time to make it to the summit and back in daylight. If you’re new to hiking and not sure how conditioned you are, aim to start around 4-5am. You may be starting your hike in the dark, but it’s much better than ending your hike in the dark. The first time I hiked Half Dome, it took me nearly 7 hours just to make it to Little Yosemite Valley. I was backpacking, so possibly a bit slower with a heavier pack, but something to keep in mind. As you become more conditioned, you’ll be much faster (more recently I went again and it only took me about 3-4 hours), but plan accordingly based on your fitness level.
Pack the right gear – Go to my Half Dome Packing List section for a list of all your day hiking essentials, like a headlamp and water filter.
But seriously, pack the right gear – Half Dome requires some special gear like gloves and good shoes. Do yourself a big favor and be prepared!
Be WILLING to turn around – Set a time for yourself. If I don’t make it to the summit by X, I will turn around. This is an important skill to practice, especially if you’re new. Also, if there is rain, hiking up the cables is a no-go. Don’t risk it.
BACKPACKING HALF DOME
In my opinion, backpacking Half Dome is a really amazing way to experience this trail, and if you have the gear, it’s an option I highly recommend.
Backpacking Half Dome will be less physically demanding, as well as give you more time to enjoy the beauty of Yosemite Valley. I recommend taking 3 days and 2 nights to backpack Half Dome.
Here’s a sample backpacking itinerary for the Half Dome Trail:
Day 1: Start at Trailhead and Hike to Little Yosemite Valley
You’ll start Day 1 by hiking up the Mist Trail. While it’s an unforgiving uphill workout, it's quicker and more efficient than your other options. Make sure to bring plenty of water and stay hydrated, especially if you’re hiking in the summer.
Spend your first night camping at Little Yosemite Valley Campground, which is a welcome respite after your long trudge up the Mist Trail. The campground is really nice and well-maintained, and it even has pit toilets (which is not common on most backpacking trails). You’ll also find bear lockers at the campground, so you don’t need to bring your own bear canister. Enjoy your evening here while you rest and get ready for day two, when you will tackle the famous Half Dome cables.

Day 2: Summit Half Dome
Before heading out on Day 2, make sure you have plenty of water on your way up to conquer Half Dome. Bring a small day pack if you have one (or empty all your stuff out of your big backpack and carry that as your daypack), and leave your big backpacking pack and most of your gear at your campsite so you can tackle Half Dome without it weighing you down. **Just remember that food and all smelly stuff should be left in bear lockers.**
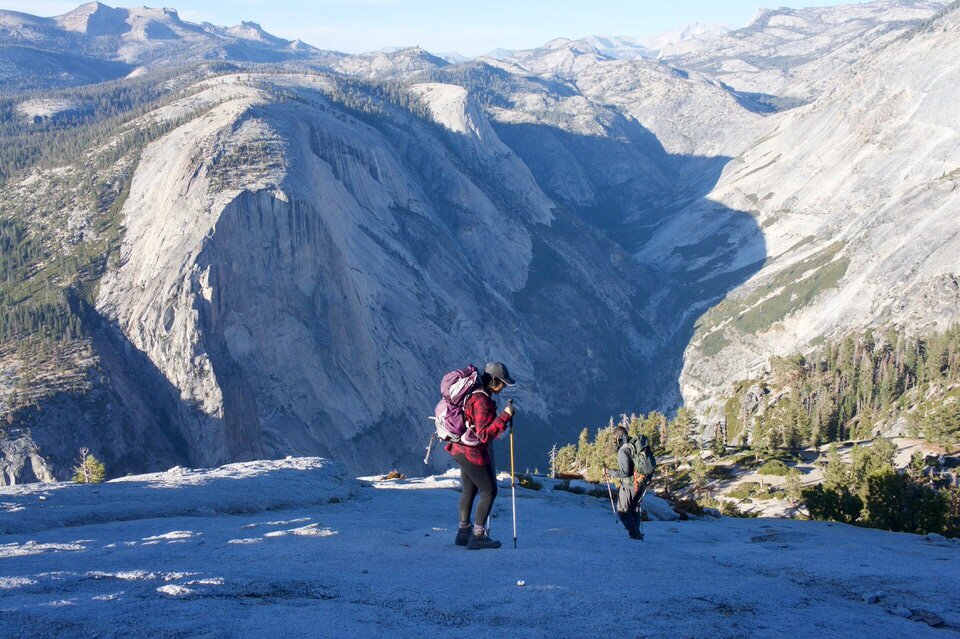
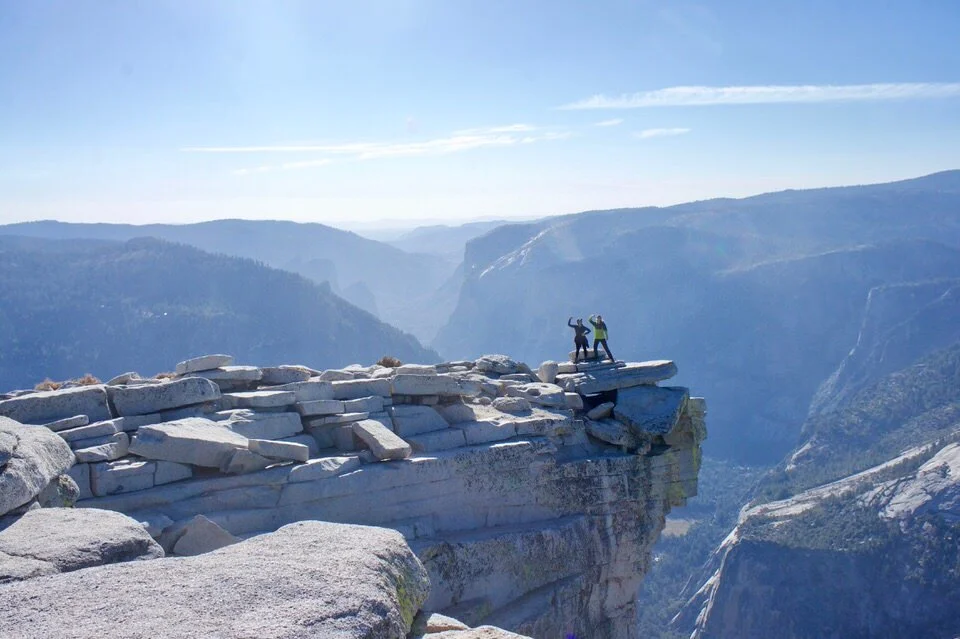
Once again, you’ll find yourself on an uphill battle as you make your way up the sub dome. When you reach Half Dome itself, you might hesitate upon seeing the cables running nearly straight up the imposing vertical rock face. But if you take your time and keep a firm grip on the cables, you can make it to the top for amazing Half Dome views and the gratifying feeling of achievement. See my recommendations for tackling the cables in the “Tips for Climbing the Half Dome Cables” Section.
Take your time to appreciate the summit, then you can take it easy, since the rest of your backpacking trip will be downhill. Make it back down to Little Yosemite Valley Campground for your second night and get a good night’s sleep before your hike out the next day.
Day 3: Hike Out!
On Day 3, embrace your final morning in Little Yosemite Valley and then pack up all your gear and start the trek back to your car.
Instead of retracing your steps down the Mist Trail, consider taking the John Muir Trail (they intersect). Although the John Muir Trail adds on about an extra mile in distance, it is a more gentle downhill slope that will be much easier on your knees than the stair-stepping Mist Trail.
You can also easily condense this itinerary to 2 days if needed!
4. WHEN TO HIKE HALF DOME
The Half Dome cables are only open from the Friday before Memorial Day (late May, conditions permitting) through Columbus Day (early October), so if you want to summit Half Dome, it has to be during that time period (unless you’re an experienced rock climber, which is out of scope for this trail guide).
You should not attempt to hike Half Dome when the cables are down, as it is extremely dangerous. However, Yosemite is open year-round, so you can always get a view of Half Dome, and usually will be able to at least hike a portion of the Mist Trail, depending on the conditions.
September is an ideal time to try to hike Half Dome (it’s personally my favorite time of the year in Yosemite), and it might be slightly easier to get a permit than during the middle of summer. There is a small chance that you could experience snow in September (in which case you should not do the Half Dome hike), but usually the weather conditions will be quite nice in early fall.
Wildfires have become a concern in September (and really all summer) in the last few years though, so just keep that in mind. Wildfires can lead to closures of certain areas of Yosemite and cause poor air quality which leads to bad hiking conditions.
Check out the Yosemite area weather average temperature chart below for reference:

Be prepared before you go. Just like I teach my students in my backpacking program, it’s important that you always research your weather conditions before you go, weeks AND days before your trip.
You never know when weather can change, and it can often happen unexpectedly.
You can check the weather conditions at one of the following resources:
Mountain Forecast – One of my favorite sources for mountain weather forecasts when checking a few days before a trip
Important Note: Do not attempt to hike the Half Dome Cables if there has been recent rain, or will be rain in the forecast. You can safely hike to the sub dome, but hiking up the cables is very dangerous when the rock is wet. This sentiment goes for snow as well. Do NOT risk it! This is how people get seriously hurt or killed.
5. HALF DOME HIKE MAP & GPX FILES
There are actually many ways you could technically get to Half Dome, but I’m just going to cover the main, most popular options here.
Most people start at the Mist Trail Trailhead / John Muir Trail Trailhead. If you type in “Happy Isle Bridge” on your Google Maps, you’ll find it super easily.

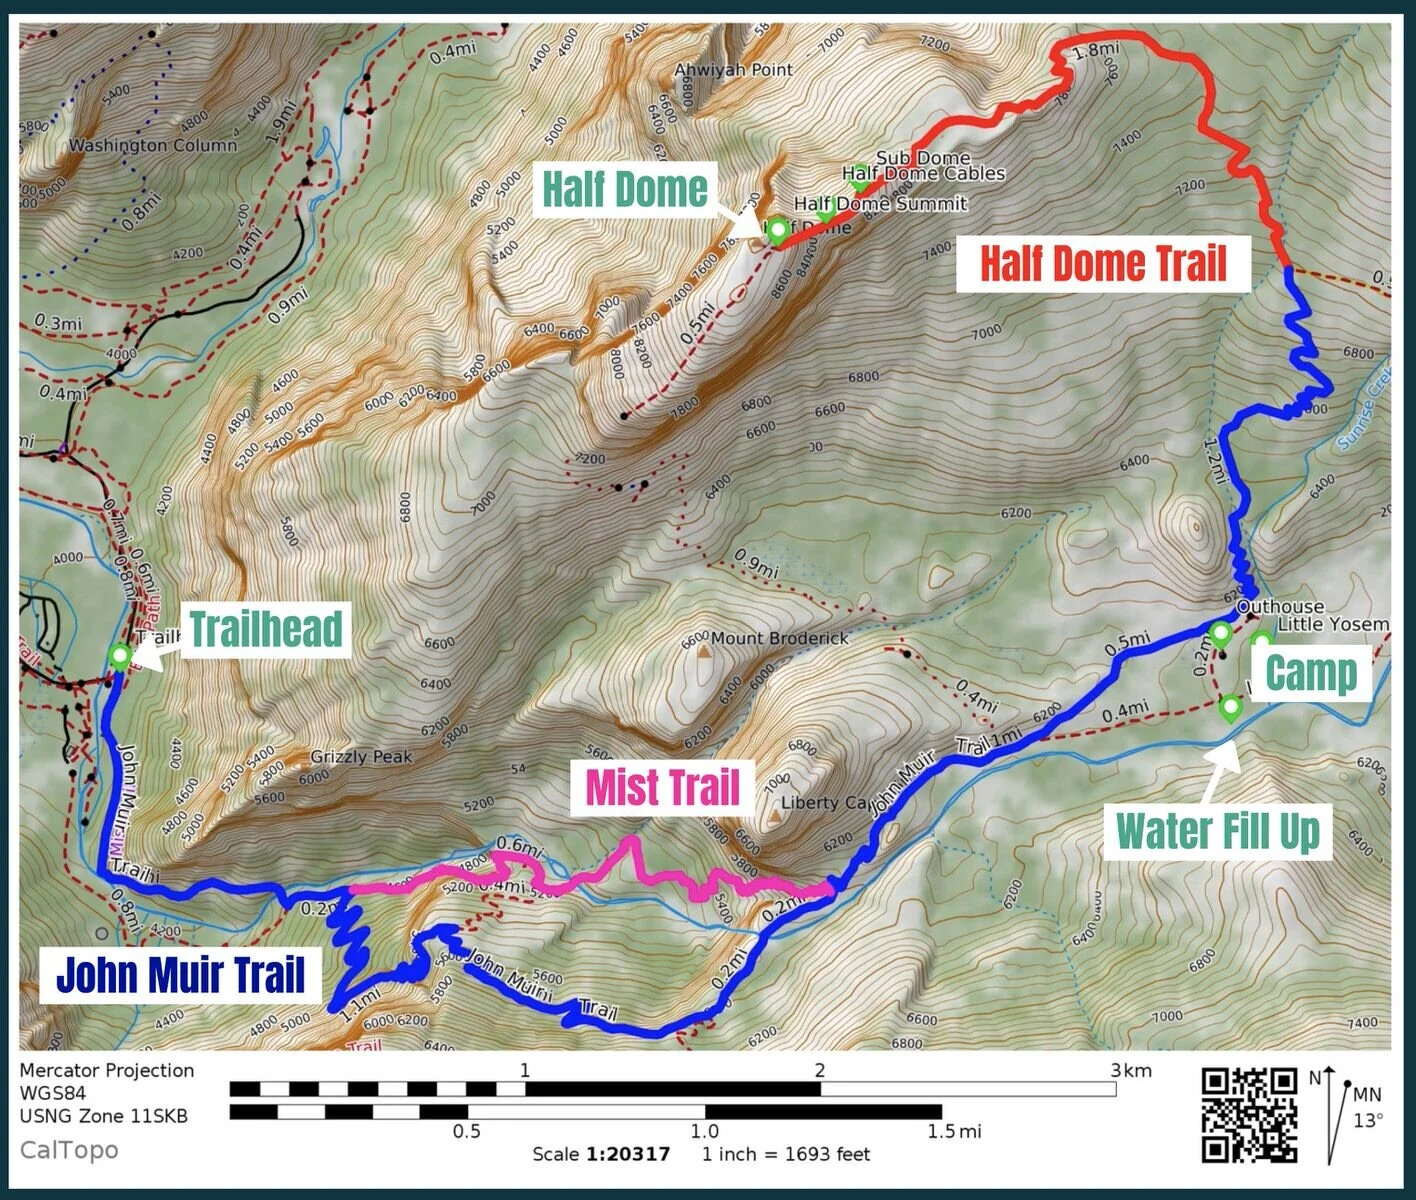
The trail to the top of Half Dome is actually a combination of trails which you can see in my Half Dome Hike map below:
Most people start on the John Muir Trail (blue) at Happy Isles Bridge
Then connect to the Mist Trail (pink line on map)
The Mist Trail then reconnects to the John Muir Trail (blue)
Eventually you will get off the John Muir Trail and turn up onto the Half Dome Trail.
Reverse your steps on the way down. However, if you want an easier “downhill” experience, opt to hike the JMT the rest of the way down instead of venturing back onto the Mist Trail. It’s a bit easier on the knees.
The trail is relatively easy to follow, but if you’re not paying attention you could also easily find yourself on an entirely different trail (as there are many out near this area).
I always recommend downloading a GPX file onto a GPS device, that way you can check in from time to time to be sure you’re on the right trail.
You can download the GPX files from Half Dome Trail map above. It details all the key milestones of the hike including the trailhead start, the sub dome, the Little Yosemite Valley Campground, and more.
DOWNLOAD THE HALF DOME GPX FILES FOR YOUR GPS HERE:
Knowledge is power my friend, and I'm a girl who loves data. Get access to this trails GPX file PLUS my library of GPX files with tracks and waypoints for all the trails loaded onto the She Dreams of Alpine blog.
Load this puppy into your trusted GPS and rest easy knowing you have tracks to follow on your next hike or backpacking trip.
DON’T HAVE A GPS? YOU SHOULD.
I believe every hiker and backpacker should strive to be self-sufficient, and that includes knowing how to practice smart navigational skills in the outdoors.
This is an important safety skill set that I teach in-depth inside of my backpacking program. There’s no reason to risk getting lost in the outdoors.
Here’s what I recommend to get started:
(Note: This list contains affiliate links)
Gaia is offering a special 10% discount on a premium account to those who subscribe online through my link.
Don’t know where to start? If you need help with some Gaia GPS basics, download my quick Gaia GPS navigation 101 guide.
2) Get an SOS Device: Once you are able to, I recommend investing in some sort of SOS communication device like the Garmin inReach Mini or the Garmin inReach Explorer+ . These devices provide not only GPS tracking capabilities, but also an SOS satellite search and rescue communicator and text communication abilities in the backcountry.
My Go-To Trail Setup: The Gaia GPS app (premium subscription) + the Garmin inReach Mini.
Alternative to Garmin: Pair your Gaia GPS App with the Zoleo SOS device . With this set up, the Gaia GPS App serves as your GPS navigation device, and the Zoleo serves as an SOS/communication device.
Learn more about the best GPS devices for hiking here.
HALF DOME HIKE ELEVATION PROFILE
Here’s a look at the Half Dome hike elevation gain profile if you are going up the Mist Trail and going down the John Muir Trail.

You can see that the total elevation gain is a little over 5,000 feet, and if you opt to go down the John Muir Trail after you summit, it is slightly longer, but less steep (and easier on the knees).
6. HOW TO GET TO THE HALF DOME TRAIL
I’m not going to overcomplicate this section. To access the Half Dome hike in California, you’re going to need to travel to Yosemite National Park, for starters.
There are all sorts of places to stay inside Yosemite National Park, from cabins to campgrounds to hotels. For more ideas on where to stay when you visit, click here.
Since you’ll want to start hiking Half Dome very early, you’re going to want to come at least a day ahead of your hike (and likely also spend the night somewhere in the park afterwards).
WHERE TO PARK FOR THE YOSEMITE HALF DOME HIKE

The closest Half Dome parking area to this trailhead is actually called “The Trailhead” and is near Curry Village. This parking lot fills up very quickly since practically all the Half Dome hikers try to park here and many of them start VERY early in the morning.
However, you can also park just about anywhere in the eastern part of the valley and take one of Yosemite’s free shuttles to the trailhead. You can also find parking in Curry Village.
7. HALF DOME CAMPING
Little Yosemite Valley Campground will be your primary campground and home base for summiting Half Dome if you plan to backpack this trail.
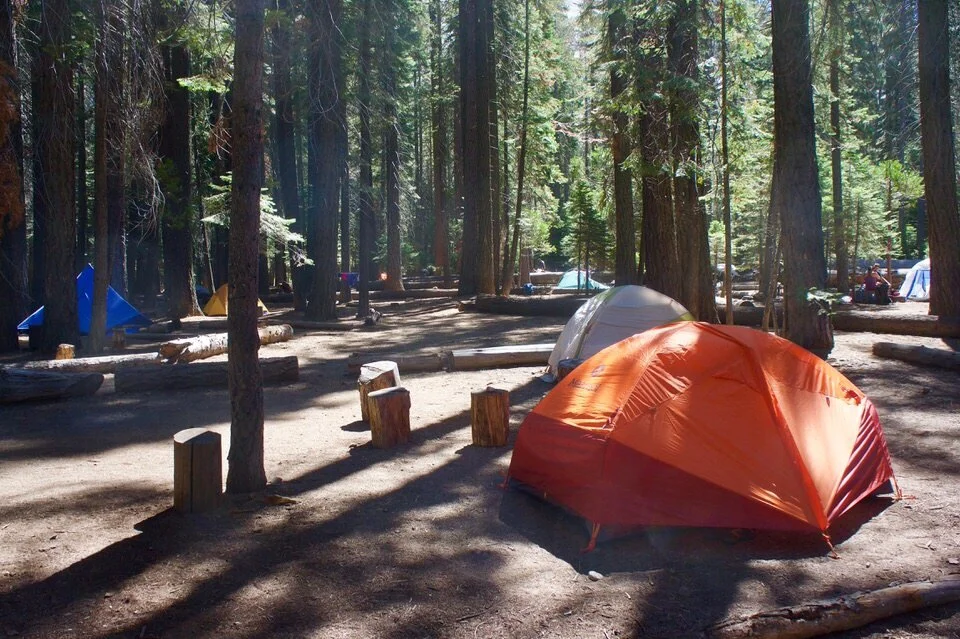
It’s a cute little campground area with many open spots, but you must have Yosemite Wilderness reservations in order to stay here. See the permit section above for more details about permits.
Unlike most campgrounds in the backcountry, this one actually has an outhouse (which is a great pit-stop for day hikers on the way to the summit as well), and has easy access to the Merced River for filling up your water.
8. IMPORTANT HALF DOME SAFETY TIPS
The Half Dome hike is filled with its fair share of dangers. Here are a few of the top things to consider and be prepared for before and during your hike.
THE MIST TRAIL
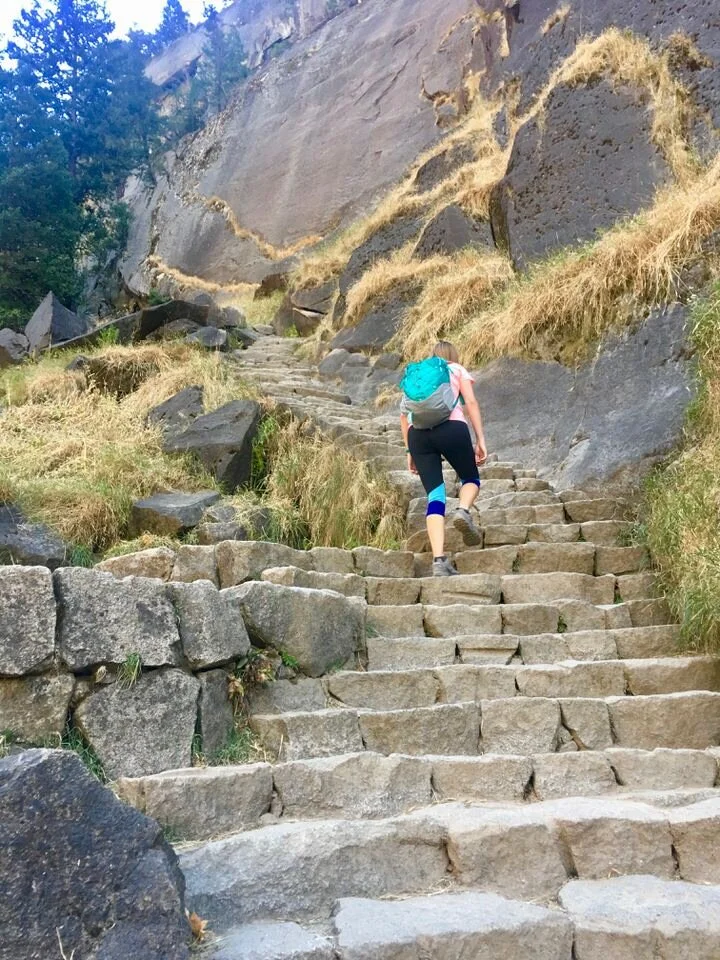
The Mist Trail is steep, and is almost like a huge, long stair case in some sections. Most people will be fine going up this trail, but may have difficulty going down it.
If you’re feeling tired or have knee problems, opt to hike down the John Muir Trail instead of the Mist Trail. It’s easier going on your weary body as you hike down from the summit of Half Dome.
THE WATERFALLS
Unfortunately there have been deaths in some of the waterfalls along the Mist Trail. I’m pretty sure these areas have signs saying “no swimming” these days, but just in case, don’t go swimming near the waterfalls. And be sure keep an eye on kiddos if you’re hiking with them.
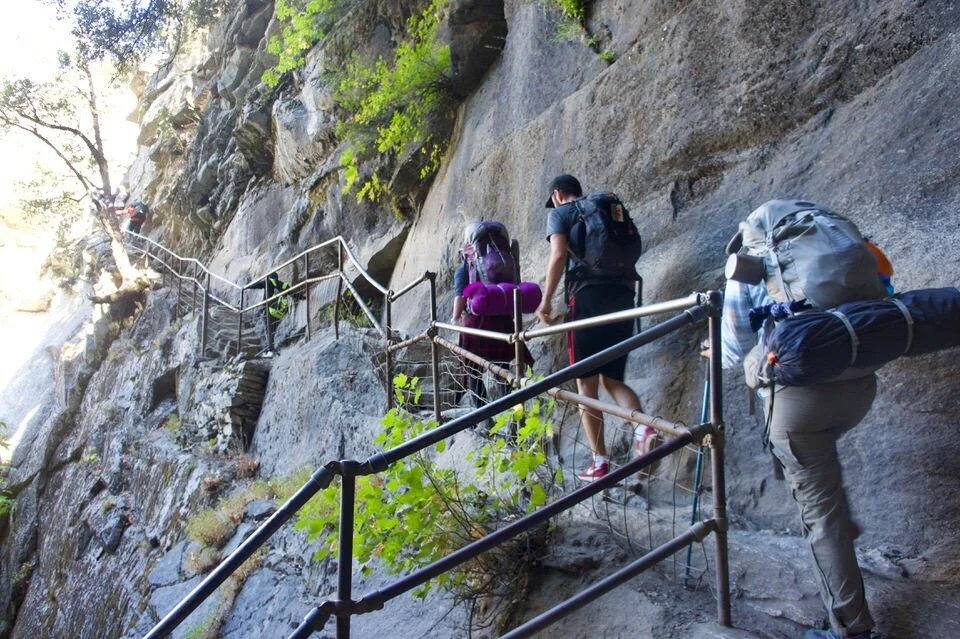
THE CABLES
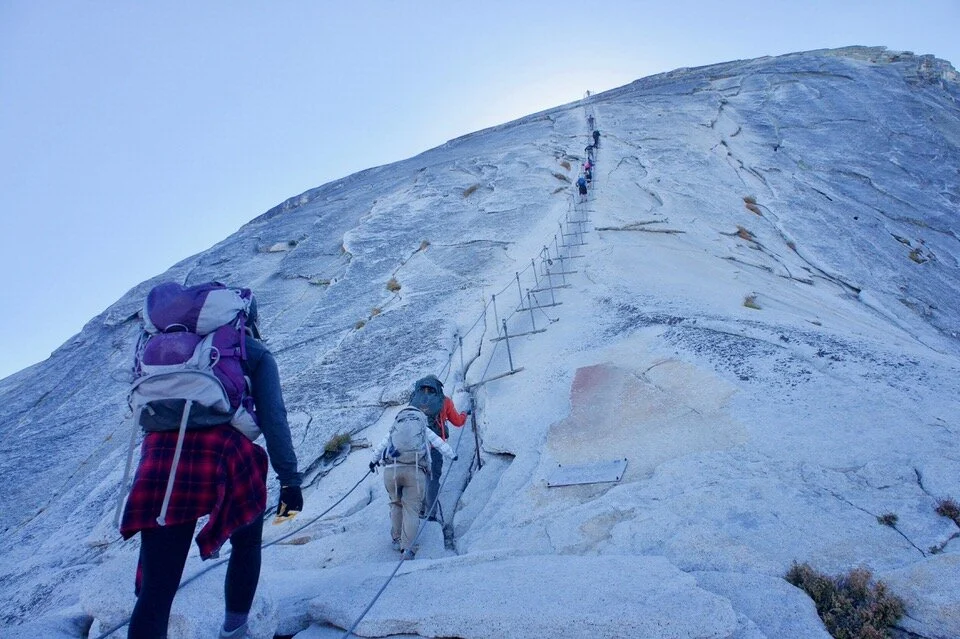
The number one safety consideration when hiking Half Dome is obviously the section of cables that help you reach the summit. When you first get to the cables, you’ll probably be a little overwhelmed. As you look up, you’ll see that the hike up the cables is almost vertical, and your only protection is holding onto the cables as you step your feet up the rock and the planked wood “stairway” to the top.
DO NOT attempt the cables without proper gloves and shoes with good grip. (More on that in the next section.)
DO NOT attempt the cables if you are very terrified of heights.
DO NOT attempt the cables in rainy or wet or snowy conditions.
DEHYDRATION
Another safety consideration is staying hydrated on the trail, and this is even more of a concern if you’re hiking Half Dome in the summer.
I highly recommend bringing plenty of water when you start the hike, as well as a water filter so you can fill up your supply at water sources along the trail. Many unprepared Half Dome Hikers do not bring nearly enough water (largely because they underestimate the difficulty of this hike). It’s also a good idea to bring electrolytes to keep your salt levels balanced when you’re sweating.

Start off with at least 3-4 liters on hand, and I recommend a fill up at Little Yosemite Valley (at least have 2 liters) before heading to the summit. Little Yosemite Valley campground is a great place to refill your water along the Merced River. Better to have more water than less, in my opinion. Be sure to use a water filter if you refill here.
RAIN & THUNDERSTORMS
Afternoon thunderstorms are not an uncommon occurrence on Half Dome, and it’s always a good practice to try and aim to summit and begin your descent (and be done with the cables section) before noon.
If a thunderstorm rolls in, lightning is a very real concern on the summit, since it is above treeline. And you definitely don’t want to try to descend the cables if it is raining and the rock is slick. This means that if you’re day hiking Half Dome, you should get a very early start.
WILDLIFE

Your biggest wildlife concern in Yosemite is black bears. Black bears are typically pretty skittish around humans, but the Yosemite bears are definitely more accustomed to seeing people around. Like with all bears, practice safe bear principles including but not limited to the following:
Make noise while you hike so wildlife is never startled by your presence.
Always keep your distance if you see a bear.
Never run from a bear.
Always store your food (and any smelly items) at night in either a bear box or bear canister.
There’s no need to carry bear spray in Yosemite, in fact, it’s not allowed within park boundaries. Just be smart, make noise while you hike, and you’ll likely not encounter one.
Also, do not leave food in your parked car. Bears in Yosemite have come to learn what coolers look like and are known to break into cars in the Valley. There are bear lockers at most parking lots. Keep the food you are not taking with you on the hike in one of those.
9. TIPS FOR CLIMBING THE HALF DOME CABLES
This is one of the most important sections of this trail guide, so definitely read through each of these “How to Hike Half Dome Cables” tips to improve your chances of a successful Half Dome summit!
Note: The list below contains affiliate links.
WEAR PROPER SHOES

The granite on the Half Dome cables is slick, especially after years and years of hikers going up and down the cables, so the “stickier” the rubber on your shoes the better. You want shoes that have good traction.
WEAR PROPER GLOVES
There are many gloves you can wear on the Half Dome hike, but the ones that I tend to recommend are Nitrile Utility Work Gloves like the ones I’m wearing in the photo below.
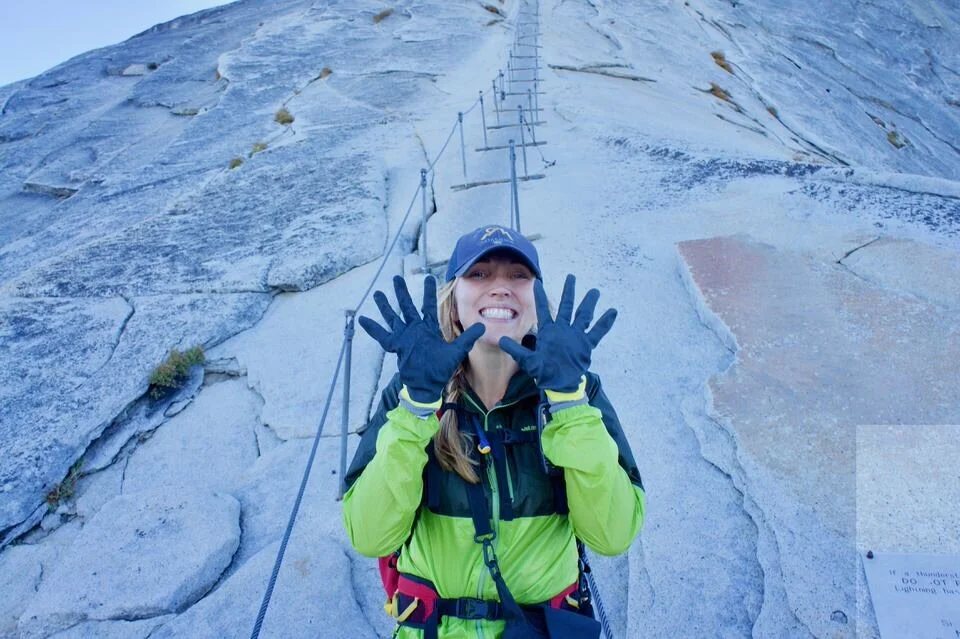
You can find these gloves at pretty much any hardware store, and they aren’t that expensive.
Suede and leather gloves have a tendency to slip, so it’s better to have something with extra traction.
Make sure to bring gloves on this hike – you DO NOT want to attempt the cables without gloves.
Also, please make sure to pack out your gloves as well. Don’t leave them behind at the cables, as this is NOT practicing good Leave No Trace principles. Used gloves are trash – please don’t leave your trash at the cables.
DON’T USE A HARNESS
Some people believe that using a harness system to ascend the cables will provide an extra measure of safety, but I actually advise against this.
In my opinion, harnesses simply act as a false sense of protection, and, in this scenario, could lead to you being less attentive as you hike up the cables. To properly and safely use a harness system on the cables, you would need a very specific via ferrata set up which most people are not likely to have.
Having to fuss with carabiners and your harness system is going to do you more harm than good in getting up the cables. Just take your time, focus on going plank to plank, and hang on with a strong grip.
TRY TO AVOID CROWDS (IF POSSIBLE)
There most likely WILL be a lot of people on this hike, and really the only possible way to avoid crowds would be to get there around sunset, but then you need to be prepared to do the hike down in the dark (which I don’t recommend if you’re a newbie).
If you aren’t comfortable with that, be prepared to share this trail with crowds.
TIPS FOR GOING UP THE CABLES
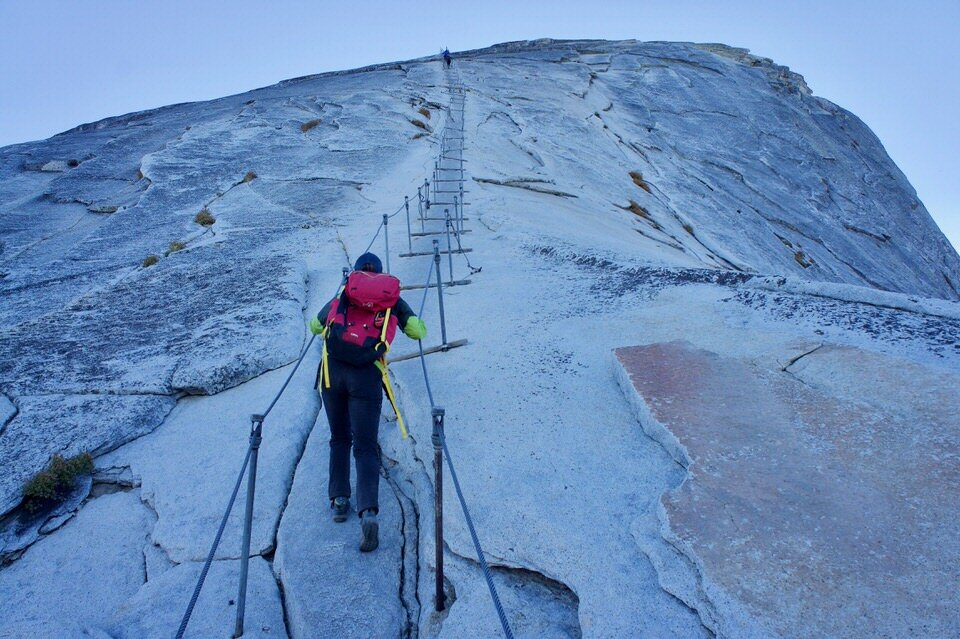
When you start making your way up the cables, you’re going to feel a bit of fear. It looks nearly vertical.
Take your time going up the cables, and don’t let others pressure you into going faster than you feel comfortable. If you find you can’t keep going, turn around. Half Dome will be here in the future. There’s no shame in turning around.
Always keep BOTH hands on the cables. Since there will be traffic going up and down the cables at the same time, you may have to let go at moments, but do not do so unless you feel absolutely stable.
I like to focus on “one plank at a time” as I go up the cables. There are “planks” of wood on the way up that make for good rest points.
The cables ARE dangerous. If you choose to go up them, you do so at your own risk. I am only sharing advice here that has helped me feel more calm and in control of my situation. The worst thing you can do is to panic on the cables. Take your time!
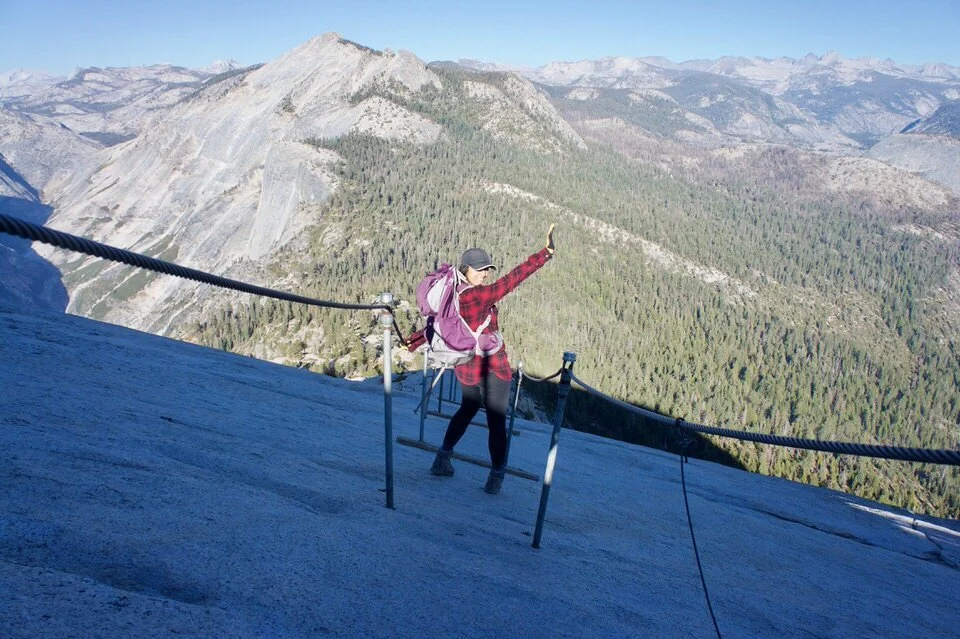
TIPS FOR GOING DOWN THE CABLES
I actually find going down to be a bit easier than going up. To feel more secure on my way down, I typically get pretty close to the cable with my arm, as seen in the photo below.

Again, take your time and go plank to plank.
10. HALF DOME HIKE TRAINING
Hiking Half Dome will be much more fun if you’re physically prepared for the tough hike. It’s a good idea to follow a training plan in the weeks leading up to your big hike. The simple way to design a training plan is to base it on the Half Dome hike and use the mileage and elevation gain of the actual Half Dome trail – approximately 14-16 miles and 5,000 feet of gain.
This means that you’ll want to build up to a total weekly mileage goal of 14 miles over several weeks, and incorporate increasing elevation as well.
For more ideas on training for the Half Dome hike, I recommend checking out my tips for hiking 14ers post, which covers creating a training plan in a bit more detail.
It’s a great idea to do your training with the pack you plan to hike with so you get used to carrying it. Fill it with weight of some kind (a water bladder is great for this, since it is heavy, and you can drink the water as you hike) and increase the weight over time until you reach the weight you plan to bring with you on the trail.
If you’re planning to take on Half Dome as a day hike, it’s also a really good idea to get in at least one big hike of at least 14 miles under your belt so you will know how it feels to actually hike for that long. This will give you extra confidence when it’s time for your Half Dome hike, since you’ll know you are capable of hiking 14 miles.
11. WHAT TO PACK FOR THE HALF DOME HIKE
Since most of you are likely day hiking the Half Dome Trail, I want you to pop over to my day hiking gear checklist and make sure you have everything you need for a day hike.
And there are a few absolutely essential items I want to call to attention to for specific Half Dome hike preparation.
Note: The list below contains affiliate links.
I recommend bringing a headlamp + extra batteries on every hike. I always bring the Petzl Actik Core on my hikes.
These are the crucial things to bring on your Half Dome day hike, but for my full gear recommendations, check out my day hiking checklist.
If you plan to backpack the Half Dome hike trail then check out my backpacking packing checklist instead.
DOWNLOAD OUR HIKING PACKING CHECKLIST:
So that you can hit the trails with peace of mind knowing that you didn’t leave anything essential behind!
And now that you’re thoroughly prepared for the hike, I’m going to leave the experience up to you!
The first time I hiked up Half Dome, I was brand new to the world of hiking and backpacking. I made so many mistakes, but it also it lit a spark inside of me.
Half Dome showed me that I am strong, brave, and capable of so much more than I ever thought was possible.
Fast forward to today, and living a life outdoors, coaching women how to become confident and self-sufficient backpackers themselves... this is my reality. I am no longer the shy, overly worrisome Texan that I once used to be.
It’s in large thanks to this big, beautiful dome.
It was the first spark in my larger personal transformation, and I hope it has a similar impact on you as well.
LOOKING FOR MORE CALIFORNIA ADVENTURES?
If you’re looking for additional California hiking adventures, check out our resources below:
A Full List of All the California 14,000 Foot Peaks
ESSENTIAL HIKING RESOURCES
Also be sure to check out these essential hiking resources!
7 Tips to Hiking and Summiting Your First Fourteener Mountain
California Backpacking Permit Process for Popular Trails and Campsites
Cheers,
Allison - She Dreams of Alpine


Related Posts:


The Best GPS for Hiking (Top 7 Devices to Navigate on the Trail) | Navigation is such an important skill to have in the backcountry, whether you’re using a map & compass, a smartphone app, or a GPS device. It can be confusing to pick the best GPS for hiking, but since I’m a total navigation nerd, I want to share my favorite hiking GPS tools with you! | shedreamsofalpine.com