Backpacking Onion Valley to Whitney Portal – John Muir Trail Section Hike

The Onion Valley to Whitney Portal section of the John Muir Trail is by FAR one of my favorite backpacking trips in the Sierra Nevada Mountains. This epic section of the JMT takes you up and down some of the most iconic Sierra Nevada mountain passes (like Kearsarge Pass), challenges you every step of the way, and finishes off by hiking to the top of Mt Whitney, the tallest peak in the contiguous United States.
Imagine yourself the evening of your second to last day backpacking in the high Sierra Nevada mountains, 34 miles in, sitting in your tent to avoid the snow and wind, wearing all the clothes you brought with you because you hadn't anticipated it being this cold.
You've got mild altitude sickness, your pal just threw up beside his tent, and you know you'll probably have to get up to go pee in the cold weather about 5 times during the night because that's what altitude does to you.

You know what makes life instantly better in that moment? Broth. A big cup of steamy miso broth. I can't describe to you how excited I got when our friend Lucas offered us all a warm cup of broth while we sat inside our tents tending to our sick, weakened bodies. I've never enjoyed a cup of broth so much. It was like the nectar of life.
The thing I love about backpacking trips like these is that it helps you enjoy the little things in life again. You basically spend your whole day worrying about simple things like food for fuel, a stream to filter water, mitigating your altitude sickness, and finding a nice rock to pee next to. Worries and anxieties melt away when paired next to the tall Sierra Nevada mountains.
The Onion Valley to Mt. Whitney section is probably best for those who have a bit of backpacking experience under their belt because it is a hard 4 days, I’m not going to lie. You’re above 10,000 feet most days, battling altitude sickness, making huge elevation gains each day, and so on... but it’s totally worth it once you feel capable!
If you’re on the fence, then be sure to check out my video of the trail below!
In this backpacking trail guide, I’m going to give you everything you need to know about planning your own backpacking trip from Onion Valley Campground to Whitney Portal.
WHAT WE WILL COVER IN THIS ONION VALLEY TO WHITNEY PORTAL GUIDE
Get ready to enjoy 43 miles on some of California’s most beautiful backcountry trails, ascending over 11,080 ft, and descending 12,227 ft, Are you excited yet to plan your own adventure here?

In this post, we will cover the following topics to help you plan and prepare for your very own successful Onion Valley to Mt. Whitney backpacking adventure:
Onion Valley to Whitney Portal Trail Stats - All the nitty-gritty details for the trail in one spot. How many miles, elevation gain, & more.
How to Get a Inyo National Forest Wilderness Permit for Backpacking - Needed for backpacking Onion Valley to Whitney Portal!
Best Time to Hike Onion Valley to Mt. Whitney – Details about the best time to hike this trail and typical weather to expect on your trip.
Onion Valley to Whitney Portal Map & GPX Files - I've created a map detailing the whole trail that you can explore, including a look at the elevation gain/profile of the hike. You can also download this file as a GPX file to upload into your own personal GPS device.
How to Get to the Onion Valley Trailhead – Driving and parking recommendations. Plus details on how to shuttle this backpacking trip.
Onion Valley Camping & Camping Spots Along John Muir Trail – Where to camp on and off the trail when backpacking.
Itinerary for Backpacking the Onion Valley to Whitney Portal Trail - I’ll walk you through my experience and suggested itinerary for backpacking this John Muir trail section hike.
Important Backpacking Safety Tips for Onion Valley to Whitney Portal – Info about the top hazards to expect along the trail.
What to Bring on Your Onion Valley to Whitney Portal Backpacking Trip – The essential packing list for hike. Don’t hit the trail without these things!
Onion Valley to Mt. Whitney Trip Report – Read my personal account on the trail in even more detail.
If you’re looking for something specific, feel free to skip ahead to the section you’re looking for!
Plus, be sure to check out the bottom of this post to find more hiking trail guides in the Sierra Nevada mountains and other additional hiking, camping, and backpacking resources!
GRAB MY [FREE] OUTDOOR BACKPACKER STARTER KIT
I created the Ultimate Outdoor Backpacker Starter Kit for you (and it's FREE)! This starter kit is filled with 14 pages of my best hiking and backpacking tips to help you learn what it takes to become a safe, confident, and self-sufficient outdoor backpacker!
1. ONION VALLEY TO WHITNEY PORTAL TRAIL STATS
If you’re anything like me, the first thing you want to know about a trail is the high-level stats and information so you can quickly figure out what the hike is all about. So here you go!
ONION VALLEY TO MT. WHITNEY TRAIL QUICK FACTS
Name of the Trail: In this post, we call it the “Onion Valley to Whitney Portal Trail” or the “Kearsarge Pass to Whitney Portal Trail,” but really this trail is made up of a bunch of trails connected together including the Kearsarge Pass Trail, the John Muir Trail, and the Mount Whitney Trail.
Type of Trail: Point-to-Point (shuttle required)
Length of the Hike from Onion Valley Campground to Whitney Portal: ~43 miles
Total Elevation Gain: ~11,080 feet total elevation gain
Total Descent: ~12,227 feet total descent
Trailhead: Onion Valley Trailhead (you could technically start at Whitney Portal, but its much harder to get permits to, so most people start at Onion Valley)
Trailhead Elevation: 9,600 feet if starting at Onion Valley Campground
Highest Point on the Trail: Trail Crest at 13,645 feet

How long does it take to hike the Onion Valley to Mt. Whitney Section? It’s recommended that you spend 4 days and 3 nights on this trail.
Do you need a permit to backpack this trail? Yes. See my permit section below.
How difficult is backpacking from Onion Valley to Whitney Portal? This is a difficult backpacking trip. I wouldn’t recommend it for beginners.
Is there drinking water available along the Onion Valley to Whitney Portal hike? Yes! There’s plenty of water fill-up options on this trail. Check out my packing list below for my recommended water filters.
Is hiking from Onion Valley to Whitney Portal dog friendly? No, once you cross over Kearsarge Pass, dogs are no longer allowed.
Other Important Notes: Bear cans are REQUIRED in the Sierra Nevada backcountry.
2. HOW TO GET AN INYO WILDERNESS PERMIT FOR BACKPACKING THIS TRAIL
You will need an Inyo National Forest Wilderness Permit in order to go backpacking on the Onion Valley to Whitney Portal Trail.
The permit information here assumes you are entering from the Onion Valley Campground area. If you want details on entering from Whitney Portal side, check out my post on Mt. Whitney Permits.

WHEN TO APPLY?
Most trails can be reserved up to 6 months in advance. So, for reservations in the summer months (July through October), you will be looking to make reservations starting in January to April.
There is a 60 person trail quota for the Kearsarge Pass entry from May to November. 60% of the permits (36) are available by reservation 6 months in advance, while 40% of the permits (24) will be released two weeks ahead of the date on the same day of the week. More details about the quota can be found here.
WHERE TO APPLY?
A wilderness permit is required for overnight trips in the national forest. Online reservations can be made at recreation.gov. You’ll need to sign up for an account if you don’t already have one.
You will be looking to apply for entry at Kearsarge Pass JM31 and exiting Mt Whitney Trail Crest Exit JM35.
HOW TO APPLY?
1) Go to recreation.gov website and search for Inyo National Forest Wilderness permits.
2) Click “Explore Available Permits”
3) Then you will be taken to a huge list of trailheads, availability, and quotas. To narrow your search, use the top to filter. Input “Overnight”, put your start date, and group size.

Then you’ll be shown a list of available permits, and you want to look specifically for “JM31” for Kearsage Pass. If there are permits available, they will show up as numbers indicating the amount of permits available. Otherwise, they will show “NR” meaning they are not reservable yet because the advanced quota has been met and the additional 40% will be released two weeks ahead of time.
4) You can flip through a list of dates to see alternative availability if your original start date isn’t available. If you find a date that is available that you want, click on the date, and then “Book Now”
5) At this point, you’ll be taken to a long order form like page where you fill in all your information
6) Finally you’ll check out and pay for your permit.
HOW MUCH DOES A PERMIT COST?
The transaction fee for reservations is $6 per application plus an additional $5 per person for the actual permit (unless you are entering the Mt. Whitney Zone which is $15 per person).
OTHER USEFUL PERMIT CONSIDERATIONS
One benefit of backpacking from Onion Valley to Whitney Portal is that you get to avoid the much more competitive Mount Whitney permit process (but still get to hike to the summit of Whitney) Yay!
>> Read more about popular California hiking & camping permits here.
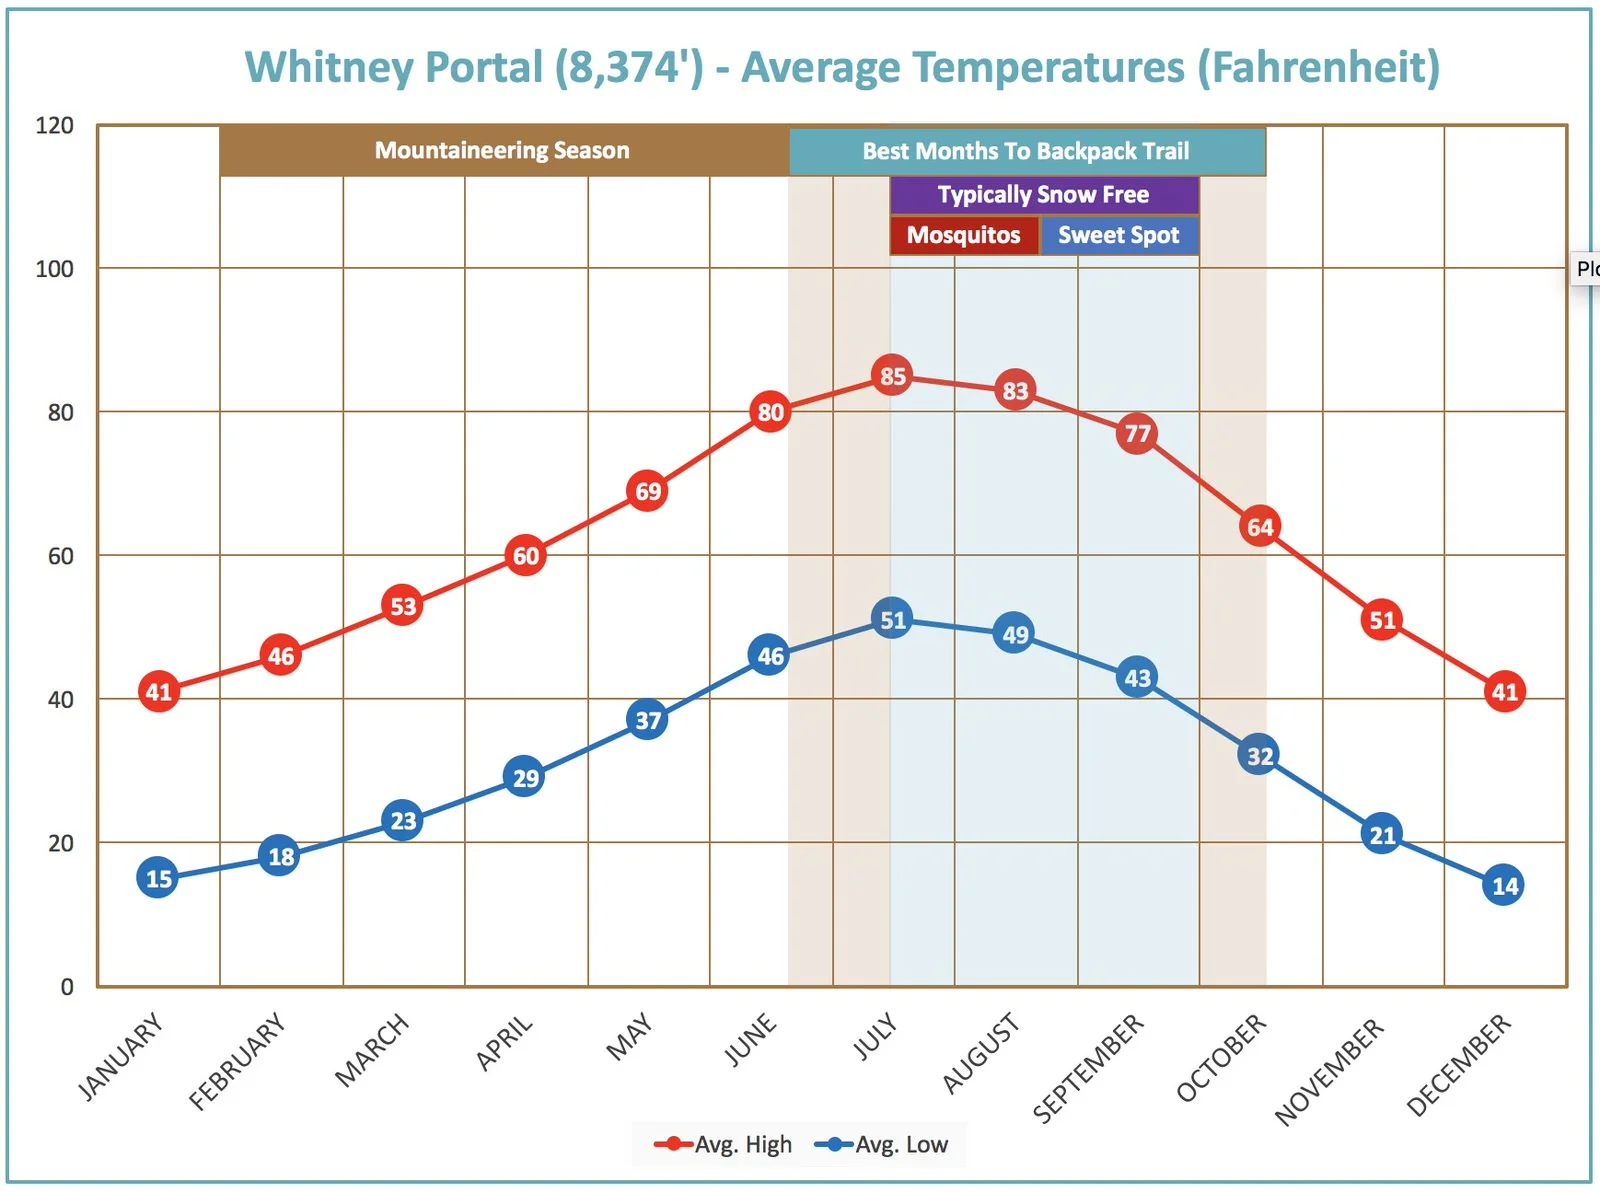
3. BEST TIME TO HIKE ONION VALLEY TO MT. WHITNEY
September is my favorite time of the year to backpack or hike peaks in the Sierra Nevada area. The weather is perfect and there are fewer mosquitos (which can be really bad when it is warm). However, wildfires have become a concern this time of year in the Sierra Nevada.
You could also plan to go in July or August but expect the weather to be a bit hotter (with a chance of relentless mosquitos). June and October are hit or miss on the Onion Valley to Whitney Portal Trail. If it was a big snow year in California, there may be too much snow on the trail in June. Alternatively, in October, the mountains can start to get their first snowfalls of the season.
Check out the Whitney Portal weather average temperature map below for reference:
Be prepared before you go. Just like I teach my students in my backpacking program. It’s important that you research your weather conditions before you go, both weeks and days before your trip. You can check the weather conditions here:
Mountain Forecast – One of my favorite sources for mountain weather forecasts when checking a few days before a trip
In my trip report below, you’ll see that we actually hiked this in early JUNE believe it or not. Which is kind of crazy now that I think about it, but it was a really dry year in California, and that’s the only reason it wasn’t snowier.
4. ONION VALLEY TO WHITNEY PORTAL MAP & GPX FILES
This trail is probably best hiked in four days, or possibly three if you’re really confident in your ability to handle the intense elevation gain and high altitudes you’ll experience on the trail.
As I mentioned above, most people will start their hike at Onion Valley and end it at Mount Whitney simply because it’s much easier to get Inyo National Forest Wilderness Permits than it is Mt. Whitney Permits.
The Onion Valley to Whitney Portal trail is actually a combination of trails including:
Kearsarge Pass Trail
The John Muir Trail (so you get to hike part of the JMT without having to go through the JMT Permit process)
Below is a map of the hiking trail and key waypoints from when I backpacked the Onion Valley to Mt. Whitney trail. If you click on the image below you will be taken to an interactive map that you can further explore.

>> Jump to Section 7 for a day-to-day itinerary for this backpacking trip.
I always recommend downloading a GPX file onto a GPS device, that way you can check in from time to time to be sure you’re on the right trail.
You can download the Onion Valley to Whitney Portal GPX files (shown in the map above) here. This file details all the key milestones of the hike including the trailhead start, where we camped, and more.
DOWNLOAD THE ONION VALLEY TO WHITNEY PORTAL GPX FILES FOR YOUR GPS HERE:
Knowledge is power my friend, and I'm a girl who loves data. Get access to this trails GPX file PLUS my library of GPX files with tracks and waypoints for all the trails loaded onto the She Dreams of Alpine blog.
Load this puppy into your trusted GPS and rest easy knowing you have tracks to follow on your next hike or backpacking trip
DON’T HAVE A GPS? YOU SHOULD.
I believe every hiker and backpacker should strive to be self-sufficient, and that includes knowing how to practice smart navigational skills in the outdoors.
This is an important safety skill set that I teach in-depth inside of my backpacking program. There’s no reason to risk getting lost in the outdoors.
Here’s what I recommend to get started:
(Note: This list contains affiliate links)
Gaia is offering a special 10% discount on a premium account to those who subscribe online through my link.
Don’t know where to start? If you need help with some Gaia GPS basics, download my quick Gaia GPS navigation 101 guide.Alternative to Gaia GPS that we also love: AllTrails+ GPS App (The + account gives you access to take maps offline when there isn’t cell service)
2) Get an SOS Device: Once you are able to, I recommend investing in some sort of SOS communication device like the Garmin inReach Mini or the Garmin inReach Explorer+ . These devices provide not only GPS tracking capabilities, but also an SOS satellite search and rescue communicator and text communication abilities in the backcountry.
My Go-To Trail Setup: The Gaia GPS app (premium subscription) + the Garmin inReach Mini.
Alternative to Garmin: Pair your Gaia GPS App with the Zoleo SOS device . With this set up, the Gaia GPS App serves as your GPS navigation device, and the Zoleo serves as an SOS/communication device.
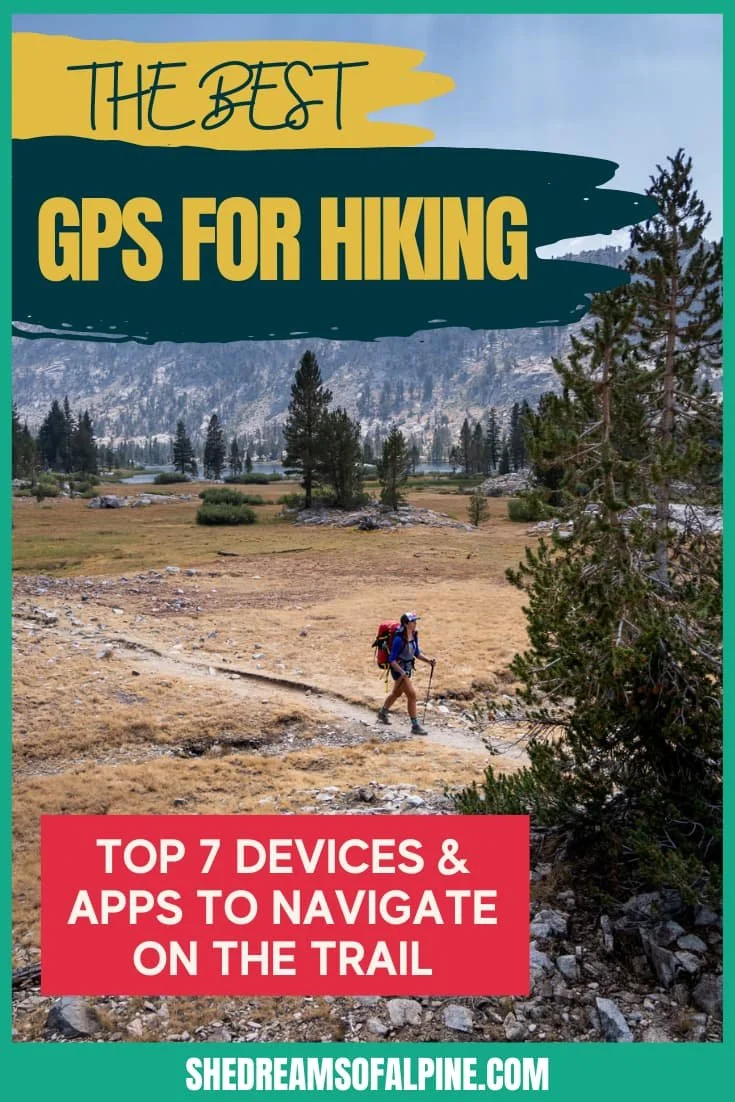
Learn more about the best GPS devices for hiking here.
ONION VALLEY TO MT. WHITNEY ELEVATION PROFILE
Below is a look at the elevation profile for the entire Onion Valley to Whitney Portal backpacking trail. As you can see above, most of the backpacking trip takes place above 10,000 feet.

5. HOW TO GET TO THE ONION VALLEY TRAILHEAD
Getting to the Onion Valley trailhead is not overly complicated (thanks to Google Maps). The complicated part is figuring out your shuttle options since this is a point to point trail. The simplest option is to backpack this trail with a group so you can leave a car at each trailhead.
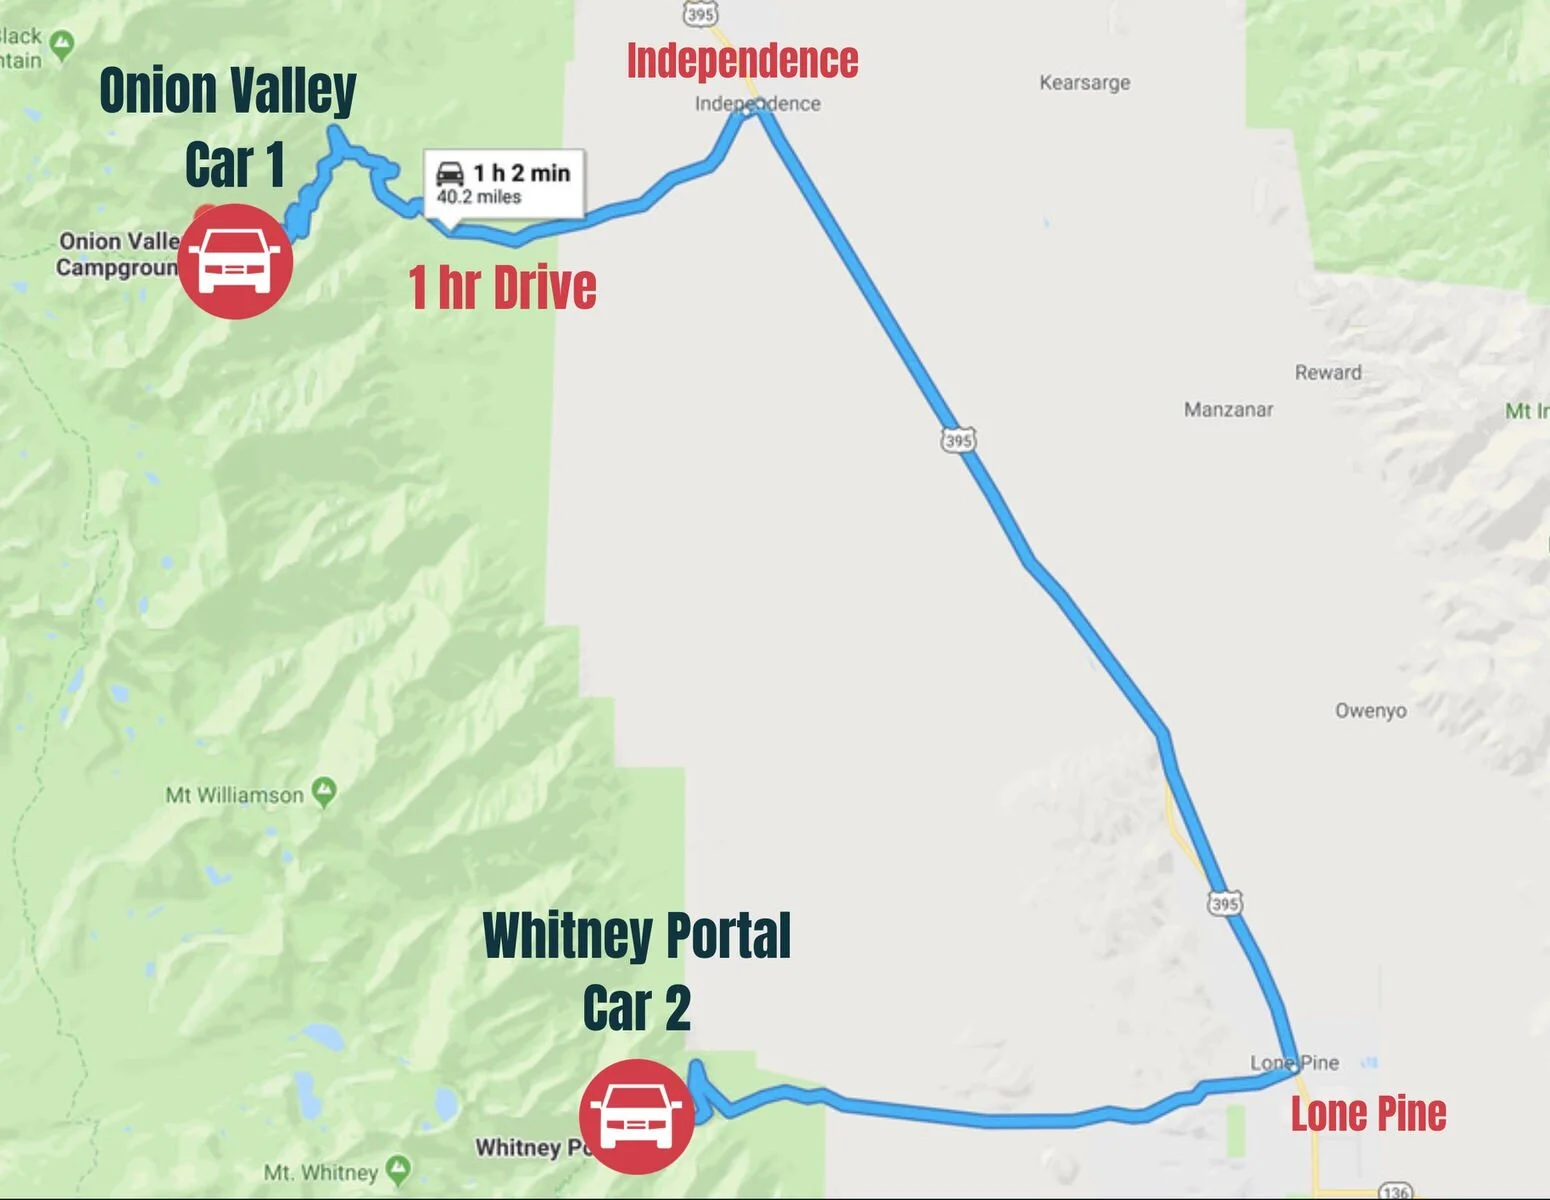
There were 5 of us in our group, so we drove 2 cars. We drove up on a Wednesday night to sleep at the campgrounds near the trailhead of Whitney Portal to start getting acclimated to the elevation.
Then, Thursday morning we woke up, left one of our cars at Whitney Portal and drove to the Eastern Sierra Interagency Visitor Center to get our permit. Then we drove to the Onion Valley Campground to start our hike. We left the second car there at the Onion Valley Campground area.
The drive between Whitney Portal and Onion Valley is about 1 hour. You will have to make that drive again after your backpacking trip to get your car from the Onion Valley Campground, but that’s not so bad. We did something similar with our hike from Tuolumne Meadows to Devil's Postpile.
6. ONION VALLEY CAMPING & CAMPING SPOTS ALONG THE JOHN MUIR TRAIL
Here are some pre-trip and on the trail camping options for the Onion Valley to Mount Whitney trail.
CAMPING NEAR THE TRAILHEAD (PRE-HIKE)
If you come in a day before your hike, I suggest that you camp at Whitney Portal the night before your first day on the Onion Valley to Whitney Portal Trail.
Camping at Whitney Portal: This spot works out perfectly for a pre-hike camping option. Spend the night before your backpacking trip at Whitney Portal so that you can (1) leave a car at the trailhead for when you finish your backpacking trip and (2) get a nights sleep at a higher altitude to help you adapt to the altitude of this trail (to hopefully prevent any serious altitude sickness).
There is a campground at Whitney Portal in which you can camp at, or you can look for free camping nearby in the Alabama Hills. I also slept in the back of my car when we came here, since it was just for one night.

CAMPING ALONG THE ONION VALLEY TO WHITNEY PORTAL TRAIL
Below are the 3 campsites we stayed at during our backpacking trip. They were perfect locations! All of them were close enough to water sources so we could easily filter water in the morning, and two of them even had bear boxes, which is pretty rare in the backcountry but nice if you don’t want to stuff all your food and smellable items into your bear can.
Campsite Night 1 – Near Bubbs Creek
I don’t know the official name of this camping area, but there were bear boxes here, and we thought it was a really excellent camping spot for Day 1.
The coordinates are: 36.73401, -118.37574
Campsite Night 2 – Near Tyndall Creek
Campsite 2 was another great spot with a name I do not know. It was located a few miles after Forester Pass near Tyndall Creek.
The coordinates are: 36.63513, -118.38521
Campsite Night 3 – Guitar Lake
Our final campsite was on the backside of Mount Whitney at Guitar Lake. It was a great spot to kick off for our final leg of the trail on the 4th day.
The coordinates are: 36.57188, -118.31331
Of course, you can mix it up and camp elsewhere, but we found these sites to be the most optimal for our trip.
>> Go to the Map and GPX section above to download my GPX file that has these 3 camping locations.
7. ITINERARY FOR THE ONION VALLEY TO WHITNEY PORTAL TRAIL
There are so many ways to split up this trail, but here’s the itinerary that worked for us.

A TYPICAL ONION VALLEY TO WHITNEY PORTAL ITINERARY
Here was our day-by-day backpacking itinerary for this trail:
Day 1 – ~11 miles from Onion Valley Campground to Camp 1 along Bubbs Creek
4.5 miles uphill to Kearsarge Pass (11,760 feet)
The rest of the day is basically downhill and eventually connects with John Muir Trail
Camp 1 Near Bubbs Creek at 10,400’ elevation
Day 2 – ~11 miles from Camp 1 to Camp 2
Relatively flat until the base of Forester Pass
Uphill over Forester Pass at (13,200 feet) and then back down into a valley. Flat(ish) the rest of the way.
3,000 feet elevation gain this day
Day 3 – ~11 miles from Camp 2 to Guitar Lake at the base of Mount Whitney
Relatively flat hike up to Crabtree Wilderness Ranger station. A good place to rest and get some water.
Hike from Crabtree to Guitar Lake (3rd camp at the base of Whitney’s backside) is uphill on a staircase-like trail
Day 4 – ~11 miles from Guitar Lake to Whitney Portal
Uphill to Trail Crest (13,800 feet)
Then 5,000’ of long downhill! It’s non-stop brutal “fun” on your knees.
8. IMPORTANT BACKPACKING SAFETY TIPS
When planning your Onion Valley to Mt. Whitney hiking trip, pay particular attention to these hazards and be prepared.

ALTITUDE SICKNESS
One key thing to take into consideration when backpacking Onion Valley to Whitney Portal is the altitude. This trail is nearly entirely above 10,000 feet, which can be very tough for people if you aren’t properly acclimatized.
Altitude sickness is extremely serious, and you should be prepared to turn around and descend if you or anyone in your hiking party starts showing symptoms of Acute Mountain Sickness (AMS). The main symptoms include persistent headache, difficulty sleeping, dizziness, fatigue, loss of appetite, and nausea or vomiting.
You should plan to spend the night at at least 7,000 ft to acclimate before heading off on this trail. For instance, my group slept at Whitney Portal the night before our backpacking trip. This is great because you need to leave a car at Whitney Portal anyway. Your first night on the trail will be sleeping at 10,000 ft.
Also be sure to drink plenty of water, before and during your backpacking trip. This will help you immensely.

SNOW ON FORESTER PASS & MT. WHITNEY
Both Forester Pass and Mt. Whitney are known to hold snow later in the season than other sections on this trail.
Try hiking this trail in July, August or September to minimize the chance of snow.
Ask the park ranger when you pick up your permits what conditions are like.
Bring a pair of microspikes or other traction with you just in case, especially if you’re hiking the trail in June or October.
BEARS & OTHER WILDLIFE
Another thing to remember is that the Onion Valley to Whitney Portal trail is in bear country. You should know that you are required to use a bear canister to hold your food and anything else with a smell that might attract a bear.
Also, definitely don’t leave food in your car at the trailhead – use a bear locker for anything you don’t bring with you on the trail.
Rangers ask that you DON’T bring bear spray with you. The black bears are pretty skittish, and bear spray is likely not needed here in this part of the US. This is what is stated by park rangers when you pick up your permit.
>> Check out more backpacking safety tips here
9. WHAT TO BRING ON YOUR ONION VALLEY TO MOUNT WHITNEY BACKPACKING TRIP
We have a really comprehensive 3-to-5 day backpacking checklist here, where you can dive in deep on what I recommend brining on a backpacking trip. But there are also a few absolutely essential items you should make sure to pack when you’re prepping for backpacking Onion Valley to Whitney Portal. Here’s the list:

*Please note that some of the below links and in this post are affiliate links.
2) Water Bladder – It’s really handy to have a water bladder like a Camelbak (3 Liter capacity) to carry as much water as you can and easily drink along the trail without having to stop too much. But be sure to carry a backup Nalgene or hard-sided water bottle as well in case your water bladder breaks or pops for some reason.
3) Water Filter – A water filter is an absolute MUST bring on your backpacking trip from Onion Valley to Whitney Portal. Do not drink the water in the outdoors without filtering it first. My favorite filter is the Katadyn Hiker Pro Microfilter , but the Sawyer Squeeze is also another great more affordable option.
4) Headlamp – You should always bring a headlamp + extra batteries on everyday hike or backpacking trip. I’m a big fan of Petzl headlamps.
5) GPS Device – It’s always smart to at least use the Gaia GPS App for peace of mind, even if you don’t have a dedicated handheld GPS device.
6) Rain Jacket – Thunderstorms are common in the mountains, so you should be prepared with a rain layer, whether that be a rain jacket like the Patagonia Torrentshell or an emergency rain poncho.
7) Down Jacket – Another high-altitude essential. Be prepared and bring at least a nice lightweight down jacket with you like the Patagonia Down Sweater or the Patagonia Nano Puff (or other similar jackets).
8) Snacks – Bring plenty of food and snacks (a mix of salty and sweet gives you options when you’re not sure what you’ll be craving) to fuel your big adventure! You’ll want to be constantly snacking on your hike to maintain energy. Altitude can make you feel “not hungry” so be sure to eat even if you aren’t feeling hunger. I love Kate's Real Food Bars. Electrolytes are also great to bring along, and I like Nuun tablets.
9) Socks – Bring at LEAST 2 pairs of socks. Dry feet are the key to preventing blisters. You’ll want to swap out your socks every so often during your hike. Don’t wait till you get hot spots. Anytime you stop to rest, just swap those puppies for a fresh pair and let the other ones dry on the back of your pack. I recommend Darn Tough wool socks.
10) Bear Canister – these are required when backpacking in the Sierra Nevada’s. Look for one that’s roughly 430 or so cubic inches, I find that fits 3-5 days of food perfectly for me, like the BearVault BV450 Bear Resistant Food Canister.
Also don’t forget your permit, and maybe some microspikes if you’re hiking this trail in early or later season as discussed above.
Again, the above list is NOT your full backpacking checklist (just some of the super important items to remember), so check out my backpacking packing list for my full gear recommendations
GRAB MY [FREE] FULL BACKPACKING PACKING CHECKLIST!
Want a full list of everything I recommend to take backpacking with you? Download our free backpacking packing checklist below! This download also includes my layering tip-sheet PLUS 25+ backpacking food ideas.

10. ONION VALLEY TO MT. WHITNEY TRIP REPORT
And after ALL of that, if you still want more, read my full trip report below.
Day 1
On Thursday morning we left one car at Whitney Portal and then piled into our second vehicle and all drove down to pick up our permits from the permit office (Eastern Sierra InterAgency Visitor Center) which didn’t open until 8 am.
Permits. Bear Canisters. Whitney Portal Poop Bags (aka WAG Bags). Check, Check, and Check!

Our hike began at Onion Valley Campground, which is about 15 miles up into the mountains from the small town of Independence.

We were a bit worried about the weather for our trip, with forecasts promising light snow for the rest of the weekend. We got started around 9:45 am.

The first milestone was Kearsarge Pass (11,760 feet), and right when we got started hiking towards the pass... it started snowing. That might've been a bad sign to most people, but we were determined. I mean, we had just started! So we kindly ignored the snow and trudged on towards the pass.
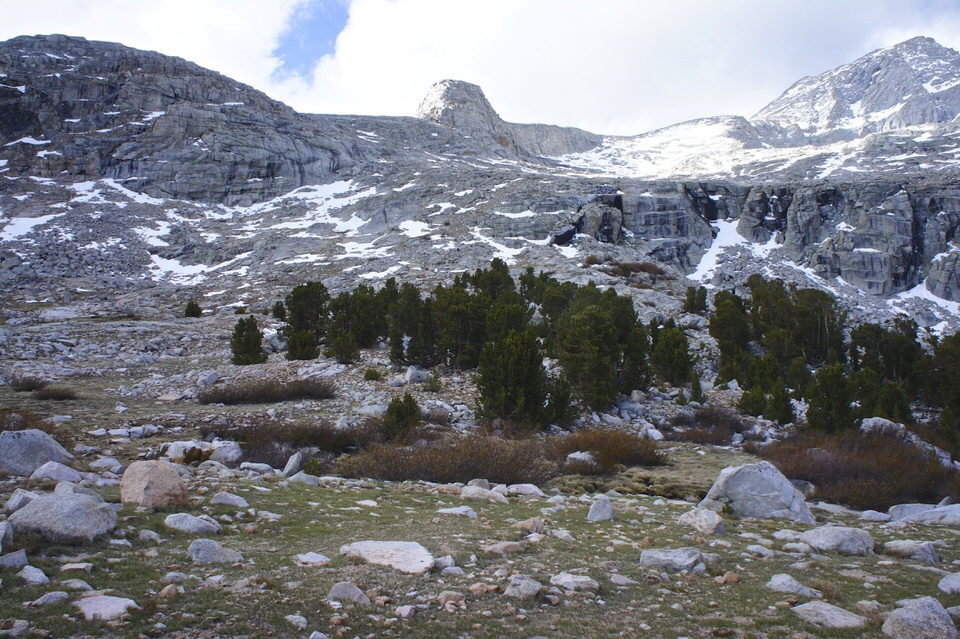
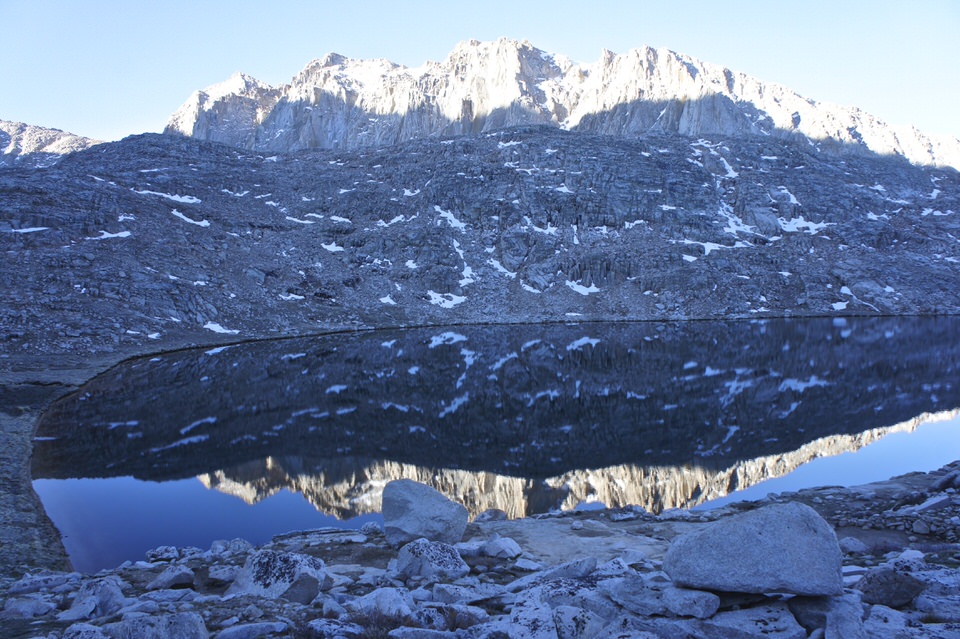
We passed a number of beautiful lakes on our way up.

I struggled on our way up to Kearsarge Pass. My pack was killing my lower back. My pack was probably around 45lbs, about 10 lbs. heavier than I wanted it to be, but I couldn't decide on what to sacrifice with the unpredictable weather, and that darn bear canister weighs one billion (fact) pounds.
Later, we adjusted my tent above my pack instead of to the side, and it magically fixed the whole problem. Amazing how a little bit of off-balance weight can hurt your back so much.
Probably my favorite views of the entire 43-mile hike were from the top of Kearsarge Pass.

The remainder of our hike the first day was downhill. From the picture you see above there was a sort of junction where we could decide to take the higher road or the lower road, but both lead to the intersection of John Muir Trail (which is where we were headed). We decided on the lower road so we could check out the lakes a little better.

Finally, we intersected with the John Muir Trail, and we were headed south. It was pretty cool actually because we ran into a lot of people hiking the Pacific Crest Trail and they were hiking North. It became this mutually beneficial relationship between us and the PCT hikers. We'd tell them about the conditions we came from and they'd tell us about theirs.

The last 2 miles were pretty rough for everybody. We rolled into a camping area around 7 pm, and it had a bear box and was near a lake. We were just shy of 12 miles for the day.

Our camp was beautiful, and it was cold. We only had an hour or so of daylight, and it was uncertain when we went to bed if our whole crew would continue on the next morning toward the portal. As I said, we all felt a bit roughed up.
I got into my sleeping bag, curled up, and tried to sleep. I've slept at altitude quite a few times before so I knew what to expect, but in case you never have... here's kind of how it goes (especially if it’s cold out).
Nightly Sleeping routine:
Enter down sleeping bag (15 degrees rated), fully clothed (all my clothes, in fact) with big wool socks on
Toss around on sleeping pad, and feel utterly cold for the first hour or so (maybe even a bit feverish)
Finally, fall asleep
A couple of hours later, wake up with the urge to pee
Debate for 30 minutes on getting up to pee
Wonder if a bear might be waiting for you outside your tent when you get up to pee
Finally, put on cold boots, walk a few paces from the tent, squat, and pee... back to the tent
Sleep again
Wake up again... commence pee routine once more
Sleep again
Finally, wake up again... almost time to wake up anyway, and you need to pee... decide to wake up early, pee, and begin morning routine.
End day 1.
DAY 2
A good night’s sleep did us all good, and we were all set to continue on the next morning.
Our first milestone for the day was Forrester Pass (13,200 ft.), and it was a gradual uphill hike towards the base of the pass.
We spent our morning crossing streams and making slow progress to the base. At the base, we fueled up and then headed toward the dome you see in the picture below.
It was slow going. I found myself thinking too much about being tired, so I changed my strategy and started counting to 100. After about counting to 100 say 3 to 4 times, I'd usually stop for a “micro-break”... take in the views, eat something real quick... and then start counting again. This was really effective for me. I'm not saying its everyone's cup of tea, but when I'm having a hard time not complaining to myself the whole time, I count.

There was about 1000 ft. left when we ran out of trail and hit snow. I was immediately glad I decided to bring my ice axe. There were tons of people, however, going across this snowfield to Forrester Pass in their sneakers.
Me, on the other hand, I like to play it safe. I feel secure with my axe, so I got it out, and strapped on some cheap yak tracks I bought last minute to replace my heavier crampons for the trip (I wasn't really expecting to need them, brought them just in case).
People may have been doing this in tennis shoes, but it was mountaineering in a simple sense, although non-technical. It was slow going. Step. breathe. Step. breathe. But we finally made it to the top!

We didn't spend much time at the pass because it was insanely cold. We snapped 2 or 3 pictures and were out of there.
We. were. wrecked.
We stopped a little ways down on the trail to the base of the other side of Forrester and had a quick break, and then made our way down the actual base and had lunch, near a stream like the one shown below.
We took a long break here, made some warm foods (Mountain Houses meals and oatmeal), and had a nice little break.

It was all downhill from there, until we reached our next campsite, which was still about 6 miles away at this point. All the lakes were pretty frozen, but it was still gorgeous. We also got snow on and off throughout our hike, but nothing too crazy.

We reached the camp exhausted. Another little site that had bear boxes and a nice small lake to filter water at.
Day 2 was my hardest day. I had zero energy left by the time we got to camp. I went to bed at like 6 or 7 pm. I think my friends stayed up, but I couldn't do it... too cold, and too tired.

I made some key mistakes on day 2 that evening. I went to bed too early, which made sleeping harder at night. And I barely drank any water before bed, so I woke up with horrible altitude-induced sickness. Learned my lesson.
End Day 2.
Day 3
Day 3 was supposed to be our easy day, but it was deceptive. It wasn't hard like day 2, but it had its own set of challenges. Namely, I woke up with blurry vision, dry mouth, and a throbbing headache, but that was my own fault because I didn't drink enough water the night before. Luckily, after I ate some oatmeal, chugged some water, and took some Advil, I started to feel good again.
I was the first of the group to wake up, as usual. It was nice when I woke up, but about 30 minutes after I woke up when everyone else had just gotten up, it started snowing. This time the snow was pretty sticky and wet. It was soaking everything. I got back in my tent and sat there eating oatmeal, and we waited for it to clear up. Fortunately, it didn't last long, but it made packing up everything a pain in the butt because everything was soaked.

At first the hike was mostly flat, and only slightly uphill, but eventually we had to gain some elevation.

At Crabtree, we took a longer lunch break. It was the only time the whole trip I felt a little bit warm. The sun was out, and with my jacket on, I was able to feel comfortably warm for maybe 30 minutes.


It was nice, until we saw the storm clouds in the distance. Time to get moving again. The sign at Crabtree told us that we only had 2.7 miles left. Hey, that's not so bad right?? Wrong. Longest 2.7 miles of my life. It was basically uphill the whole way. And it was like one big step after another. Felt like 15 miles.

But, amongst all that pain, it was absolutely dreamy out there. It was snowing and misty and beautiful. I made it to Guitar Lake (which is at the base of the Whitney on the other side, not the portal side) with Mike and it was a cloudy, snowy, misty mess... and it was cold.

We scouted out a spot to make camp and began our routine.
This time though, it was super windy. I started worrying about the wind hitting my not-so-four-season-tent at night... so I built a little rock wall around it. Not sure how much that really would've helped, but building the wall helped keep me warm. Looking back, I wouldn’t build a rock wall again, because of Leave No Trace, but I was pretty new to backpacking then.

Our last evening was quite interesting. The other guys strolled in an hour or so after Mike and I had made our tents. There was still bad weather but it was only 5 pm. They were feeling pretty bad. They made their tents, and we basically all got in our tents to avoid the weather... hoping it would clear up in a bit so we could make some dinner.
Two of our guys threw up and were having bad altitude sickness. I was feeling pretty nauseous myself. After waiting a while though, things started to finally clear up. That's when Lucas offered us the amazing broth, and immediately after the cup of broth, it felt like the whole attitude changed.
We slowly started coming out of tents, the sun came out, we chatted with our tent neighbors... and before I knew it, it was 9 pm and time to go to sleep. I warmed up a liter or so of water with some tea, and drank it before bed and slept pretty good the whole night (still peed like 3 times though).
End Day 3.
Day 4
The last day was an epic day. Epically long, epically beautiful, and epically painful on my feet.
We first were headed up to Trail Crest, which is close to Whitney's summit, but not quite there at about 13,800 ft. We tried to get an earlier start in the morning so that if there was any snow to encounter, it would be firm and not slushy.

The majority of the trail up to Trail Crest was switchbacks, there was a bit of snow, but nothing too crazy.

Like every uphill this weekend, it was slow going, but we all felt immeasurably better than we had the day before, and the views were unbeatable. I think we reached Trail Crest at about noon, and we were all stoked!


We decided not to summit Mount Whitney, (a California 14er peak) because I’d been there, done that, and just two people on our team hadn't summited, but they weren't feeling up to it.
Only 8.7 miles of downhill left to go before we could sink our teeth into a nice juicy burger. Oh, but did we mention that it was about 5,000+ ft to descend, and first we needed to navigate the infamous snowy switchbacks that we had been hearing rumors about the whole trip?
Here was some of the different feedback from the PCT'ers we asked along our hike the past 3 days concerning the condition of the switchbacks:
"Nah, the switchbacks are fine, I saw someone going down in tennis shoes.”
"I would definitely wear crampons... and use an ice axe. If you have those, you should be good."
"I think you should take the chute."
"They looked pretty icy, I'm not sure..."
"I saw some people sliding down the chutes, that looked like fun! ...."

The feedback was so all over the place, sp we knew we'd just have to see for ourselves. Turns out, it was 90% totally fine.
There were a few sections of snowy switchbacks that had the hairs on my arms sticking up, but nothing was overly sketchy. (However, I did wear my YakTrax again and used my mountaineering ax.)
The chutes looked like a soggy mess and a stupid idea. We heard someone broke their tailbone glissading down them, too, so that was really out of the question.

Eventually, there was no snow left, and we reached the bottom of the switchbacks. We still had a ton of miles left to go though and it was a long trip back down to the portal.


The downhill is pretty rough. The first half you are just pounding your feet and knees on rock the whole way, and you're just praying for dirt the whole time because you know once you hit dirt, you might actually make some speed with your downhill.

But then once you finally do hit the dirt, your knees and feet are so wrecked you can hardly go 2 mph.
It got to the point where we wouldn't even stop to take breaks for fear that if we stopped moving, we may never move again.

But like with many painful hiking stories, we did eventually reach the Portal, and it was glorious. We ate a big burger and plate of fries at the Mt. Whitney Portal Store, gave advice about the switchbacks to the eager hikers hanging around in the area, and then finally drove off (getting more food at the McDonald's in Lone Pine) and headed back home to Bakersfield.
Kearsarge Pass to Whitney Portal was a hard backpacking trip, but amazing. I'm really glad I got to go. Here are some key (but basic) things I learned for future backpacking trips:
Broth. Pack broth packets, trust me!
Chocolate covered coffee beans. Most amazing thing ever when backpacking that I almost forgot to mention!
Drink a lot of water before sleepy time.
If you are in good enough shape, enjoy backpacking, and can handle a bit of pain for a consistent 4 days, I highly recommend this trail if you can get a permit. It was awesome. I dare even say... I'd do it all over again.
LOOKING FOR MORE EPIC ADVENTURE RESOURCES?
Check out there trail guides for popular California hikes:
A Full List of All the California Fourteeners
Backpacking Mount Langley Trail
Backpacking Split Mountain Via the Red Lake Trail
Backpacking from Tuolumne to Devils Postpile
15 Adventure-Worthy Backpacking Trips for Beginners
Also, be sure to take a look at these essential backpacking resources!
Essential Backpacking Hygiene Tips & Feminine Care in the Outdoors
10 Awesome Hiking Groups and Challenges to Encourage You on Your Hiking Adventures
Cheers,
Allison - She Dreams of Alpine


Hiking Mount Langley - California 14er Complete Trail Guide | Mount Langley is the 9th tallest mountain in California and one of three California 14ers that can be accessed via a Class-1 hiking trail which makes it one of the easiest California 14ers to summit. Even if you aren't interested in summiting Mount Langley, just hiking to the Cottonwood Lakes is a worthwhile trip all on its own. This is by far one of the best hikes in California.| shedreamsofalpine.com