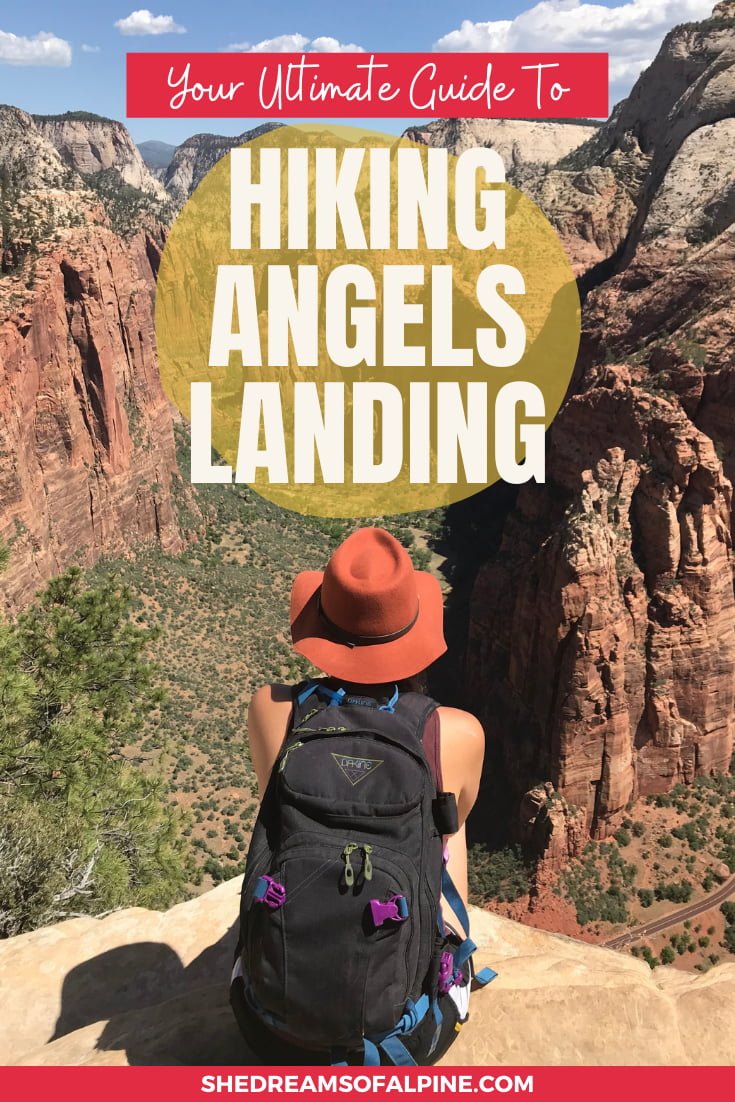
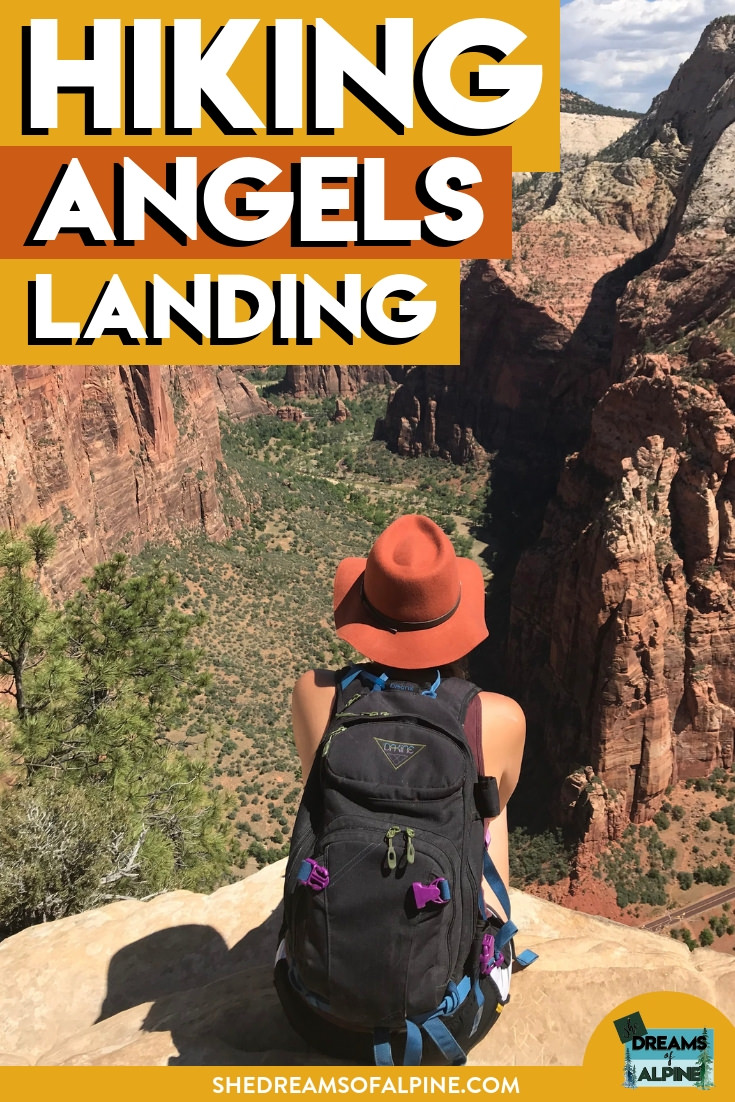
The ULTIMATE Guide to the Angels Landing Hike in Zion National Park

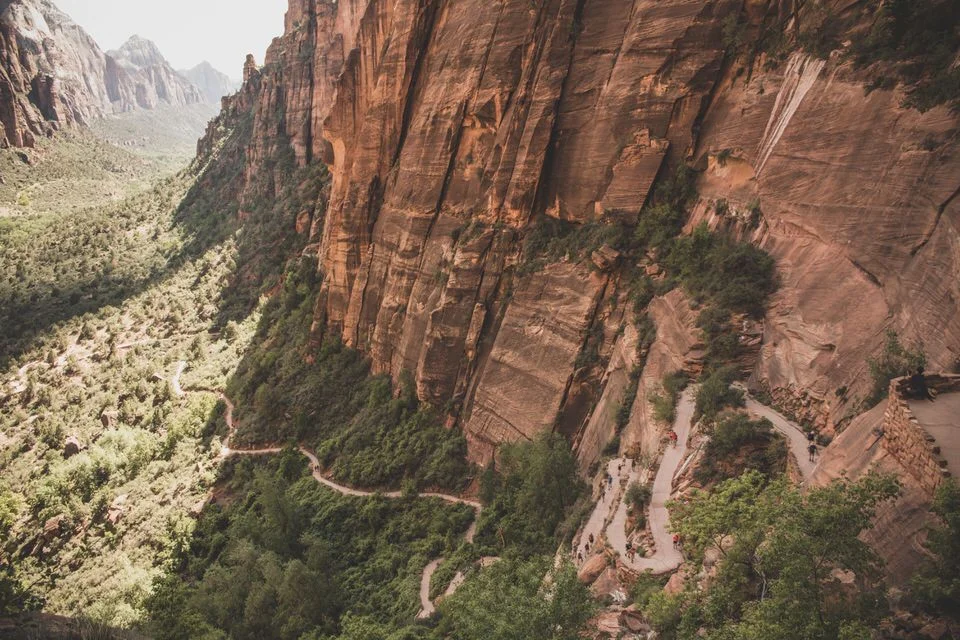
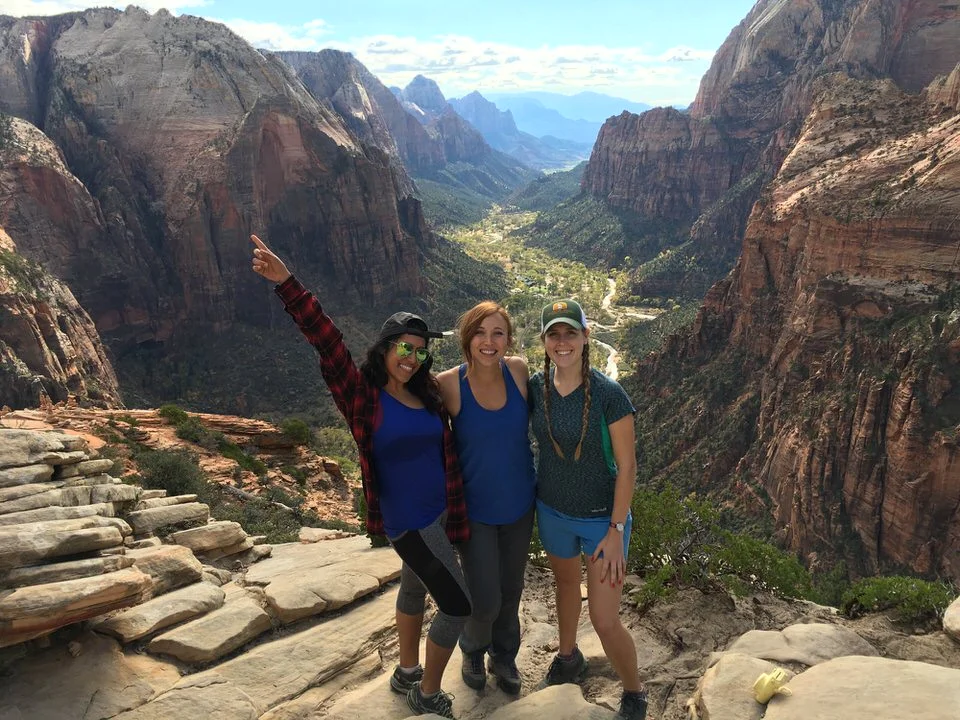
The Angels Landing hike in Zion National Park is one of the MOST ICONIC hikes in Zion, and the entire United States in my opinion. It’s a true classic in every way! The views are absolutely unmatched, and the trail will challenge you both physically and mentally the whole way up.
You might be reading this post because you are scared or nervous about attempting the Angels Landing Trail for the first time, and I totally get that. Even as an avid hiker and rock climber, I still got butterflies the first time I went to hike this trail. It’s hard not to, with all the wide angle photos out there that make the already narrow trail look even more narrow.
The first time I hiked Angels Landing, I had no idea what to expect. So when you hear about how people have died on the trail, the fear-talker kicks in trying to talk you out of the hike before you’ve even made it to Zion. I’m hoping to help you kick that voice of fear to the curb though.
I’ll answer all your questions about this trail, and hopefully by the end of this Angels Landing trail guide you will feel well-prepared and equipped to take on this beautiful & epic challenge in Zion National Park. It’s a classic for a reason, and despite the crowds, it’s a must-do for any adventurous hiking soul.
Thise guide goes into great depth on everything you need to know logistically (& mentally) about hiking Angels Landing in Zion National Park, and includes lots of Angels Landing photos, turn-by-turn directions of the trail, and what to expect along the way.
If you are looking for additional resources on hiking trails near Zion National Park, also be sure to check out my post on hiking Kanarra Falls. Kanarra Falls is a beautiful short waterfall canyon hike that is great for the family and less crowded than the hikes in Zion National Park.
Let’s begin, shall we?
ANGELS LANDING HIKE History + What we will cover in this guide
If you aren’t familiar with Angels Landing or Zion National Park, here’s a very brief history. Zion National Park was Utah’s very first National Park, officially designated in 1909. In 1916, a man name Frederick Fisher discovered the thin, red mesa that is now known as Angels Landing and remarked that, “Angels Landing is so high, that only an angel could land on it,” hence the name. However, despite its height, Angels Landing is not the highest point in Zion Canyon. Observation Point stands even taller at 6,521 feet.
The infamous switchbacks leading up the trail were developed in 1924 and are known as Walter’s Wiggles, named after Walter Ruesch, the first superintendent of Zion National Park. There are 21 total switchbacks along the Walter’s Wiggles section of the trail, and they were constructed with natural and native materials to blend in with the beautiful Zion landscape and scenery.
In this guide to Angels Landing, you will find:
Angels Landing Trail Stats - All the key details for the trail in one spot. Mileage, elevation gain, & more.
How to Get to the Angels Landing Trailhead - How to get to the trailhead in Zion National Park, including shuttle logistics.
When to Hike Angels Landing - Details about the best time to hike Angels Landing and the typical weather to expect on your trip.
Angels Landing Trail Map - An interactive map of the Angels Landing trail, as well as an elevation profile graph.
Angels Landing Permits - Everything you need to know about when & how to get permits to hike Angels Landing. Permits are now required for Angels Landing.
What to Bring on Your Hike to Angels Landing - The essential packing list for an Angels Landing day hike. Don’t hit the trail without these things!
Turn-by-Turn Directions for Hiking the Angels Landing Trail - Details about the different sections you’ll encounter on the Angels Landing trail.
Frequently Asked Questions about Angels Landing - Common questions & concerns about hiking Angels Landing.
The FAQ addresses questions like who should (and who shouldn’t) hike the Angels Landing Trail in Utah, how dangerous is Angels Landing, what’s the scariest part of Angels Landing hike, and more! So stick around to the end to get these common questions answered.
Plus, be sure to check out the bottom of this post to find more hiking trail guides and other additional hiking, camping, and backpacking resources!
Hiking Details for the Angels Landing Trail
Whenever I’m gearing up for a hike and doing research on a trail, I like to know the quick information right of the bat, like how tall is my hiking objective, what is the trailhead name, how many miles is the trail? So that’s why I like to lead off with this section. In just a short few bullet points, you’ll get a high-level overview of what to expect on your Angels Landing hike.
Name of Trail to Hike to Angels Landing: This one’s easy, it’s the Angels Landing Trail :)
Trailhead Name? The Grotto Trailhead - Zion Canyon
Type of Trail: Out and Back
How long is the Angels Landing hike? Total hiking mileages is about 5 miles round trip
Total Elevation Gain? ~1,800 feet total elevation gain
How tall is Angels Landing? The Angels Landing summit elevation is 5,790 feet
How long does it take to hike Angels Landing? 4-5 hours, depending on your fitness level
How hard is the Angels Landing hike? This hike is difficult! This hike ascends about 1,800 feet in 2.5 miles, and it’s uphill that whole way. If you do this hike in the summer, add in the fact that it is very, VERY hot, which will slow you down (and can be very dangerous if you aren’t accustomed to hiking in the heat). Plus, this hike definitely has a “fear factor” to it, since the trail gets very narrow towards the top. All of these aspects combined can make for a difficult hike, particularly if you’re not an experienced hiker.
Is a permit required to hike Angels Landing? Yes! You didn’t used to need a permit, but thanks to the continued popularity of the trail, a permit is now required for everyone who hikes to the top of Angels Landing. More info can be found here on the Zion National Park website, and this guide will also go over the details of how to get Angels Landing permits.
Angels Landing Crowds: High! The crowds can really be a problem on this hike, but the permit requirement was instated to help with this. You can also try to avoid the crowds by avoiding peak season.
Is water available along the Angels Landing Trail? There is water and restrooms at The Grotto (where the shuttle bus will drop you off to access the trailhead). Make sure to fill up with water at The Grotto if you don’t already have enough, because you won’t find any other opportunities along the hike to fill up. I suggest bringing at least 3 liters of water with you on the hike, ESPECIALLY if you are doing this in the summer. The elevation gain and the heat are no joke. Make sure you have a backpack to carry your water though, since you will want to have your hands free when you hike up the Angels Landing chains and narrow portions of the trail.
Is this hike dog-friendly? There are no dogs allowed on the trails in Zion National Park, but you wouldn’t want to bring a dog on this hike anyways since it is so narrow. Leave the pups at home for this one, or find a local dog-sitter in the Zion area.
Is Angels Landing kid-friendly? I definitely wouldn’t bring young kids on this hike, because there are very high consequences on the trail if you were to trip or make a misstep. But you’ll have to be the judge of whether or not this hike is safe enough for your kids.
Where is Angels Landing?
By now, you’ve probably figured out that Angels Landing is located in Zion National Park in Utah. It is one of Zion’s most cherished and popular hikes.
If you want to visit, Zion National Park is open 24 hours a day every day of the year! However, be sure to check conditions in the park because during certain seasons (like winter) some services or facilities may be closed or have reduced hours of operation.
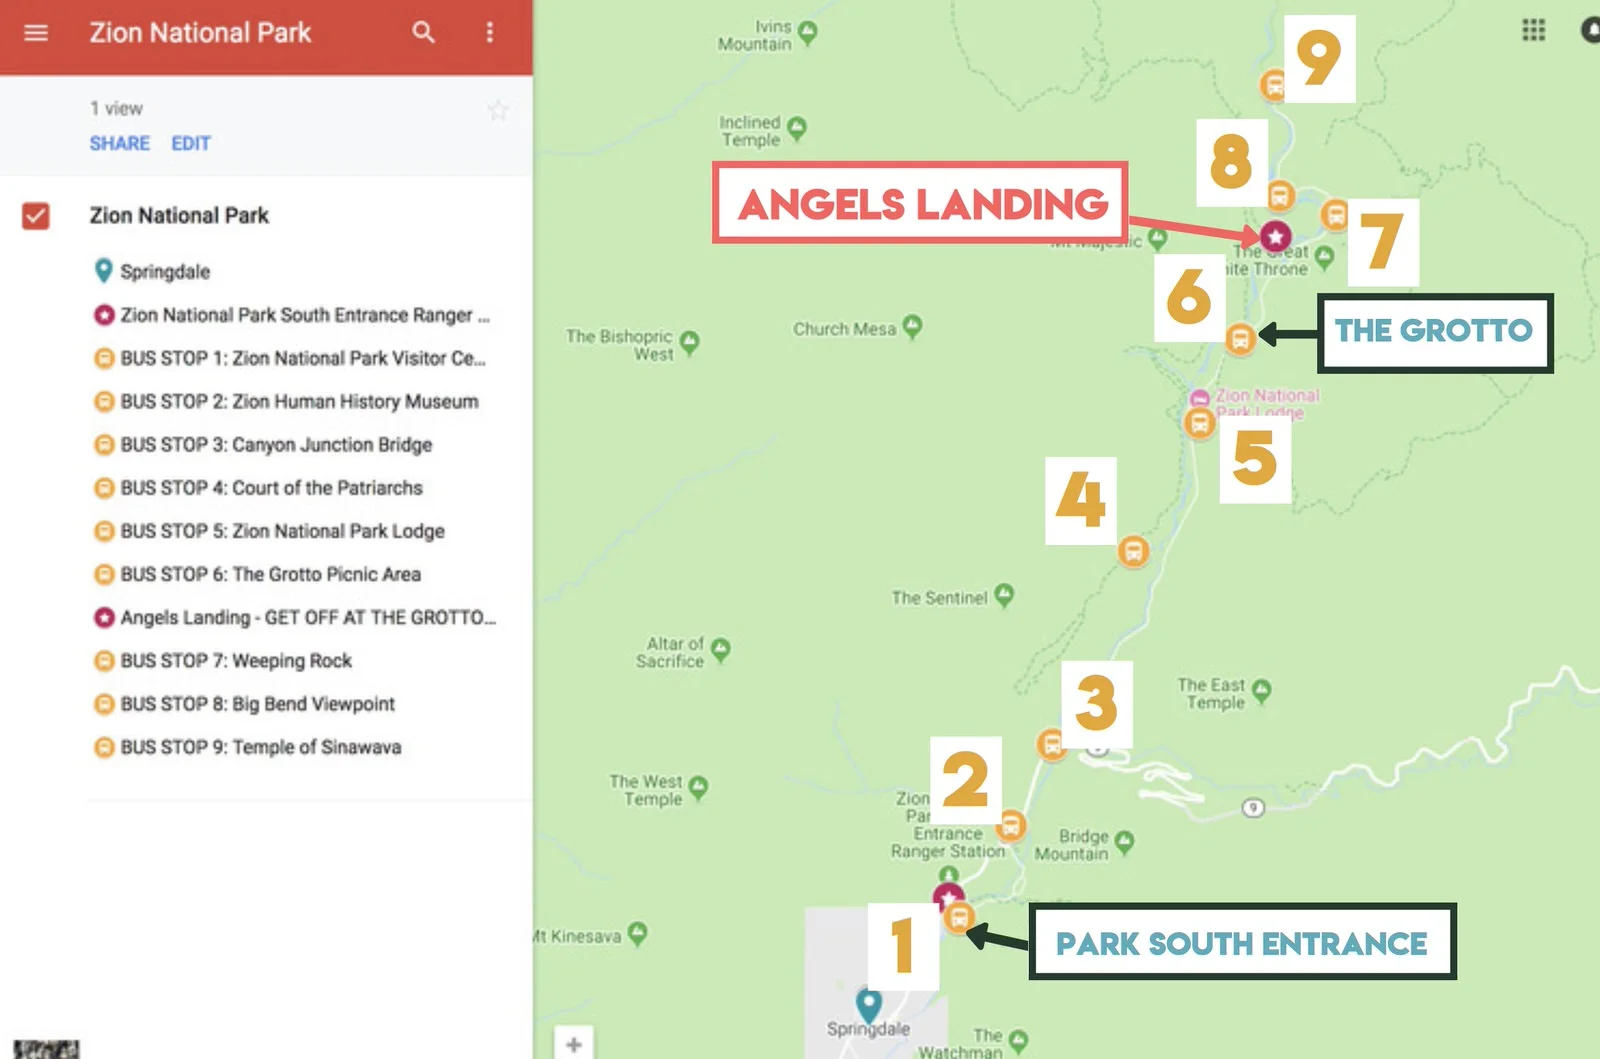
Click on the map below to go to an interactive Google map of the park and bus stops.
Parking for Zion National Park:
There is a big parking lot located at the Zion National Park South Entrance and Visitor Center area, but it will fill up very fast during the most popular times of the year. If you really want to park at the main parking area, be prepared to get there early.
Alternatively, you can park anywhere in the town of Springdale and catch one of the (free) town shuttles to the park entrance. The town shuttle picks up approximately every 5-10 minutes at various stops in Springdale.
Getting Around Zion National Park & the Shuttle Bus System in Zion National Park:
During the most popular times of the year for tourism in Zion National Park, there is a shuttle bus system that takes visitors from the South Entrance Visitor Center throughout the heart of the park. The shuttle busses arrive at each stop every 7-10 minutes. However, the bus system is typically shut down in the offseason and at that point you may drive your car around the park. Check the NPS site for more details for your particular date.
Note: When the bus IS operating, there are no private vehicles allowed on Zion Canyon Scenic Drive, and you will only be allowed to enter the main canyon via the shuttle bus.
How do I get to the Angels Landing Trailhead?
During most of the year, you’ll likely take Zion’s shuttle bus into the park to get to the trailhead. The bus stop you’ll want to get off at for the Angels Landing hike is “The Grotto” bus stop, marked on the map above (and Zion National Parks Map at the time of this writing) as bus stop number 6. There are several other bus stops along the way, and they are as follows:
Visitor Center Bus Loading at South Entrance of Park
Zion Human History Museum
Canyon Junction
Court of the Patriarchs
Zion National Park Lodge
The Grotto (This is where you’ll get off for Angels Landing)
Weeping Rock
Big Bend Viewpoint
Temple of Sinawava (The Narrows hike starts here!)
For more maps of Zion National Park, click here.
When to Hike Angels Landing
Weather-wise, the best time of the year to visit Zion National Park and hike Angels Landing is in the spring months (March to Mid-May) or the fall months (mid-September to November). These months are also less crowded than the summer months. However, as long as there is no ice or snow on the trail, you can hike Angels Landing year-round.

If you’re hiking in the summer:
Go early in the day! This trail is in the sun for a large part of the day and can get very, very hot in the summer months. If you can get a permit, I’d recommend you be on the first bus to Angels Landing in the morning. Make Angels Landing your first hike of the day, and then enjoy other hikes like the Narrows later in the day since you can walk through the water and be more shaded.
Bring PLENTY of water. It’s an uphill battle, and in the heat, you’ll need lots of water.
Bring so much sun protection.
Is Angels Landing open in the winter?
Short answer, yes, but this trail can be very dangerous if there is snow or ice on the trail. (In fact, on a She Dreams of Alpine team retreat, we chose to turn around and skip the last ridge to the summit because of the icy conditions.) Don’t plan to do this hike if the conditions are bad. If in doubt, check with the Zion Park staff.
It’s also best to avoid this trail if there has been rain, again because this can lead to dangerously slippery conditions.
Be sure to call the ranger station before heading out on your trip to get weather and snow updates.
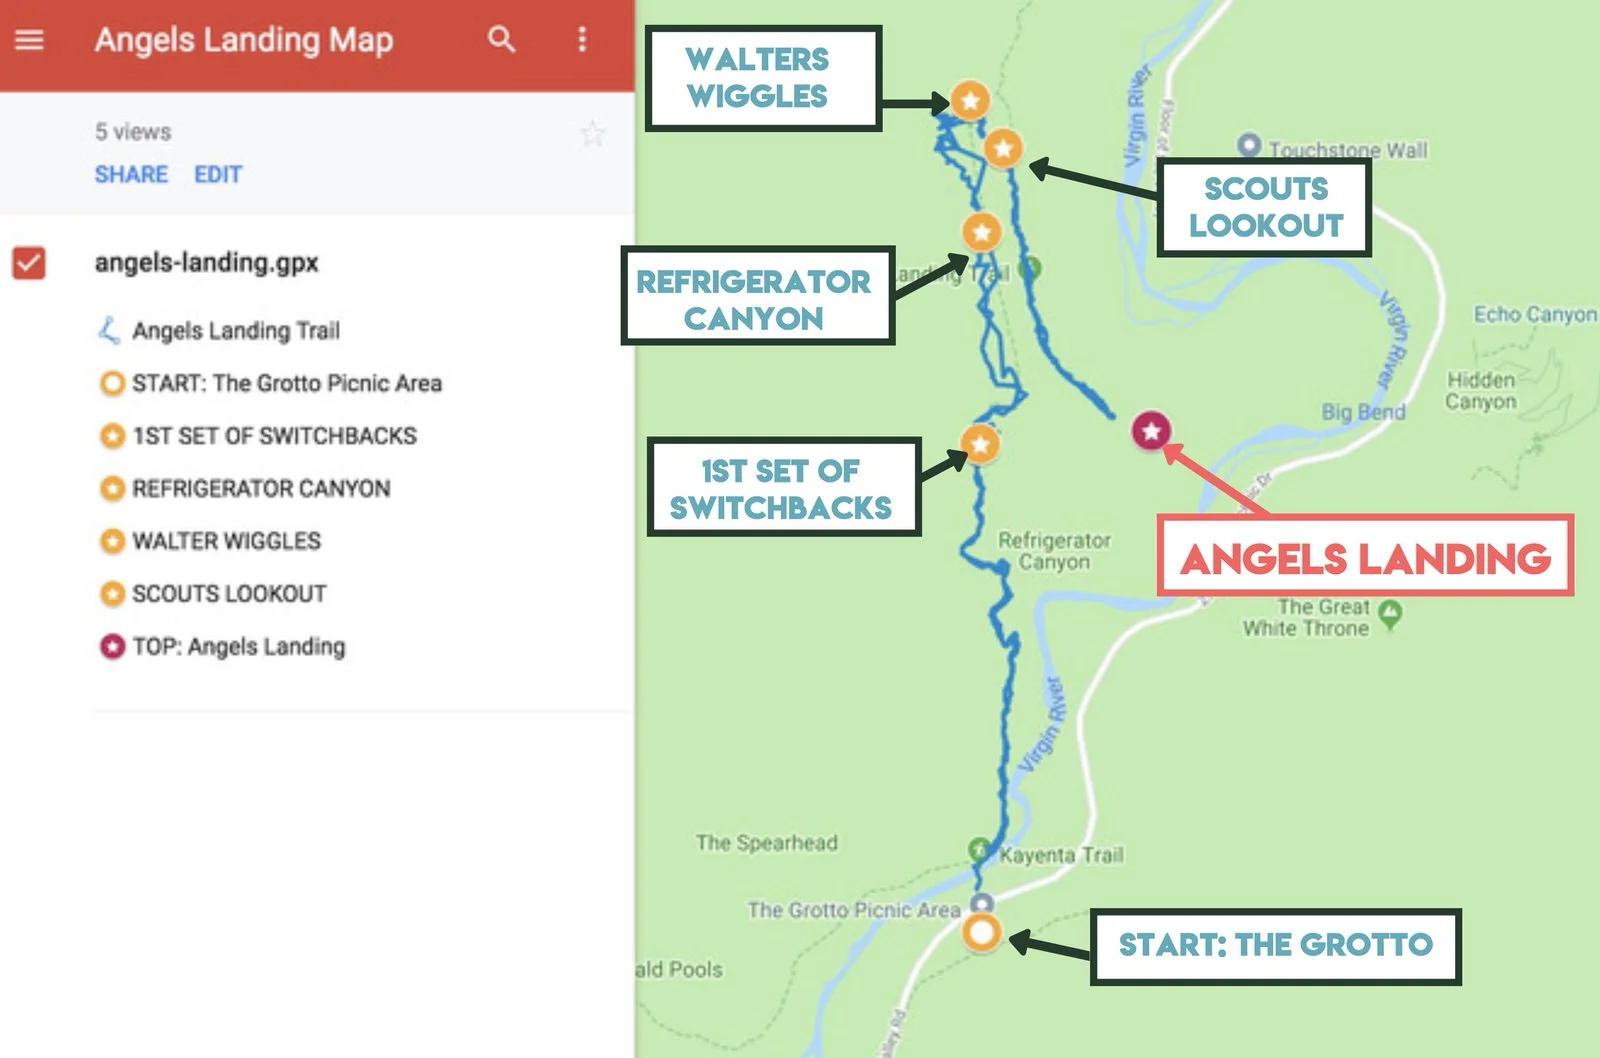
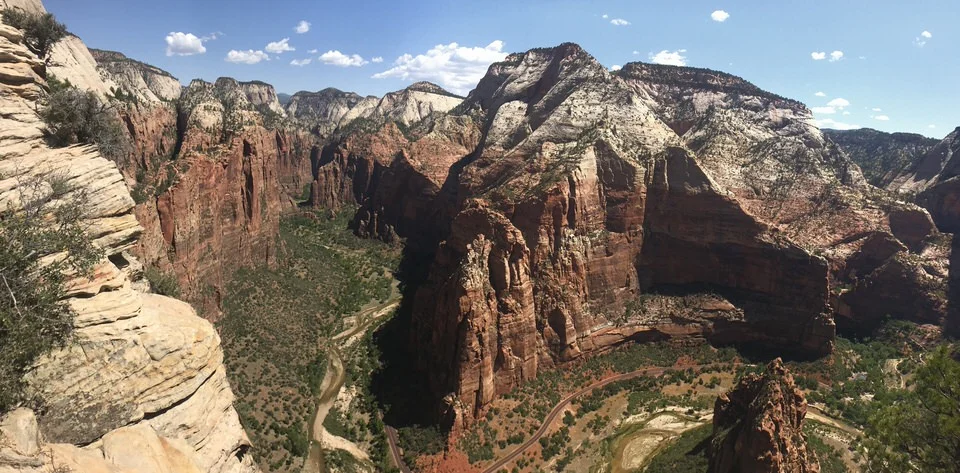
Angels Landing Trail Map
The trail up to the top of Angels Landing is pretty straight forward to follow. Check out the maps at the trailhead when you start, but you should be OK without having a GPS or trail map.
Below is a map of the Angels Landing trail starting from the Grotto Trailhead. If you click on the image below (or click here), you will be taken to an interactive map that you can further explore.
Alternatively, you could hike the Angels Landing via the West Rim Trail for a longer day-hike or backpacking trip.
Below is a look at Angels Landing elevation profile:

Angels Landing Permits
Permits are required for anyone hiking to the summit of Angels Landing, but you do not need a permit to hike only as far as Scout Lookout.
Due to the popularity of the Angels Landing hike, the crowds and congestion on the trail led Zion National Park to institute a permit program. You can find all the details about Angels Landing permits on the Zion National Park website.
Permits for Angels Landing are now available via both a seasonal lottery and a day-before lottery. (Nice to have options for both the planners & non-planners!) All permits are distributed through Recreation.gov.
Seasonal Lottery
Some Angels Landing permits will be issued seasonally, so you can apply and know before your trip if you have received a permit. Here is a chart of the lottery dates and deadlines:

You can apply for the Angels Landing seasonal permit lottery through Recreation.gov.
Day-Before Lottery
You can also apply for an Angels Landing permit the day before you plan to hike through Recreation.gov. The day-before lottery opens each day at 12:01am and closes at 3pm (Mountain Time). Permits for the next day will be issued at 4pm.
Permit Fees
Each application costs a $6 non-refundable fee. If you are issued a permit, you will be charged an additional $3 per person.
Permit Changes & Cancellations
Seasonal lottery permits can be cancelled for a refund of the $3 per person fee until two days before your permit date. You can also reduce the group size, but no other changes are allowed.
Day-before permits cannot be changed or cancelled.
All permits are non-transferable.
Using Your Permit
If you are issued an Angels Landing permit, make sure to print or download your permit before you get to Zion National Park. Cell service is spotty in the park, so you can’t rely on accessing your email.
Permits are issued for specific times (before 9 am, between 9 am and 12 pm, and After 12 pm), and the time on your permit is when you need to arrive at The Grotto. Give yourself enough time to get into the park and take the shuttle to The Grotto (stop #6) by your permit time.
Rangers might check your Angels Landing permit at The Grotto, at Scout Lookout, or anywhere along the trail. You may not be allowed to continue your hike if you do not have your permit with you.
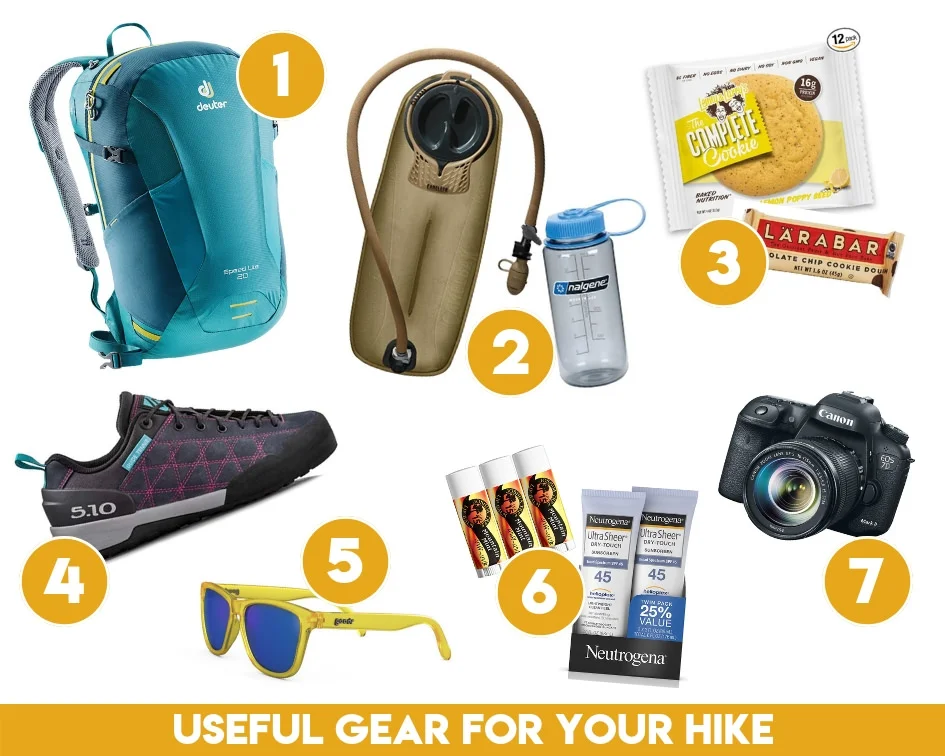
What to Bring on Your Hike to Angels Landing
Here are some of the most important items to bring with you on your day hike up Angels Landing. And always be sure to check the weather and pack appropriately!
*Please note that some of the below links and other links in this post are affiliate links.
Here’s what I recommend having with you on your hike up Angels Landing.
7) Camera: Don't forget to pack a camera or a phone to capture your hike! Read our post on the Outdoor Adventure Photography Gear we use if you want details on the cameras we recommend for outdoor photography, but also you can't go wrong these days with your phone camera either. Your choice!
Also, be sure to pack appropriate layers for the weather! There are other smaller items I typically bring with me on a day hike, which aren’t necessarily mandatory for the Angels Landing hike (especially because this hike is so popular, you are not very likely to be alone on this trail), but if you’d like a more detailed description of the gear I recommend for a day hike, be sure to check out my Essential Hiking Gear List.
You can also download my hiking gear checklist below for easy reference:
Turn-by-Turn Directions for Hiking Angels Landing Trail
If you still aren’t sure if you’re ready or not to hike the Angels Landing trail, here’s a little turn-by-turn taste of what to expect on your Angels Landing hike.

In summary, here are the key hiking landmarks along the Angels Landing Trail:
The Grotto Trailhead (Trailhead for Angels Landing)
Refrigerator Canyon (Shaded year round)
Walters Wiggles (21 steep switchbacks)
Scouts Lookout (Many people turn around here)
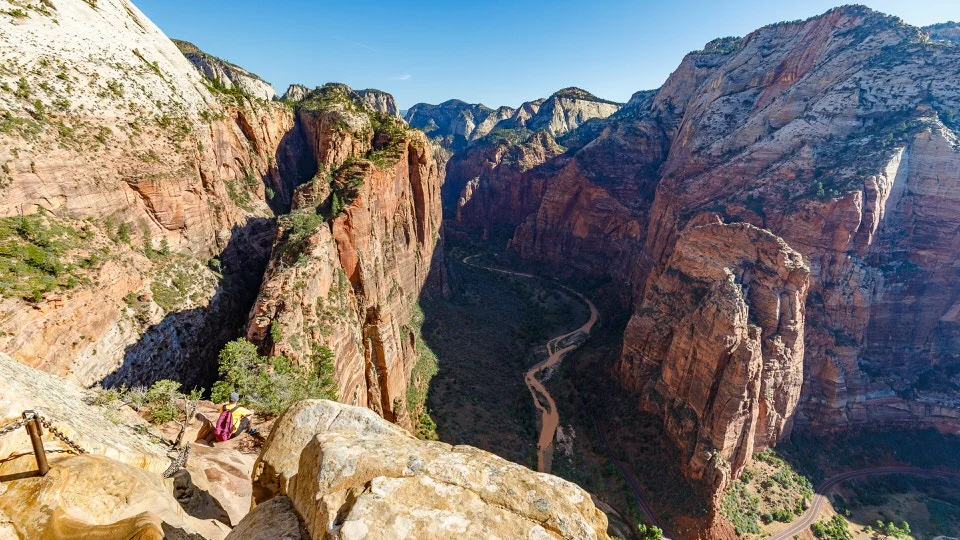
Angels Landing Spine & the Angels Landing Chains (This is where things get spicy!)
The top of Angels Landing! (Your ultimate goal and best views in the park!)
The Grotto
Assuming you take the bus into the heart of Zion National Park, you’ll get off at The Grotto (stop #6) in order to get to the Angels Landing Trailhead. The Grotto area is a great place to get any final bathroom breaks out of the way and to fill up on water if you need to.
From the bus stop, you’ll cross the street to find the trailhead for the Angels Landing hike, and begin with a nice and easy gradual ascent of the trail. Don’t be fooled though, it will get steeper! :)
The start of the trail is very well-maintained and pretty wide in comparison to the top of the Angels Landing trail. You’ll eventually hit a series of longer switchbacks that lead you to an area known as Refrigerator Canyon.

Refrigerator Canyon
When you enter Refrigerator Canyon, you’ll get a short rest from the steep uphill switchbacks as well as a short break from the heat. This area of the hike got its name because it is shaded and protected from the sun year-round.
The hiking here is easier, so if you need a moment to rest and regroup, this is a great place to do so.
Walter’s Wiggles
After your leisurely stroll through Refrigerator Canyon, you will hit what is known as Walter’s Wiggles. These “wiggles” are a series of 21 steep uphill switchbacks. If you recall from the beginning of this post, these switchbacks were named Walter’s Wiggles after Walter Ruesch, Zion National Park’s first superintendent when the trail was built back in 1924.
The best advice I can give for this section of the trail is to just put your head down and pace yourself towards the top. If you need to break the switchbacks up, set some smaller goals and take mini breaks along the way up. Most importantly, just listen to your body and keep moving forward.

Scout Lookout
Once you finally reach the top of Walter’s Wiggles (don’t you just love that name?!), you’ll reach another milestone on the Angels Landing Trail known as Scouts Lookout. A lot of people stop their hike here and turn around, and if you are uncertain about continuing on to the top of Angels Landing, it is still an amazing hike to make it to Scouts Lookout!
When you reach Scouts Lookout you’ll find a lot of people resting from the Wiggles and assessing their next move. Should I do it? Should I continue on?
You’ll see some parties break into separate groups, those that stay, and those that go.
You’ll hear a lot of conversations about how scary it looks, how nervous people are, and how intimidating the trail is.
You’ll probably start second guessing yourself and your abilities.
You’ll probably wonder why you’re even doing this stupid hike in the first place.
But none of that matters. The only thing that matter is… will you continue on?
And if your answer is yes, you’re in for what I think is the best and most exciting part about the Angels Landing Zion hike.
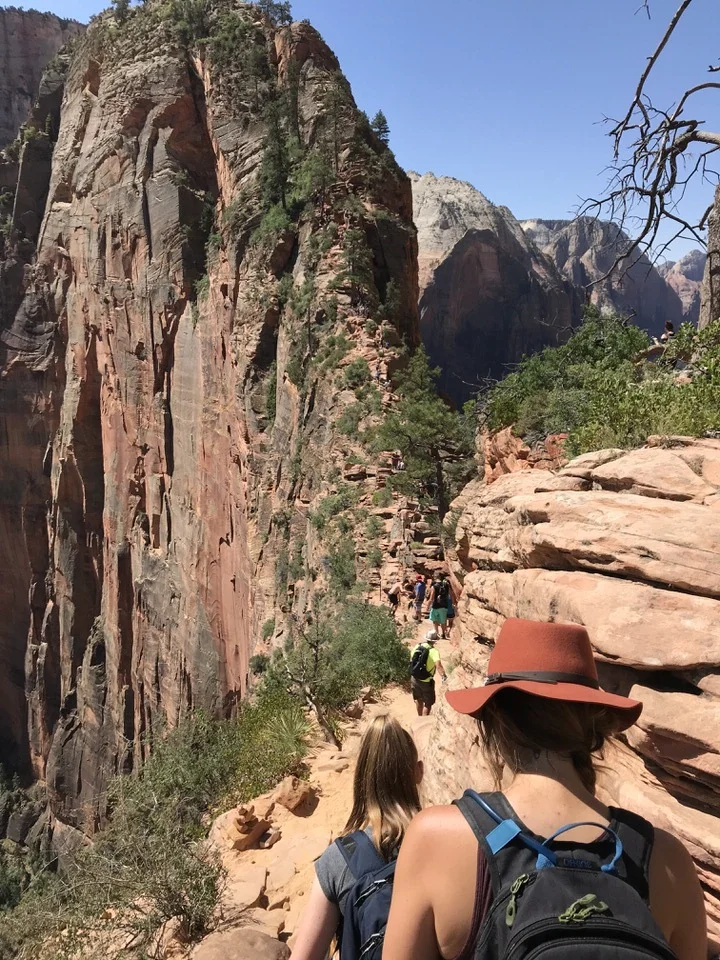
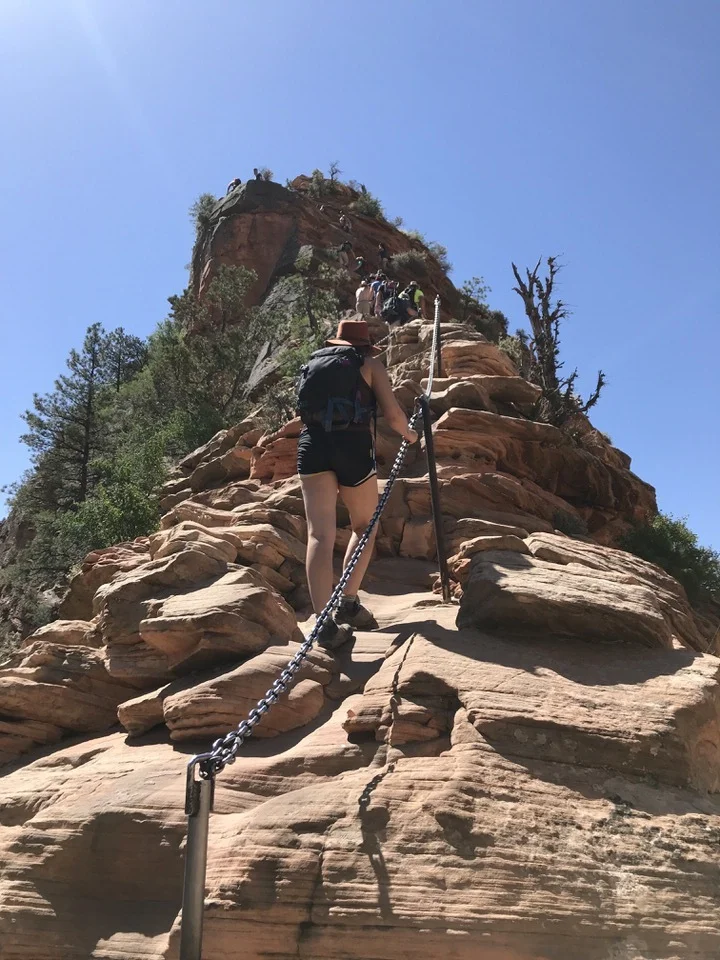
Angels Landing Spine
Now this is where the fun begins!
The rest of the Angels Landing hike will test your mental strength, as your path will become more and more narrow, and eventually it will become very steep.
Keep believing in yourself though, because it’s totally worth it! Make use of all the tools you have at hand, like good strong sturdy hiking legs and hands that can grip onto the chains along the way. Make sure to take deep breaths and pace yourself, and most importantly, try to enjoy the moment and excitement of it all!
You won’t be alone on your journey to the top, you’ll be in good company. So if at any point you’re feeling scared, let your buddy know, and help each other out.
Just be cautious, mind your steps, and hold on to the chains. You’ll have to navigate some two-way traffic along the Angels Landing spine (those hiking up the spine versus those hiking down the spine from the summit), so just always keep at least one hand on the chains at all times. Maintain your three points of contact, and never do anything that makes you feel overly uncomfortable.
The Top of Angels Landing
Once you make it to the top, enjoy those sweet, beautiful Zion National Park views… you’ve freaking earned it!
360 degrees of National Park beauty. Take as many photos as your heart wants, but then be sure to take time to really soak it all in (without the phone).
Congratulations. You are a badass!
Can you feel it already?
Time to hike the Angels Landing trail, my friend. You’ve got this.
GRAB MY [FREE] OUTDOOR BACKPACKER STARTER KIT
I created the Ultimate Outdoor Backpacker Starter Kit for you (and it's FREE)! This starter kit is filled with 14 pages of my best hiking and backpacking tips to help you learn what it takes to become a safe, confident, and self-sufficient outdoor backpacker!
FAQ - Common Angels Landing Hike Questions & Concerns
1) Who shouldn’t hike the Angels Landing Trail? I wouldn’t take kids on this hike, but if you have a confident and fearless teenager, you will have to make the call yourself as to their capability on terrain like this. You could certainly hike up to Scouts Landing and then decide once you see the remainder of the trail.
Also, if you are deathly afraid of heights, you should probably avoid this trail as well. This trail should really only be hiked by those who are feeling up to the challenge (mentally) and who are physically able.
2) What is the typical time it takes to hike Angels Landing? Most people hike the trail in 4-5 hours depending on their level of physical fitness.
3) How tall is Angels Landing? The top of Angels landing is at 5,790 feet in elevation, a little over 1000 feet from the Zion Valley floor from the top.
4) How dangerous is Angels Landing? Drop-offs along the narrowest portion of the trail range from 800 to 1000 feet, so if you fell, that would be deadly. However, the park has done a fantastic job at make a narrow trail feel very safe. Thousands of people do this hike every year without incident.
5) What’s the scariest part of Angels Landing? To me, the scariest part about Angels Landing isn’t the 1000 foot drop-offs on either side of the trail, but the fact that you have to share the trail with hundreds of other hikers. Otherwise, the trail is pretty well-protected along the way, and there are chains along the hike to help keep you stable.
Hopefully, the new permit system will help alleviate some of the crowds. But if you really want to avoid the crowds, try to visit in the off-season.

6) What are the Angels Landing chains? Towards the very top of the trail where it gets steep and narrow (after Scout’s Lookout), there are chains installed along the trail that you can hold on to as you make your way to the top. The chains are there to help you keep stable and feel more confident on your way to the summit of Angels Landing.
7) How narrow is the Angels Landing trail? The narrowest portion of the trail is only a few feet wide, but don’t worry, you have the chains to hold on to. Remember to always maintain at least 3 points of contact on the narrow parts of the trail, go slowly if you feel unsteady, and breathe!
8) How many people have died on Angels Landing? Records show there have been 19 recorded Angels Landing deaths. But keep in mind that nearly 4.5 million people visit Zion National Park every year.
Angels Landing Hike Safety Advice:
Wear good, grippy hiking shoes.
Take a small backpack so you can be hands-free.
Hike earlier in the day to avoid crowds and avoid the heat.
Bring plenty of water.
Go slowly if you feel scared.
Don’t hike if there is snow, ice, or has been recent or frequent rains, and don’t hike the trail if there is a chance of thunderstorms.
Believe that your success on this trail is inevitable! Just keep taking it one step at a time!
I hope you have a chance to hike this exhilarating, beautiful trail, and get to experience some of the best views Zion has to offer!
If you are looking for more Utah and hiking inspiration, check out our other resources below!
More Utah and Desert Hiking Trail Guides:
Utah: Kanarra Falls Hike
Arizona: Havasu Falls
Arizona: The Wave Hike
Arizona: Best Hikes in Sedona
Arizona: Hiking Humphreys Peak (Tallest Peak in Arizona)
New Mexico: White Sands National Monument
California: The Ultimate Death Valley Weekend Getaway
Also be sure to check out these essential hiking resources!
Cheers,
Allison - She Dreams of Alpine


Related Posts:


How to Get a Mt. Whitney Permit: Understanding the Permit & Lottery Process for Day Hiking and Backpacking the Whitney Area | Mount Whitney is the tallest peak in the lower 48 states, which makes it a very popular peak to hike and climb. Due to its popularity, there is a very structured permit process, and this post covers everything you need to know about grabbing Mount Whitney permits so you can plan your hike up this epic California peak. | shedreamsofalpine.com