The Ultimate Guide to Hiking the Kanarra Creek Trail to Kanarra Falls

If you happen to be making a visit to Zion National Park or are road tripping through Utah, consider making a stop to Kanarraville Utah to hike a cool little slot canyon to Kanarra Falls on the Kanarra Creek Trail (also known as Kanarra Creek Falls, the Kanarra Creek Hike, Kanarra Creek Canyon, Kanarraville Falls, or the Kanarra Creek Canyon Trail). While this trail is shorter and not as well-known as Zion’s “The Narrows” hike inside of Zion National Park, this trail is equally as beautiful, and we are lucky the people of Kanarraville have done what they can to share this trail with us. All this being said, please don’t forget to practice leave no trace principles when visiting this trail and respect that Kanarra Creek is connected to a primary water source for the people of Kanarraville. You can find more details on this below.
WHAT TO EXPECT IN THIS POST:
Leave no Trace Principles
Key Hiking and Trail Details + Pro Tips
How to Get to Kanarra Falls Trailhead
Map of Kanarra Creek Trail
Best Time of the Year to do the Kanarra Falls Hike + Flash Flood Safety
Cost to Hike and Permits needed
Useful Gear to Bring on the Hike
LEAVE NO TRACE AND RESPECT THE LAND
You may be wondering why I decided to lead off with discussing “leave no trace” principles for this hike. That’s because I feel like sharing the details of this hike with the internet come with a certain responsibility to remind people that these places need to be treated with respect and as if they were in our own backyard. This should go without saying with any hike that you go on, but practice leave no trace hiking principles whenever you go outside. Basically, you should aim to leave this area and trail in better shape than it was before you came. Make sure to stick to designated trails if there are trails, utilize bathroom facilities that are available for the public so you don’t contaminate water sources, and pack out anything that you bring on the trail with you. We are lucky the Kanarra Falls Hike is still open to the public, especially since it has grown in popularity with the public due to its close proximity to Zion National Park. If you don’t take care of this trail, you will lose access to it.
Also, it is especially important to note that one of the towns primary water sources comes from a nearby spring which could be fed by Kanarra Creek. This becomes a big concern as hikers can easily contaminate the water if they are urinating in or near this water source. So please, don’t do this. There are bathroom facilities at the trailhead that you can use before your hike to Kanarra Falls. And due to the growing popularity of the hike, the town has implemented a permit for hiking the trail. They use these funds to help protect the trail, maintain the parking lots and portable toilet facilities on site. It is likely that this hike may have daily hiking restrictions on it and a lottery system put in place in the future to help control the damage and crowds at this trail. Do your part, take care of the land, follow the rules put in place, and be respectful.

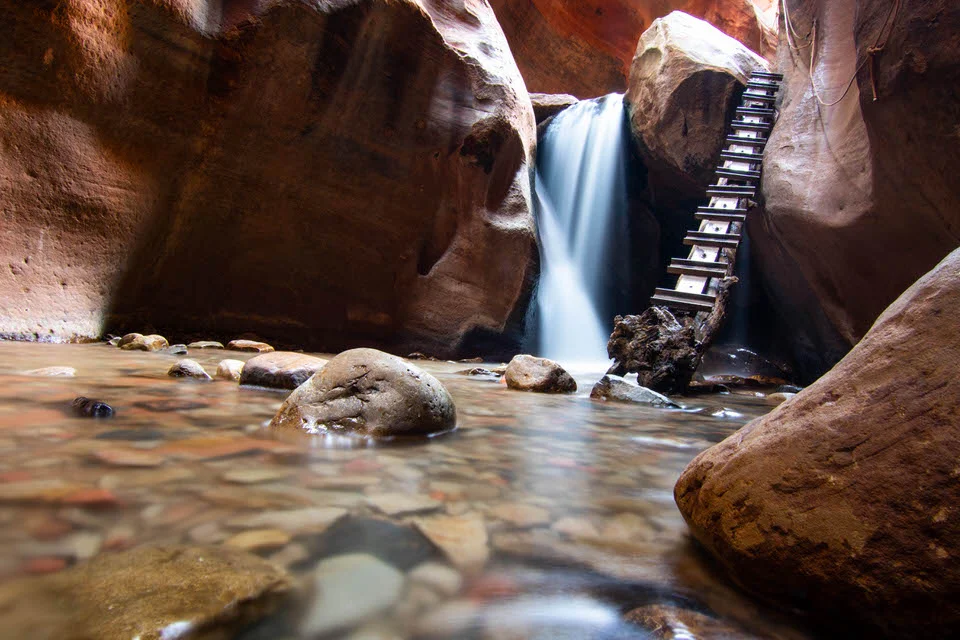
Small waterfall right above Kanarra Falls after climbing the first ladder
KANARRA FALLS HIKE DETAILS
How long is the trail: We tried logging the miles on our GPS, but the tall slot canyons made the accuracy of our GPS a little questionable. It appears that hiking to Kanarra Falls (the first of 2 waterfalls) is about 1.5 miles (one way), and about 2-2.5 miles (one way) to the second waterfall. You can continue further up the canyon if you wish, but some parts may not be maintained and may require special gear to continue. If you are only going to Kanarra Falls you will have an approximately 3 miles round trip hike.
Trailhead Elevation: about 5,625 feet
Elevation gain: roughly 600ft of total gain
Time Required: Plan for 2-5 hours of hiking (depending on your fitness level) unless you continue deeper into the canyon.
Type of Hike: a dirt trail which leads to a slot-canyon where eventually you will be hiking in the water. This is an out and back trail.
Difficulty: difficulty varies depending on how far into the canyon you decide to hike. If you only go to the base of Kanarra Falls then it will be an easy-moderate hike. However, climbing up the ladders above the falls could be potentially dangerous and everyone should asses their own skill levels before continuing forward on the hike.
Permit Required? Yes! Permits are $12 per person including parking and fees. Tickets are limited to 150 hikers per day so advance purchase is strongly recommended.
Water Available? Nothing on site. Bring plenty of water with you before starting this hike.
Pets Allowed? No pets are allowed! This is an important part of keeping the Kanarra Creek clean, so please respect this rule.
Dangers on Trail: As with many slot canyons in Utah, be sure to check the weather for any danger of flash flood warnings. Also, be prepared to hike on uneven terrain and hike in the river to get to the waterfalls. Shoes with sticky rubber and hiking poles are advisable, particularly if you have difficulty with uneven terrain.
Other Tips: We hiked this trail on a Saturday in June, and we avoided the crowds and pretty much had the trail to ourselves by starting out around 7PM. Thankfully, the summertime allows for a lot of daylight, but we did have to turn around early because we knew we were running out of daylight. However, try starting the hike earlier in the morning for a similar experience. Again, respect the rules of the trail.
HOW TO GET TO KANARRA FALLS TRAILHEAD
The trailhead is located in the small town of Kanarraville, Utah a short distance off of Interstate 15, and only about an hour from Zion National Park. Getting to the trailhead is fairly straight forward following google maps, and there are a couple obvious main parking areas for the trail. If it is really busy, be respectful and try not to park in front of peoples homes and on people’s property.
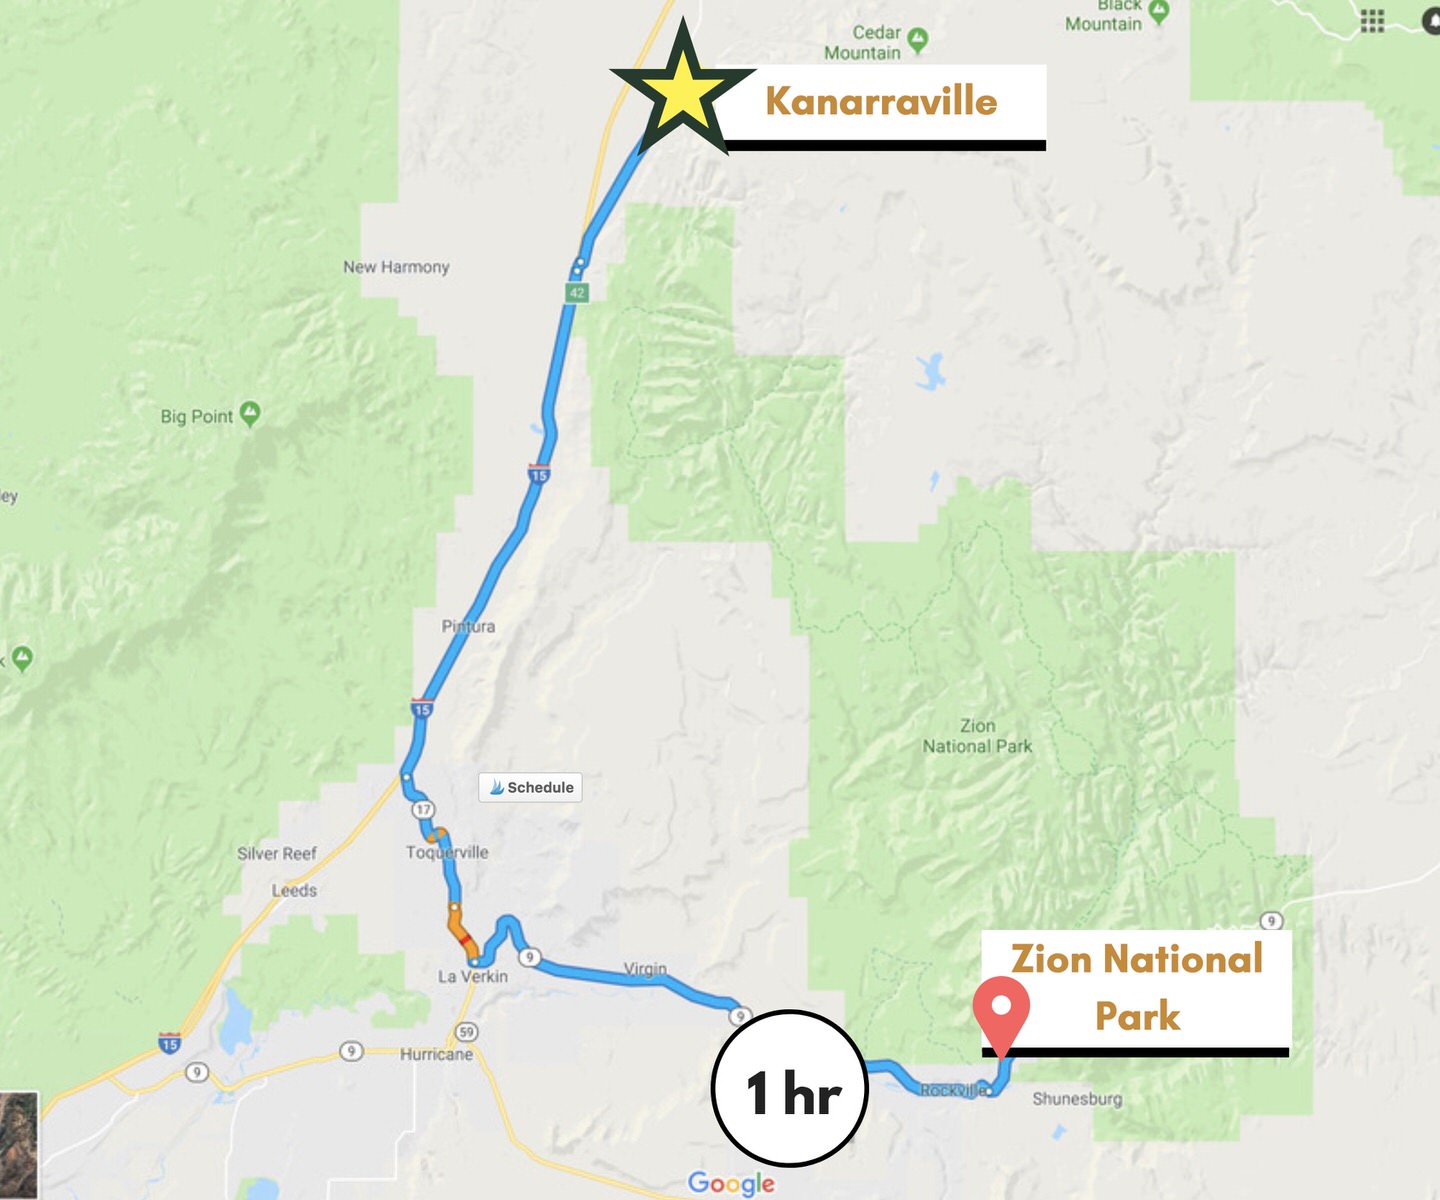
Distance from Zion National Park to Kanarraville, Utah.
MAP OF KANARRA CREEK TRAIL
There is a little kiosk at the beginning of the trailhead where you will pay for your permit to hike the trail, and then following the trail from there is pretty straight-forward, at least to the first waterfall. You’ll be able to stay dry for a big portion of the beginning of the trail by hiking on the sides of Kanarra Creek, but when the trail seems to end, the trail continues in the water into a tall slot canyon to Kanarra Falls. To get above the first waterfall you will climb up a ladder that has (when we were there) rope railings installed to assist you on your way up. Always be sure to check the integrity of the ropes and systems you are climbing on before continuing up any structure. You are responsible for your own safety on the trail. Ropes and ladders can become worn from nature and continual use. The hike continues on to a second waterfall if you wish to go further, and for those who are able to tackle technical canyons you could potentially continue further up. This would require technical gear and skills though and should only be attempted by those who know what they are doing.
Below is a map of the hiking trail. If you click on the image below you will be taken to an interactive map that you can further explore

DOWNLOAD THE GPX FILE FOR THIS TRAIL!
Knowledge is power my friend, and I'm a girl who loves data. Get access to this trails GPX file PLUS my library of GPX files with tracks and waypoints for all the trails loaded onto the She Dreams of Alpine blog.
Load this puppy into your trusted GPS and rest easy knowing you have tracks to follow on your next hike or backpacking trip.
DON’T HAVE A GPS? YOU SHOULD.
I believe every hiker and backpacker should strive to be self-sufficient, and that includes knowing how to practice smart navigational skills in the outdoors.
This is an important safety skill set that I teach in-depth inside of my backpacking program. There’s no reason to risk getting lost in the outdoors.
Here’s what I recommend to get started:
(Note: This list contains affiliate links)
Gaia is offering a special 10% discount on a premium account to those who subscribe online through my link.
Don’t know where to start? If you need help with some Gaia GPS basics, download my quick Gaia GPS navigation 101 guide.
2) Get an SOS Device: Once you are able to, I recommend investing in some sort of SOS communication device like the Garmin inReach Mini or the Garmin inReach Explorer+ . These devices provide not only GPS tracking capabilities, but also an SOS satellite search and rescue communicator and text communication abilities in the backcountry.
My Go-To Trail Setup: The Gaia GPS app (premium subscription) + the Garmin inReach Mini.
Alternative to Garmin: Pair your Gaia GPS App with the Zoleo SOS device . With this set up, the Gaia GPS App serves as your GPS navigation device, and the Zoleo serves as an SOS/communication device.
Learn more about the best GPS devices for hiking here.
When to Hike THE KANARRA FALLS Trail + FLASH FLOOD SAFETY
This trail could potentially be hiked year-round, but there are definitely more optimal times to visit than others. As you can see in the weather chart below, temperatures in the summer can hover into 90 degrees F and so doing this hike in that heat could be potentially exhausting, however, since you are hiking in the water for portions of the hike and near waterfalls and inside shaded slot canyons, you could likely still manage. On the flip side, this area of Utah gets very cold in the winter months. In my opinion, the best time to do the Kanarra Falls Hike would be anywhere from April to October.
The biggest risk, weather-wise, on this hike is flash floods. It might not be raining where you are at the trailhead, but flash floods can start from different areas of Utah and travel to this canyon and still be unsafe. It is always best to check the weather ahead of time and be aware of any flash flood warnings that are in place. The most common months for flash floods are July, August and September. Flash floods happen fast and are no joke, so don’t hike this if there is a storm rolling in or if it is raining.

COST TO HIKE AND PERMITS NEEDED

You must get a permit to hike this trail. Here are a few more details on the permit system and cost.
Hiking Permits are now $12 per person including parking and fees.
Tickets are sold on a first-come first-served basis and are limited to 150 hikers per day. Advance reservations are strongly recommended.
You can either purchase in advance online at Kanarra Falls website or purchase them at the trailhead. There are NO CASH purchases allowed though, and you must use credit card or debit card.
If you choose to purchase your permit in advance, there are no refunds… rain or shine.
Group permits are not offered for the 2019 season.
USEFUL GEAR TO BRING ON THE HIKE

Here’s what we recommend having with you on your hike to Kanarra Falls.
1) Grippy Shoes: Since for part of this hike you will be hiking through water, it is useful to bring closed toed shoes and shoes with “grippy” rubber that allow for more stable hiking in the water. If you have weak ankles it could also be nice to have a shoe that has ankle support as well. We like hiking in our 5.10 Guide Tennies.
2) Hiking Poles: If hiking on uneven terrain is not your forte, it could be useful to bring a pair of hiking poles with you to help stay balanced while hiking in the water and over the river rocks. My favorite hiking poles are the Black Diamond Trail Pro Trekking Poles.
3) Camelbak for Water: Bring plenty of water on the hike and avoid drinking from the Kanarra Creek. Camelbaks are our favorite way to pack out lots of water in the summertime.
4) Dry Bag to Store any Electronics or Keys: in the unfortunate event that you drop your backpack in the water or get it wet in the waterfall, it could be nice to have some sort of waterproof container to hold your electronics and keys. We like to use dry bags anytime we will be hiking in or around lots of water.
If you are looking for more suggestions on day hiking gear that we recommend, check our article on the best day hiking gear.
Grab My Day Hiking Packing List

KANARRA CREEK TRAIL OVERVIEW

The base of the first waterfall, Kanarra Falls.
As I mentioned above, we started our hike at 7PM in the summertime on a Saturday and there was nearly no one at the trailhead. This made for easy parking right at the trailhead too. It looked like maybe there was a water spout at the trailhead, but we didn’t test it out so I don’t want to tell people to rely on being able to fill up on water at the trailhead. We paid for our permits and then headed up the trail through the gates.
The trail was well maintained and easy to follow, it also felt like the elevation gain was all very gradual.

Eventually our hike was weaving around the side of Kanarra Creek until we finally reached a point where you had to start hiking in the water, up into a tall slot canyon. For some reason, when we were there, there was a tall Cairn stone marker on the other side of the creek, which made us think that we weren’t supposed to go inside of the slot canyon and instead follow the Cairn into the other side of the creek. This was a mistake though, and we quickly saw how poorly people had been treating this area. There was leftover toilet paper all over the place, and obviously someone just built that Carin for “fun” as it served us no purpose and we turned around.

Start out hiking alongside Kanarra Creek.

Some creek crossing involved at the beginning.
Come on people, a little rant ahead… Use the bathrooms that are provided to you at the trailhead, and in an emergency, bring your own zip lock bag to carry out your dirty toilet paper. Maybe more trails should be treated like the Whitney Portal area, where you have to carry out your own waste. Also, don't build Cairn stones just for fun. Cairns are meant to help guide you through confusing terrain on unmarked trails, like hiking up to the summit of Mount Langley. They are a just ruining the trail when they are built for no reason. Leave the rocks in their place. Rant over.

We love hiking through slot canyons, and this one was just as amazing. When we got to the first waterfall we were amazed that we were the only people there and were very happy to be enjoying Kanarra Falls all to ourselves, a privilege we had not been expecting. We spent some time enjoy the waterfall, and then hiked up the ladder to check out what was above it. At the time of our visit, the ladder and rope railing on the wall seemed in good shape and sturdy. However, it looked really easy to slip on the ladder since it was wet the whole time.

Entrance to the slot canyon, where you will start walking in the water.

Water wasn't too deep at the time of our visit, about ankle high.
Since we started our hike later in the day we had set a turnaround time limit for ourselves (especially because we had forgotten our headlamps), and so we didn’t get to continue on much further into the canyon, but I hope that someday we can come back and go even further back.

According to other online sources, you can continue even further to a second waterfall where there is another ladder that you have the option of ascending at your own risk. The state of the ladder at the second waterfall is typically unknown at any given moment so asses it at your own risk.
We are really glad we stumbled across the Kanarra Falls Hike, recommended by a friend who had recently hiked there. We had been driving for about 7 hours previously that day, making our way up through Utah from California and this was a much needed break for us before we set up camp outside of Zion National Park.
Let us know if you've visited the Falls, and tell us about your experience in the comments below!
Cheers,
Allison


Related Posts:


How to Get a Mt. Whitney Permit: Understanding the Permit & Lottery Process for Day Hiking and Backpacking the Whitney Area | Mount Whitney is the tallest peak in the lower 48 states, which makes it a very popular peak to hike and climb. Due to its popularity, there is a very structured permit process, and this post covers everything you need to know about grabbing Mount Whitney permits so you can plan your hike up this epic California peak. | shedreamsofalpine.com