Your Ultimate Guide to Backpacking the Trans-Catalina Trail on Catalina Island
The Trans-Catalina Trail was on my backpacking wish list for a long, long time, but it isn't the most logistically easy place to get to and coordinate. In fact, it took me about 6 years of living in California to finally get the needed campsite reservations in order to complete this trail! It was totally 100% worth it though!
I will add the caveat that backpacking Catalina Island is sort of like the Havasu Falls Trail in that it requires that you spend a bit of money in order to get there and hike the trail, but just like Havasu, it is worth every penny! I'm so glad we got around to finally doing it.
The Trans-Catalina Trail circumnavigates Catalina Island, which is located off the coast of Southern California, on Tongva, Payómkawichum, and Kizh native lands. It is one of a kind, and one you aren't likely to forget the experience, from the boat ride over to the island to the hilly sea-side views.
In fact, it wasn't our first time out to Catalina. We took a sailboat to Catalina Island with the LA Sailing club one time, which was another amazing trip! I also ran my first half marathon on Catalina Island. It really is a super special place, and it should be on your list to visit regardless if you backpack the whole trail or not.
But if you're looking for a trail that is challenging but beautiful, mountainous but near the ocean, secluded but still very close to civilization, backpacking the Trans-Catalina trail is a perfect adventure for you! This would also be a great trail to do solo, particularly if you were looking to take your first solo-backpacking trip.
Find all the juicy details below on how to make this dream backpacking trip a reality!
Also, big thanks to my husband Michael for all his beautiful photos of the trail down in the Trip Report section. Be sure to check them out!
WHAT WE WILL COVER IN THIS GUIDE:
This guide is designed to provide all the info you need to backpack the Trans-Catalina Trail and enjoy your time on the trail. If you are looking for something specific, I have broken this post down into the following sections:
Trans-Catalina Trail Stats - All the key details for the trail in one spot. Mileage, elevation gain, & more.
Trans-Catalina Trail Map & GPX Files - A map of the entire trail, including the elevation gain/profile of the hike. You can download this as a GPX file to use on your own personal GPS device.
When to Hike the Trans-Catalina Trail - Details about the best time to hike the Trans-Catalina Trail and the typical weather to expect on your trip.
How to Get to the Trans-Catalina Trailhead - Logistics about the ferry to Catalina Island and taxi service on the island.
Trans-Catalina Trail Permit & Campsite Reservations - Everything you need to know about reserving campsites for your Trans-Catalina backpacking trip.
What to Bring on Your Trans-Catalina Trail Backpacking Trip: The essential packing list for backpacking the Trans-Catalina Trail. Don’t hit the trail without these things!
Itinerary for Backpacking the Trans-Catalina Trail - I’ll walk you through my experience and suggested itinerary for hiking the Trans-Catalina Trail.

GRAB MY [FREE] OUTDOOR BACKPACKER STARTER KIT:
I created the Ultimate Outdoor Backpacker Starter Kit for you (and it's FREE)! This starter kit is filled with 14 pages of my best hiking and backpacking tips to help you learn what it takes to become a safe, confident, and self-sufficient outdoor backpacker!
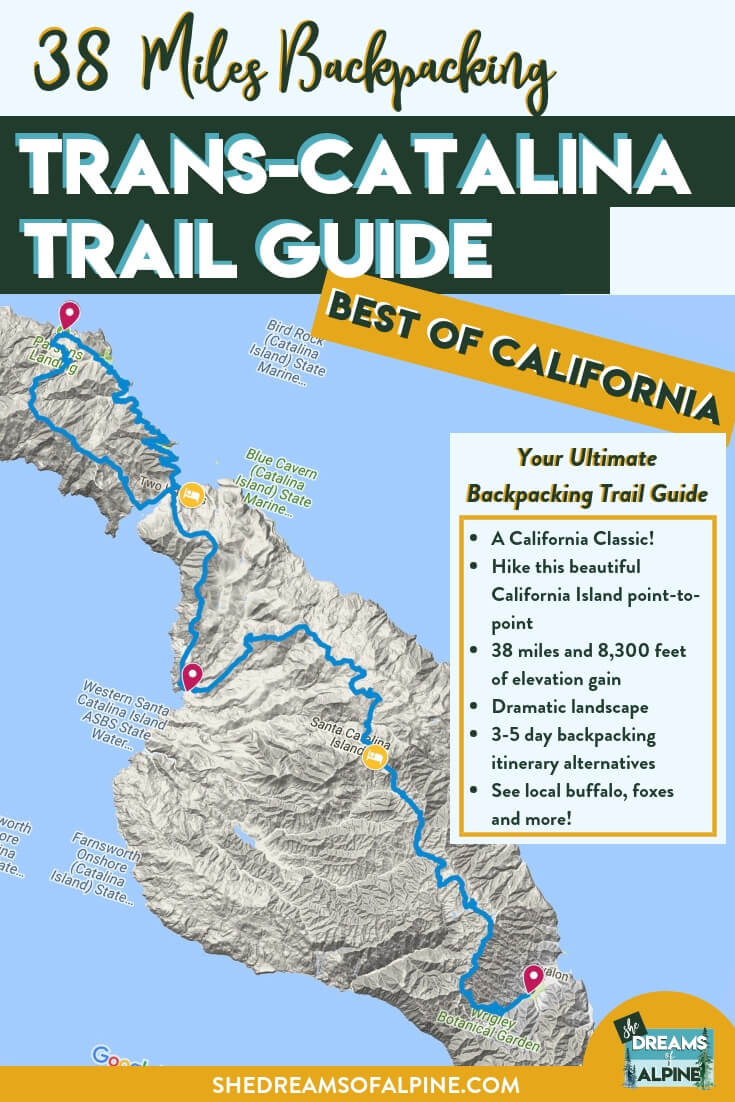
TRANS-CATALINA TRAIL STATS
How long is the Trans-Catalina Trail? ~38.5 Miles Round Trip (Avalon to Parsons Landing to Two Harbors)
Total Elevation Gain: 8,329 feet
Trailhead Elevation: You’re basically starting at sea level!
Highest Point on the Trail: 1,748 feet
How long does it take to backpack the Trans-Catalina Trail? 3-5 days depending on your preference and/or fitness level.
Do you need a permit for the Trans-Catalina Trail? Campsite reservations are required!! These count as permits for backpackers. You’ll need a free permit for day hiking.
Is there drinking water available along the Trans-Catalina Trail? Several water sources are available along trail, no water filters needed.
Is hiking the Trans-Catalina Trail dog-friendly? Nope. Leave your dogs at home for this one.
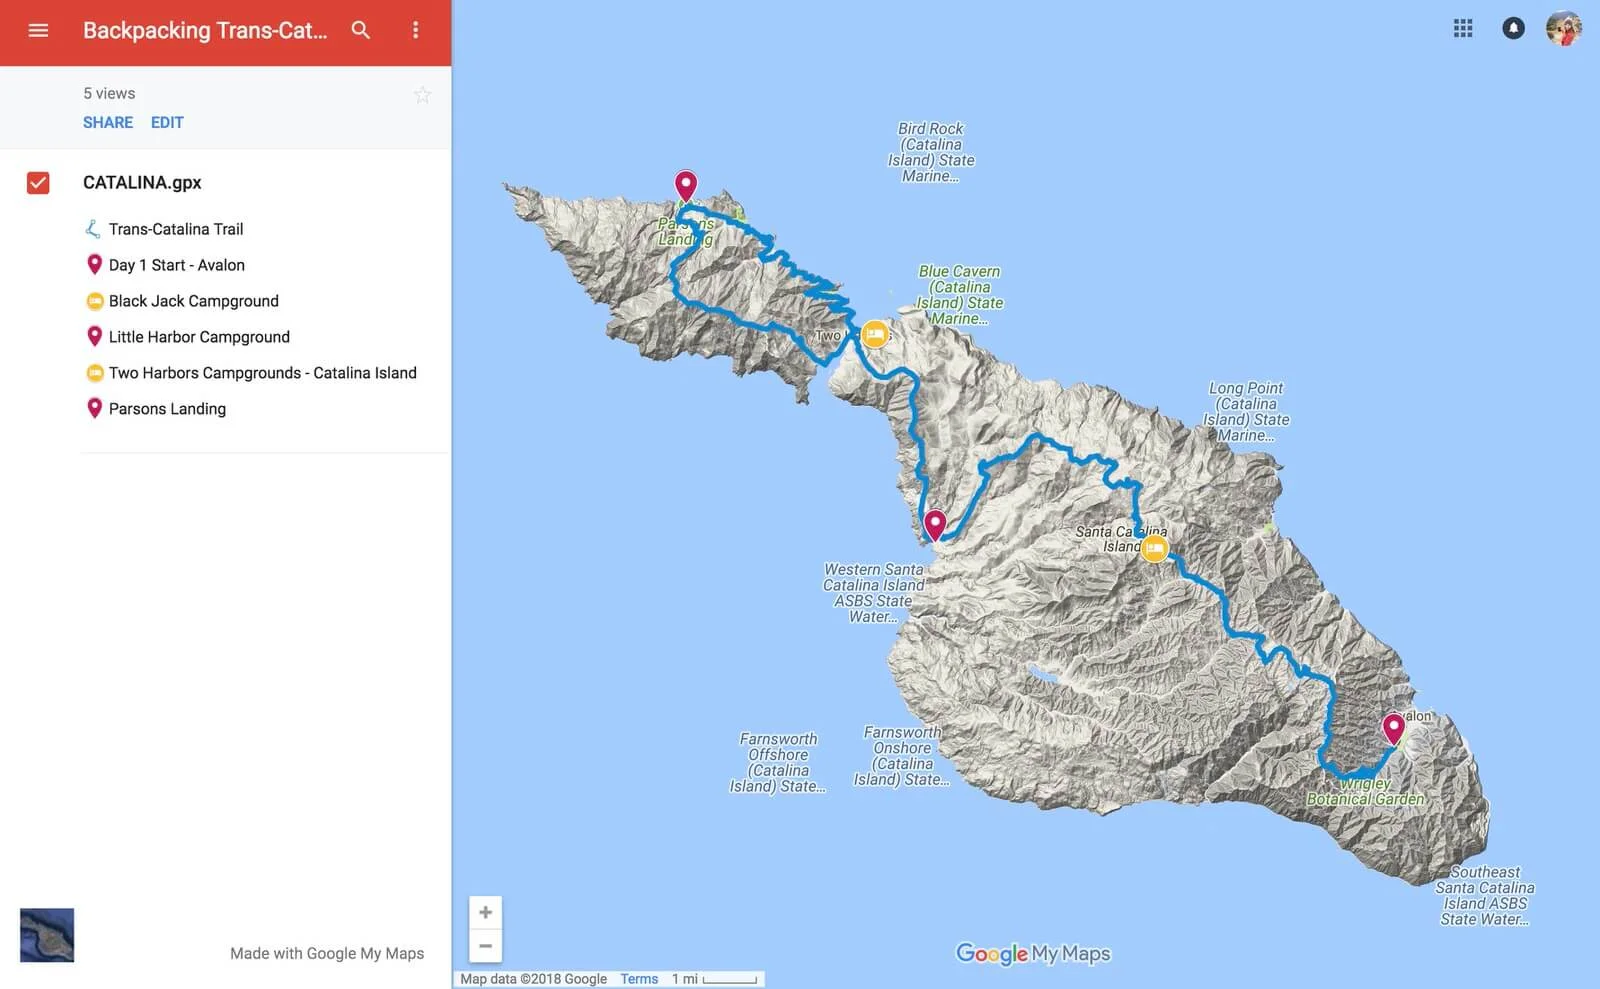
TRANS-CATALINA TRAIL MAP & GPX FILES
Below is a map of our backpacking trail from my GPS. If you click on the image, you will be taken to an interactive map that you can further explore.
Our group decided to hike this trail in three days, but you can easily adapt this for 4 or 5 days. Also, I want to note that we only hiked the "official" trail out to Parsons Landing and back to Two Harbors. Some people choose to extend their trip by hiking all the way out to Starlight Beach, which would require some extra time in your itinerary. In the Itineraries in this post, I assume you will only hike out to Parsons Landing.
3-DAY ITINERARY - What we did!
Day 1 - Hike ~10.7 miles from Avalon to Black Jack Campground
Day 2 - Hike ~14.5 miles from Black Jack Campground to Two Harbors Campground
Day 3 - Hike ~14.6 miles from Two Harbors Campground - out to Parsons Landing - back to Two Harbors Campground
4-DAY ITINERARY
Day 1 - Avalon to Black Jack Campground
Day 2 - Black Jack Campground to Little Harbor Campground
Day 3 - Little Harbor Campground to Two Harbors Campground
Day 4 - Two Harbors Campground - out to Parsons Landing - back to Two Harbors Campground
5-DAY ITINERARY
Day 1 - Avalon to Black Jack Campground
Day 2 - Black Jack Campground to Little Harbor Campground
Day 3 - Little Harbor Campground to Two Harbors Campground
Day 4 - Two Harbors Campground to Parsons Landing Campground
Day 5 - Parsons Landing Campground to Two Harbors Campground
IF YOU WANT TO DIG FURTHER INTO THE ITINERARY OPTIONS - Check out our Detailed Guide to the Trans-Catalina Trail Map. I go much more in-depth on each of the different sections of the trail and the itineraries here.

DOWNLOAD THE GPX FILE FOR THIS TRAIL!
Knowledge is power my friend, and I'm a girl who loves data. Get access to this trails GPX file PLUS my library of GPX files with tracks and waypoints for all the trails loaded onto the She Dreams of Alpine blog.
Load this puppy into your trusted GPS and rest easy knowing you have tracks to follow on your next hike or backpacking trip.
DON’T HAVE A GPS? YOU SHOULD.
I believe every hiker and backpacker should strive to be self-sufficient, and that includes knowing how to practice smart navigational skills in the outdoors.
This is an important safety skill set that I teach in-depth inside of my backpacking program. There’s no reason to risk getting lost in the outdoors.
Here’s what I recommend to get started:
(Note: This list contains affiliate links)
Gaia is offering a special 20% discount on a premium account to those who subscribe online through my link.
Don’t know where to start? If you need help with some Gaia GPS basics, download my quick Gaia GPS navigation 101 guide.
2) Get an SOS Device: Once you are able to, I recommend investing in some sort of SOS communication device like the Garmin inReach Mini or the Garmin inReach Explorer+ . These devices provide not only GPS tracking capabilities, but also an SOS satellite search and rescue communicator and text communication abilities in the backcountry.
My Go-To Trail Setup: The Gaia GPS app (premium subscription) + the Garmin inReach Mini.
Alternative to Garmin: Pair your Gaia GPS App with the Zoleo SOS device . With this set up, the Gaia GPS App serves as your GPS navigation device, and the Zoleo serves as an SOS/communication device.
Learn more about the best GPS devices for hiking here.
ELEVATION PROFILE
Below is a look at the elevation profile for the entire Trans-Catalina Trail:
I created this elevation profile map myself, you are welcome to use it on your own site for more descriptive detail on elevation details on the Trans-Catalina Trail. All I ask is that you link back to my website for credit.
WHEN TO HIKE THE TRANS-CATALINA TRAIL
The Trans-Catalina Trail can typically be hiked year-round due to the favorable weather on the California coast, although it is more popular to hike in spring, summer, and fall.
See the chart I created below for more details.

HOW TO GET TO THE TRANS-CATALINA TRAILHEAD
The main logistical obstacle of getting to the Trans-Catalina Trail is coordinating your ferry rides to and from Catalina Island. We opted to take the ferry in to Avalon and then leave from Two Harbors, but you could also decide to start at Two Harbors and take a ferry into Two Harbors then take a ferry out of Avalon. However, the tricky thing with that option is that Two Harbors has less frequent ferry options than Avalon.
Another option if you want to start at Avalon would be to take a taxi from Two Harbors to Avalon once you've completed your hike, since there are taxis on Catalina Island.
There are several ferry options going to and from Avalon. From the California mainland, you can take a ferry out of:
San Pedro, California
Long Beach, California
Dana Point, California
However, the only place that ferries to and from Two Harbors campground is San Pedro.
We decided to take the ferry from San Pedro to Avalon on their early morning 8AM ferry ride, and then we left Two Harbors for San Pedro at 2PM. This meant on our third day (when we had about 13-14 miles to hike), we had to start really early in the morning.
Our back up plan (if things went wrong for some reason) was to take a taxi to Avalon if we missed the ferry in Two Harbors. It didn't end up being an issue though, and we were confident we could make that timeline with a little bit of an "alpine" start mentality.
Pricing: A round trip ticket to and from Catalina Island will cost you about $84 a person. You can book your tickets for the Catalina Express online. You might find some other deals available, but go over the details carefully before purchasing any of them because sometimes it is a different kind of boat and only leaves Avalon at inconvenient times.
Below you can see a map of the different ports to Catalina Island.

TRANS-CATALINA TRAIL PERMIT & CAMPSITE RESERVATIONS

These are the Trans-Catalina Trail permit details as of 2024. You can also check my Permit Deadlines and Reservations for Popular California Hiking Trails and Campsites post for details on more trail permits in California.
When to Apply:
For this trail, you primarily need to worry about booking campsites in advance. It will ultimately depend on how many days you are splitting your trip up into, but the main campsites are Hermit Gulch Campsite, Black Jack Campground, Little Harbor, Two Harbors, and Parson’s Landing. Permit reservations can be made roughly a year in advance.
Campground Options:
Hermit Gulch - The only campground near Avalon, otherwise you can stay at a hotel in Avalon. We actually didn't stay in Avalon at all, and just started our hike immediately upon arriving there.
Black Jack - This is a primitive campground.
Little Harbor - This is a beautiful campground located on a more secluded side of the Two Harbors area.
Two Harbors - This campground offers tent and cabin camping and is located closer to the town of Two Harbors.
Parson’s Landing - This is a primitive campsite, but you can plan ahead and reserve a locker with a bundle of firewood & a jug of water to pick up here.
Permits for all campsites can be made roughly a year in advance either online at Catalina Island Company, where you can specifically book all your TCT campgrounds at once, or by phone at 310-510-4205.
How Much Does it Cost:
Campground rates vary based on time of the year and range from $30 to $32 per night per person. Yup, you heard that right, I'm not going to sugar coat it – it is expensive! We spent about $110 per person on campsites and $70 per person on the ferry. That is about $180 per person for the whole thing, similar to the cost of the Havasu Falls Trail.
There are ways to make this a little cheaper though!
Make sure to call the booking office at 310-510-4205 to waive the two-night minimum required for certain campgrounds on Friday & Saturday during peak season. While the website will require you to book the two nights, the office will waive that requirement for Trans-Catalina Trail hikers.
Plan your trip during the off season! Fees are a few dollars less in the winter.
WHAT TO BRING ON YOUR TRANS-CATALINA BACKPACKING TRIP

I have listed some basic items to remember to pack on your backpacking trip here, but it is not a comprehensive list. Be sure to check the weather and pack appropriately. And I highly recommend trekking poles for the Trans-Catalina Trail!
*Please note that some of the below links and in this post are affiliate links.
15) Camera: Don't forget to pack a camera or a phone to capture your hike! You can read our post on the Outdoor Adventure Photography Gear we use if you want details on the cameras we recommend for outdoor photography, but also you can't go wrong these days with your phone camera either. Your choice!
19) Clothing (based on time of year you’ll be hiking): For details on clothing, hiking boots, and socks we recommend, I suggest reading our Essential Hiking Gear List. The weather temperature is fairly consistent on Catalina Island, so there shouldn't be too much to anticipate besides potential rain. As for footwear, definitely bring a good pair of hiking boots and at least 2 pairs of wool socks.
For more detailed descriptions on gear that we like and recommend, check out our Essential Hiking Gear List.
GRAB MY [FREE] FULL BACKPACKING PACKING CHECKLIST!
Want a full list of everything I recommend to take backpacking with you? Download our free backpacking packing checklist below! This download also includes my layering tip-sheet PLUS 25+ backpacking food ideas.

ITINERARY FOR BACKPACKING THE TRANS-CATALINA TRAIL
Here is a detailed breakdown of our 3-day itinerary backpacking the Trans-Catalina Trail.
Day 1 – Hike ~10.7 miles from Avalon to Black Jack Campground
We drove up to San Pedro the morning of our 8AM ferry ride to Catalina Island, so it was a pretty early wake up call on the Friday morning of our first day of hiking. We already bought our ferry tickets online so we just walked in and got in line for the ferry.
The ferry ride to Catalina Island is only about 45 minutes. It was a great time for us to catch up a bit since my friend Ashima lives in the Bay Area, and I never see her anymore!

Usually, I am ultra-prepared on backpacking trips. I have a trail GPX file pre-downloaded to my GPS, I have a map all ready to go, and I know exactly where to start. But because I knew this wasn't going to be the middle of nowhere in the alpine (there are two towns on Catalina Island, and lots of tourists!), I was a bit more relaxed on this trip.
So we showed up and started looking for an information center, because I thought we needed to pick up hiking permits. The information center we went to on the beach told us to go to the Catalina Island Conservancy, so we turned toward town and started hiking there.

It is pretty funny at first because you look super nerdy with all your backpacking gear, and you are hiking through the center of Avalon with tons of other tourists who are there just to enjoy the cute town.
When we reached the Conservancy, they told us we didn't need an official backpacking permit as long as we had campground reservations. I just ended up buying a map there. The lady at the Conservancy also told us that there was plenty of water along the trail (marked on the map).
She also told us to zip our tents from bottom up…because apparently the foxes are crafty in Catalina. Looking at the photo below, they look more sleepy than crafty to me, but maybe that is what they want you to think?

And this is the only group photo we snapped that has all of us in it – a collection of my favorite humans!

We slathered on some sunscreen and then hit the trail, or asphalt rather. You hike on the road for a bit until you reach a turning point for the trail at Hermit Gulch Campground in Avalon. Then, my friends, it is a steep, steep climb up. You get most of your elevation gain on the first day on the very first part of your hike toward Black Jack Campground.

Even though it was early April when we hiked this, it was pretty hot, so we were sweating big time when we reached the top of the first big incline.
Once you reach the top though, you get some great views of Avalon and the trail system in Catalina. It's stunning!

At the top of the first hill, Michael realized he left the micro SD card at home for the drone, so sadly he had to carry drone weight the whole trip but never got to use it!

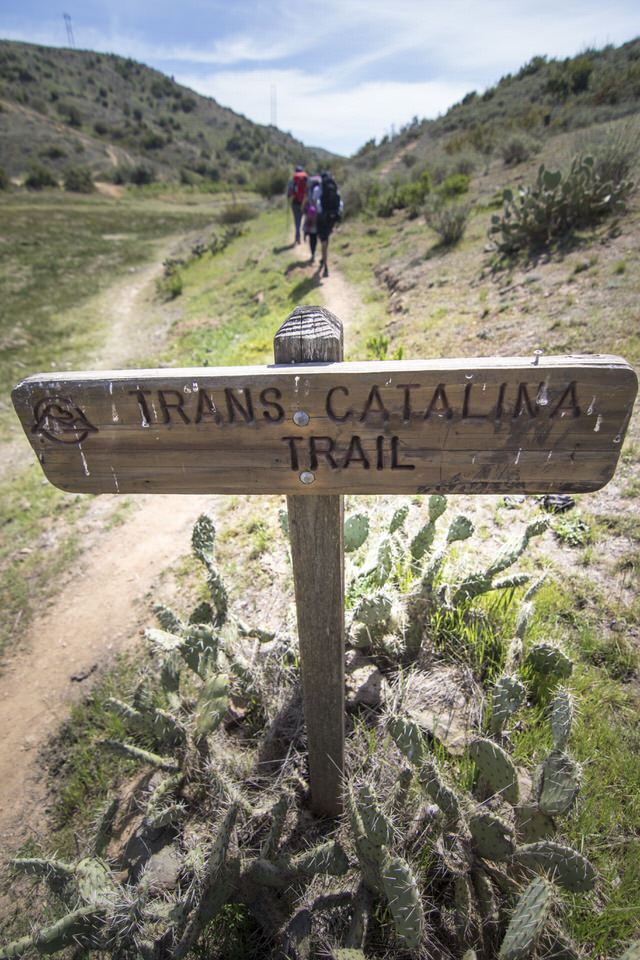
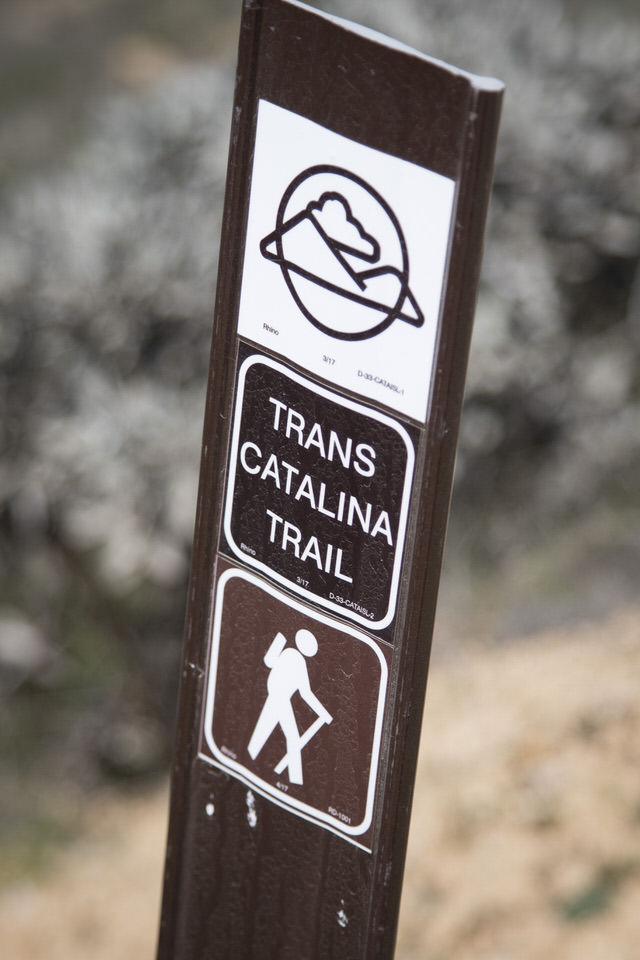
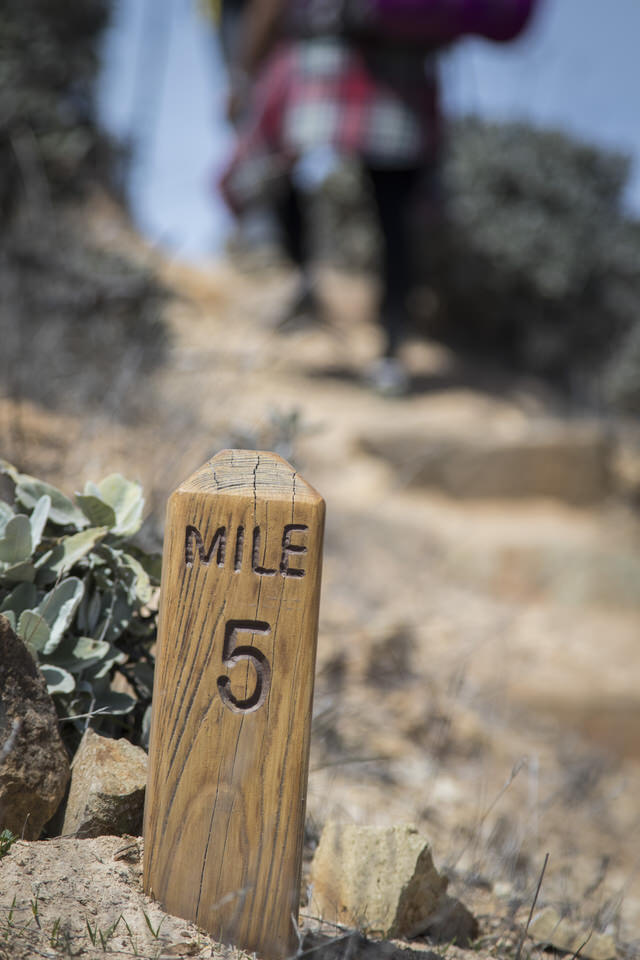
Staying on the official trail during your Trans-Catalina hike is very straightforward. Even though there are a lot of diverging trails, there are a ton of signs and mile markers along route to keep you on the main Trans-Catalina hike. The three photos below show you the kinds of signs to keep an eye out for.
This is one of the reasons I think the Trans-Catalina Trail would make a great solo backpacking trail if you are a first timer to solo backpacking. The trail is well marked, you aren't far from civilization, and it's beautiful!
The rest of day one was a series of ups and downs on our walk toward Black Jack Campground.

We stopped at the Haypress Recreation Area to fill up on water before continuing on our hike. The water at Haypress is fine to drink straight up, no need to filter it. In fact, all the designated water areas on Catalina should be OK to drink from without filtering beforehand.
At Haypress, we also got to see our first buffalo of the trip! One of my big goals during this hike was to finally see some buffalo! I have been to Catalina at least three times already but had never seem to run across them. We ended up seeing quite a few buffalo the first day of our hike on the Trans-Catalina Trail. It’s definitely unique to be hiking on an island with buffalo!


Poor Michael didn't really get many photos taken of him on the trip since he was the main photographer, but we managed to snag one, so I had to add it in here. It’s on this little bench made of Trans-Catalina trail signs.

We made it to our campsite area with plenty of daylight to spare. The campsites are called "primitive" online, but it is nothing like what I would call primitive. In fact, it was pretty luxurious if you ask me!
There were benches, fire pits, bathrooms (with toilet paper!), and "buffalo" boxes. Your campsites are assigned in your reservation, so you just go and set up in your assigned spot. We never got approached by any campsite host or ranger while at the campground.

We were all really tired from waking up super early, so we didn't have any trouble falling asleep.
Day 2 – Hike ~14.5 miles from Black Jack Campground to Two Harbors Campground
We weren't in a huge rush on day 2, even though we had quite a bit of mileage to cover. So we took our time waking up and getting ready in the morning and then headed off into the foggy hills.

The whole day was super overcast, foggy, and dream-like. It turned out to be really nice because it shaded us from the heat of the sun and added a cool aspect to that part of the hike. It didn't really even feel like we were hiking on an Island.
We also saw some more buffalo!

Classic power nerd pose.

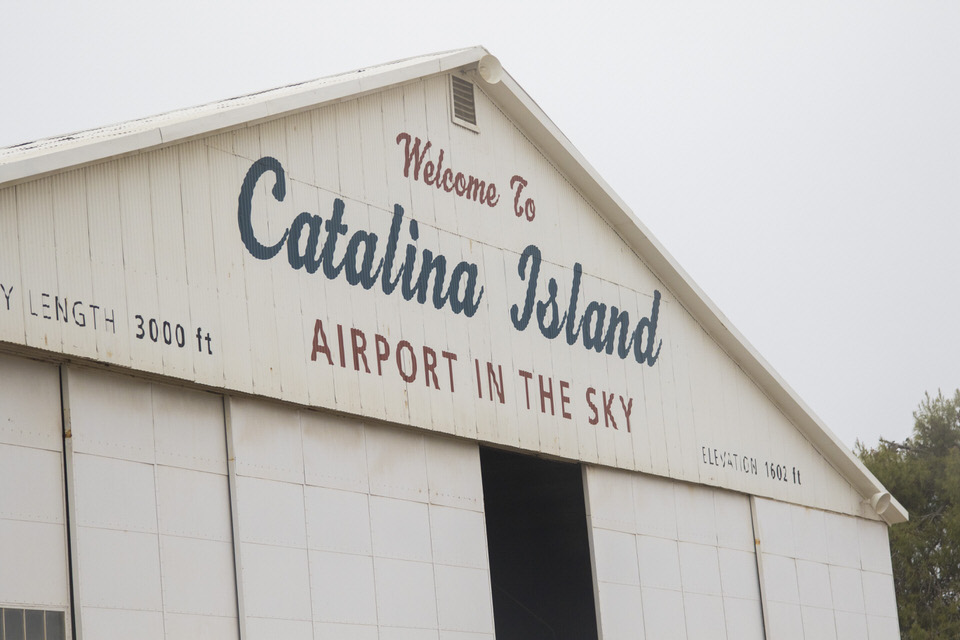
Not that long into our hike on the 2nd day, we came across the Catalina Airport and decided to go check it out and use their bathrooms. We ended up staying there for around an hour or so, grabbing food and coffee, because... why not?
This backpacking was starting to feel very glamorous. First there were toilets at the "primitive" Blackjack Campground, then there was a cafe right in the middle of the trail!
We have plenty of moments of suffering in the mountains, so we decided to embrace the island blessings of food and coffee. If we had known beforehand how many options there would be along the trail for snacks and food at restaurants, I probably would've packed less food.

Once we were finished spoiling ourselves at the airport, we continued on our way, up and down, up and down. There is a surprising amount of elevation gain on the Trans-Catalina Trail. Had I done some more thorough research beforehand, I would've seen that each day had about 3,000-4000 feet of gain. Not too shabby!
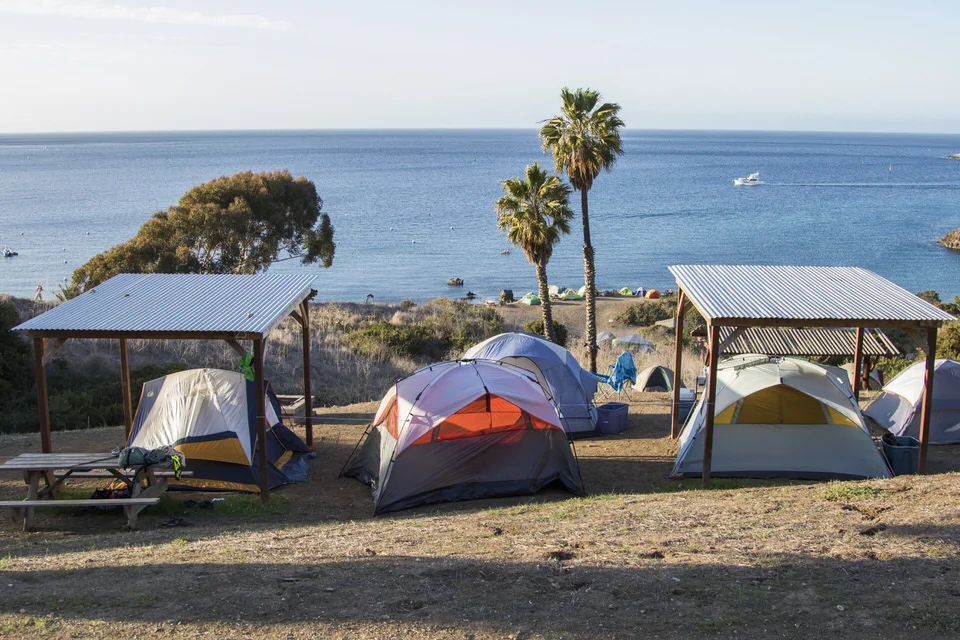
Sometimes hikers opt to camp at Little Harbor Campground, which you can see in the photo below. I really wish we could've stayed here, but it just didn't make sense, since we only had 3 days to complete the hike. If you do have more time though, I would definitely check it out. It looked so nice and secluded, right along the beach.

Once you get to Little Harbor, you will hike another big hill up, and then travel along some beautiful coastline on the western side of the island.

By the end of day 2, we were all feeling very exhausted, so it was so awesome to see Two Harbors in the distance! So beautiful too!

We decided to spoil ourselves again and instead of hiking straight to our campground, we ended up hiking right into town to eat some real food.


Food and beer mid-backpacking trip? Yes please. This is what true happy campers look like.

Eventually, we did make our way over to the Two Harbors Campground. While you have to hike about an additional half mile to get there, it is another beautiful campsite, right along the coast. Again, there were tons of amenities, including port-a-potties, picnic tables, etc.
We had to go to bed early on day 2 because we had an early wake up call for our 3rd day on the trail.
Day 3 – Hike ~14.6 miles from Two Harbors to Parsons Landing & back to Two Harbors
If I remember correctly, we woke up around 3:30 AM so that we could be off on the trail by 4AM. An island alpine-start! Our ferry would be leaving at 2pm from Two Harbors, and we had over 14.5 miles to cover.
It was a little strange starting a hike in the same place you would end it. It would have been really easy to just say, "mehhh, lets just be beach bums," but I'm glad we stuck to our guns and finished up the remaining part of the Trans-Catalina Trail, because it was awesome!

Day three was probably the most epically beautiful day out of all the hiking we did on the Trans-Catalina Trail. I am guessing it is partially because we decided to get up early before sunrise to start our hike on the third day. We were rewarded with the most beautiful sunrise I've ever seen, and some amazing hiking above the clouds on Catalina Island.

And to be honest, even though on the map the uphill part of day three looks terrifying, it actually went by really fast. It was probably partially due to the fact that we did the worst bit in the dark, but also the views made the pain a bit more distracting.

Just gorgeous.

Once you get most of the uphill completed on day three, you are pretty much done with the hard part. It is mostly all downhill to Parsons Landing.


Some portions of this trail were super steep though, so I definitely advise that you bring hiking poles. We all pretty much ate it at one point or another on this part of the trail.


I really wish we could've stayed the night at Parson's Landing. Out of all the campsites we came across, it felt the most "primitive" and isolated, and it was right on the beach. We did at least stop there for a bit to eat and rest our feet.

But then we were determined to finish up the hike!

From Parson's Landing back to Two Harbors is another beautiful stretch of the Trans-Catalina Trail, and you get views of the ocean pretty much the entire hike back.

We enjoyed sharing the trail with some other small creatures of the island.

The last few miles were hard because our feet were pretty tired, but the views made it oh-so worth it.


We made it back to Two Harbors with a few hours to spare before our ferry boat left back for the mainland! I'm sort of glad our ferry departure forced us to wake up early, because otherwise we would've missed the beautiful sunrise that morning.
All in all, it was a really great trail! Expensive yes, but absolutely gorgeous.
I also was surprised by how challenging it ended up being. I think I went into the hike thinking it would be a very "chill" hike, but I didn't realize how much gain and mileage we would be doing each day.
If you want to challenge yourself, definitely consider hiking this in 3 days, but if you want to take your time enjoying the island, extend your trip and stay at Little Harbor or Parsons Landing.
The Trans-Catalina Trail was an awesome hike to add to the books, and another great memory of Catalina Island. Are you adding this trail to your backpacking bucket list?
LOOKING FOR MORE AMAZING CALIFORNIA HIKING ADVENTURES?
Check out our resources below for info on some of the most epic trails in California:
ESSENTIAL HIKING (OR BACKPACKING) RESOURCES
Also be sure to check out these essential hiking resources!
7 Tips to Hiking and Summitting Your First Fourteener Mountain
California backpacking permit process for popular trails and campsites
Cheers,
Allison - She Dreams of Alpine


Related Posts:


Your Ultimate Guide to the Angels Landing Hike in Zion National Park | The Angels Landing Trail is one of the most iconic hiking trails in the Untied States for a reason. It has every quality an amazing day hike needs: physical challenge, beautiful views, and epic adventure! This trail will test your mental strength as you make your way up the narrow steep spine toward the top of Angels Landing, but, trust me my friend, it’s well worth it! Check out our full trail guide & safety tips for hiking the Angels Landing trail here! | shedreamsofalpine.com