The Ultimate Guide to Backpacking Isle Royale (in Lake Superior)
Isle Royale National Park is the least visited national park in America, but is the most revisited. Backpacking Isle Royale is an incredible experience – no matter what trail or route you choose, Isle Royale is a guaranteed good time!
Isle Royale National Park offers some of the most pristine wilderness you could hope to find in a National Park since it sits on an island in Lake Superior. The island is only accessible by Isle Royale ferry or seaplane.
Even on “crowded” days when the campgrounds were full, the trail seemed to be practically empty, with only a few other hikers on the trail. Berry plants and ferns over four feet tall, coupled with swampy lowlands stamped with the occasional massive moose print, give Isle Royale a very Jurassic vibe.
While Isle Royale is notoriously logistically heavy planning and time-consuming just to get to, once you’re there it’s clear why all that planning is so worth it! In this trail guide, Kellie from Team Alpine will give you all the details of her experience backpacking Isle Royale, including the 7-day Isle Royale backpacking itinerary of a loop she routed to save time and money.

WHAT WE WILL COVER IN THIS GUIDE:
There is a lot of information in this post, so if you are looking for something in particular, feel free to skip ahead to one of the specific sections.
In this backpacking Isle Royale trail guide, we will cover the following topics to help you plan and prepare for your very own successful Isle Royale hiking adventure:
Isle Royale Trail Stats - All the nitty gritty details for the trail in one spot. How many miles, elevation gain, & more.
How to Get an Isle Royale Permit - Needed for backpacking Isle Royale.
Day Hiking Isle Royale vs Backpacking Isle Royale – Explore which option is best for you!
Best Time to Hike Isle Royale– Details about the best time to hike Isle Royale and typical weather to expect on your trip.
Isle Royale Hiking Map & GPX Files - A map detailing the whole trail that you can explore, including a look at the elevation gain/profile of the hike. You can also download this file as a GPX file to upload into your own personal GPS device.
How to Get to Isle Royale – Isle Royale is, well, an island, so we’ll cover Isle Royale ferry and seaplane info to get there.
Isle Royale Camping – Where to camp on and off the trail when visiting.
Itinerary for Hiking Isle Royale - Team Alpine’s Kellie will walk you through her experience and suggested itinerary for hiking Isle Royale.
Important Isle Royale Safety Tips – Tips about the top hazards to be prepared for along the trail.
What to Bring on Your Isle Royale Hike – The essential packing list for Isle Royale hiking – don’t hit the trail without these things!
Plus, be sure to check out the bottom of this post to find more hiking trail guides and other additional hiking, camping and backpacking resources!
GRAB MY [FREE] OUTDOOR BACKPACKER STARTER KIT
I created the Ultimate Outdoor Backpacker Starter Kit for you (and it's FREE)! This starter kit is filled with 14 pages of my best hiking and backpacking tips to help you learn what it takes to become a safe, confident, and self-sufficient outdoor backpacker!

1. ISLE ROYALE TRAIL STATS
You have a lot of options for backpacking Isle Royale National Park, so the actual mileage & elevation gain will vary drastically depending on the route you take. The route options seem nearly endless, because (for a price) you can book a water taxi to drop you off all over the island, but many backpackers like to hike the Greenstone Ridge Trail from Rock Harbor to Windigo or vice versa.
To eliminate the need for water taxis or complicated ferry schedules, Kellie of Team Alpine planned an Isle Royale backpacking route on the eastern side of the island, starting and ending in Rock Harbor.
ISLE ROYALE TRAIL QUICK FACTS
How long is the Isle Royale eastern loop? ~35 Miles round trip (from Rock Harbor to Moskey Basin to McCargoe Cove and back)
Total Elevation Gain: 3,294 feet feet total elevation gain
Type of Trail: Loop
Trailhead: Rock Harbor
Trailhead Elevation: 627 feet
How long does it take to hike Isle Royale? 3-6 days depending on your preference and/or fitness level.
Isle Royale crowds: You definitely won’t be alone at the campgrounds, and in busy seasons the Isle Royale National Park staff will tell incoming backpackers to be ready to share campsites. However, since we passed very few people in the pristine backcountry while backpacking Isle Royale, it was hard to believe the campgrounds were actually full.
Do you need a permit to hike Isle Royale? Overnight permits are required for backpackers and anyone staying at the campsites. But no advanced reservations are required, and the permits are free!
How difficult is hiking Isle Royale? Moderate to strenuous. The lower elevation gain may sound easy, but the real challenge of hiking Isle Royale is the very rocky and root-bound trails! Rangers at Isle Royale advise backpackers to be conservative with their route plans due to this.
How dangerous is hiking Isle Royale? Hiking Isle Royale is not particularly dangerous, as it is not at all technical. Wildlife, like moose, seasonal algal blooms, and tripping over roots will be your biggest hazards while backpacking Isle Royale. While Isle Royale does have a healthy wolf population, it is extremely rare to encounter wolves.
Is there drinking water available along the Isle Royale hike? Yes. Rock Harbor and Windigo have potable water that does not need to be filtered. On the trail, there are many creeks and lakes to filter from, however, many of the interior lakes develop toxic algal blooms. Filtering from Lake Superior is the safest bet for drinking water. Check out my packing list below for my recommended water filters.
Is hiking Isle Royale dog-friendly? Nope, dogs and other pets are not permitted anywhere on Isle Royale.
Is hiking Isle Royale kid-friendly? While this specific route is too strenuous for kids, Isle Royale has many trail options that would be great for families hiking or backpacking Isle Royale.

2. HOW TO GET AN ISLE ROYALE PERMIT
Though Isle Royale does not have a lottery or limited permits, permits are required to backpack Isle Royale. You get your Isle Royale permits on the island when you check in and submit your itinerary to a ranger.
WHEN TO APPLY
There are no deadlines, applications, or advanced registrations for Isle Royale backpacking permits! Get your overnight permits upon arrival when you check in with rangers at either Windigo or Rock Harbor.
HOW TO APPLY
You’ll need to have your route planned by the time you arrive, because Isle Royale backpackers are required to submit their hiking route (complete with camps they plan to stay at) to park rangers upon arrival. Campgrounds on Isle Royale cannot be booked in advance and are a first-come/first-serve system.
You can find out more about all the campground options to help plan your trip in The Greenstone, Isle Royale’s annual newspaper full of information about the park.
Also, new in 2025, animal-resistant food storage containers (bear cans) are now required for overnight camping on Isle Royale.
HOW MUCH DOES A PERMIT COST?
The permit is free, but visiting Isle Royale costs $7/day per person. If you plan on backpacking Isle Royale, you will pay $7 per person for every day you are on the island. You can pay your Isle Royale fees online ahead of time or with a credit/debit card at one of the visitor centers on the island. Cash is not accepted in the park.
Pro tip: Buying an Isle Royale Season Pass for $60 could save you money if you are staying more than 8 days OR backpacking Isle Royale with others!
3. ISLE ROYALE DAY HIKING VS. BACKPACKING ISLE ROYALE
Isle Royale has tons of options for day hikes and backpacking trails, but you likely won’t be taking a round trip from the mainland in just one day. Because of intense planning logistics, long ferry rides, and costly seaplane services, Isle Royale visitors typically stay overnight either in the backcountry, Rock Harbor campground, the Rock Harbor Lodge, or Windigo Camper Cabins.

DAY HIKING
Rock Harbor Lodge guests and campers at the Rock Harbor Campground or Windigo Camper Cabins at Isle Royale National Park can definitely get some great day hiking in. The eastern side of the island has several trails with varying difficulty. Additionally, Isle Royale visitors can book a water taxi to get to trails and campgrounds away from the bustle of Rock Harbor or Windigo.
Rock Harbor Day Hikes
Stoll Memorial Trail to Scollville Point - This popular 4.7 mile loop trail takes Isle Royale hikers to the end of the eastern side of the island for a nearly 360-view of Lake Superior. The Stoll Memorial Trail is considered easy to moderate and is composed of footpaths and elevated boardwalks that require steps to access. Some steps along the trail are carved into rock formations. The trail goes along Tobin Harbor and Rock Harbor sides of the island; the Tobin Harbor side is considered easier, while the Rock Harbor side is rockier and more difficult.
Hike to Suzy’s Cave - Suzy’s Cave at Isle Royale is a wave-washed cliff and inland sea arch, probably unlike any other cave you’ve seen before! Take a break in the cool air of Suzy’s Cave and enjoy a refreshing rest on a cold rock. Isle Royale hikers can choose to take either Tobin Harbor Trail or Rock Harbor Trail to Suzy’s Cave, each about 4 miles round trip. The Rock Harbor trail is more challenging because of rocky and root-bound terrain. Tobin Trail is a bit easier, and you are more likely to see a moose!
Windigo Day Hikes
Minong Ridge Overlook - Enjoy views of Lake Superior, the Canadian shoreline, and Isle Royale’s west end on this 6.5 mile out and back trail. This trail is considered moderately challenging.
Grace Creek Overlook - Take in views of Grace Creek, Grace Harbor, and Lake Superior on this 3.5 mile out and back trail. This trail is considered moderately challenging.
BACKPACKING
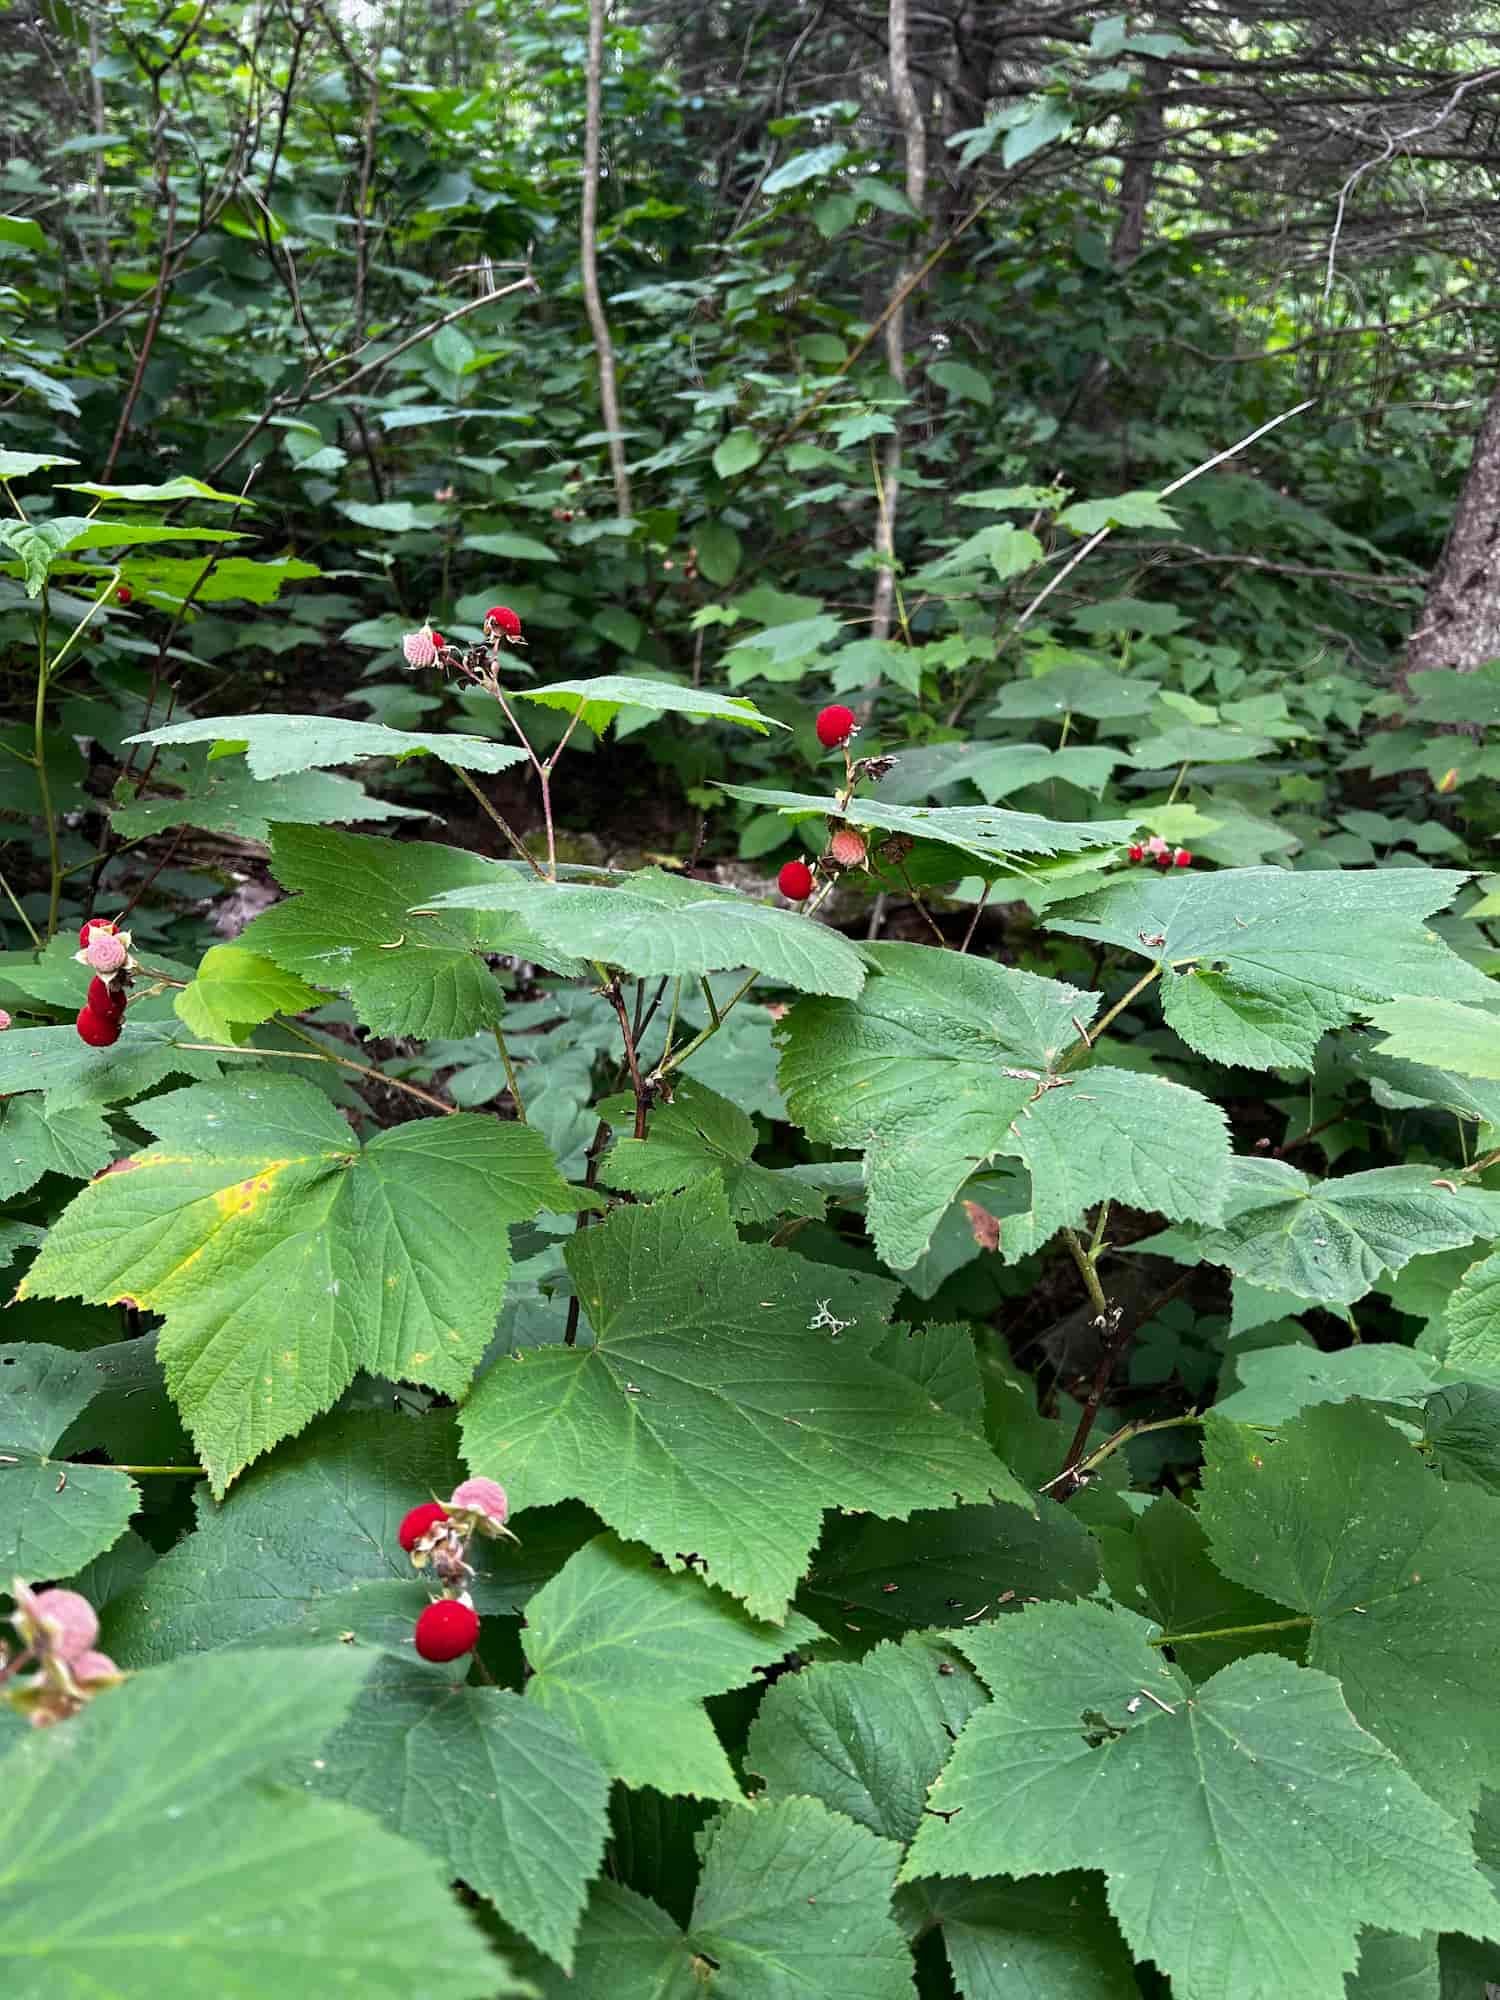
Honestly, there is no better way to soak in the pristine wilderness of Isle Royale than a backpacking trip! Backpacking Isle Royale guarantees gorgeous lake sunrises and sunsets, plants of prehistoric size, and miles of trails lined with sun-ripened blueberries, strawberries, and thimbleberries (perfect for morale boosts on long days)!

Because Isle Royale is the least visited park of all the national parks in the US, the wildlife abounds. Backpacking Isle Royale offers exciting wildlife viewing for animals like moose, loons, and otters. Isle Royale backpackers may hold out hope to see wolves, however these animals are extremely rare to actually spot (you might find some wolf prints in the sand though).
Other than being a bit of a challenge to plan, backpacking Isle Royale is really a great option for beginner backpackers. Kellie jokes that it was her most luxurious backpacking trip ever – “A seven day backpacking trip where I had to dig zero catholes!”
That’s because every campground has outhouses, and many of the campgrounds have spacious screened huts that keep Isle Royale backpackers safe from the elements and annoying mosquitos. The trails are also extremely well-marked at any trail junctions.
Note: New in 2025, animal-resistant food storage containers (bear cans) are now required for overnight camping on Isle Royale. Rangers will also be installing food-storage lockers in every campground on Isle Royale during the 2025 season. Find more info about the new food storage rules on Isle Royale here.
4. BEST TIME TO HIKE ISLE ROYALE
Isle Royale and the surrounding islands are closed to all visitors annually from November 1st to April 15th. Winters are so extreme that an ice bridge forms between Isle Royale and the shores of Canada.
Even though Isle Royale opens mid-April and closes at the end of October, the Isle Royale ferries and seaplanes only offer transportation to and from the island from mid-May until September, so that is the prime season to visit Isle Royale.
To avoid biting bugs and enjoy the incredible berry-bounty, the best time for an Isle Royale backpacking trip is late summer (August - September). Because Isle Royale is so far north and sits in a Great Lake, it typically doesn’t get extremely hot in summer months.
The downside to a trip later in the summer season is many of the interior lakes develop toxic algal blooms by August, making Lake Superior the safest (and sometimes only) place for backpackers to get water. Backpackers planning to traverse the Greenstone Ridge trail should factor the common algal blooms into their safety plan for collecting water. (Reminder: filters and purifiers do NOT filter out toxic algae!)
Check out the Isle Royale weather average temperature map below for reference.

Be prepared before you go. Just like I teach my students in my backpacking program, it’s important that you research your weather conditions before you go, both weeks and days before your trip. You can check the weather conditions at one of the following resources:
Recreational Weather Forecast for Isle Royale National Park
Marine Forecast – Lake Superior is the largest of the Great Lakes, both in volume and depth. Severe weather will affect Isle Royale ferry and seaplane operations, and could affect trails and campgrounds on the shorelines.
5. ISLE ROYALE MAP & GPX FILES
Trails at Isle Royale are generally easy to follow thanks to well marked junctions and lush greenery lining the trails – not to mention the long sections of trail that are planks over low marshy areas. Backpacking Isle Royale still requires hikers to have solid navigation skills though, so be sure to bring along a GPS plus your trusty map and compass!

We’ve created a map detailing the loop that Kellie from Team Alpine backpacked. You can download this file as a GPX to upload into your own personal GPS device.
I always recommend downloading a GPX file onto a GPS device, that way you can check in from time to time to be sure you’re on the right trail.
You can download the GPX files from the Isle Royale trail map below.

DOWNLOAD THE ISLE ROYALE GPX FILES FOR YOUR GPS HERE
Knowledge is power my friend, and I'm a girl who loves data. Get access to this trails GPX file PLUS my library of GPX files with tracks and waypoints for all the trails loaded onto the She Dreams of Alpine blog.
Load this puppy into your trusted GPS and rest easy knowing you have tracks to follow on your next hike or backpacking trip.
DON’T HAVE A GPS? YOU SHOULD.
I believe every hiker and backpacker should strive to be self-sufficient, and that includes knowing how to practice smart navigational skills in the outdoors.
This is an important safety skill set that I teach in-depth inside of my backpacking program. There’s no reason to risk getting lost in the outdoors.
Here’s what I recommend to get started:
(Note: This list contains affiliate links)
Gaia is offering a special 10% discount on a premium account to those who subscribe online through my link.
Don’t know where to start? If you need help with some Gaia GPS basics, download my quick Gaia GPS navigation 101 guide.
2) Get an SOS Device: Once you are able to, I recommend investing in some sort of SOS communication device like the Garmin inReach Mini or the Garmin inReach Explorer+ . These devices provide not only GPS tracking capabilities, but also an SOS satellite search and rescue communicator and text communication abilities in the backcountry.
My Go-To Trail Setup: The Gaia GPS app (premium subscription) + the Garmin inReach Mini.
Alternative to Garmin: Pair your Gaia GPS App with the Zoleo SOS device . With this set up, the Gaia GPS App serves as your GPS navigation device, and the Zoleo serves as an SOS/communication device.
Learn more about the best GPS devices for hiking here.
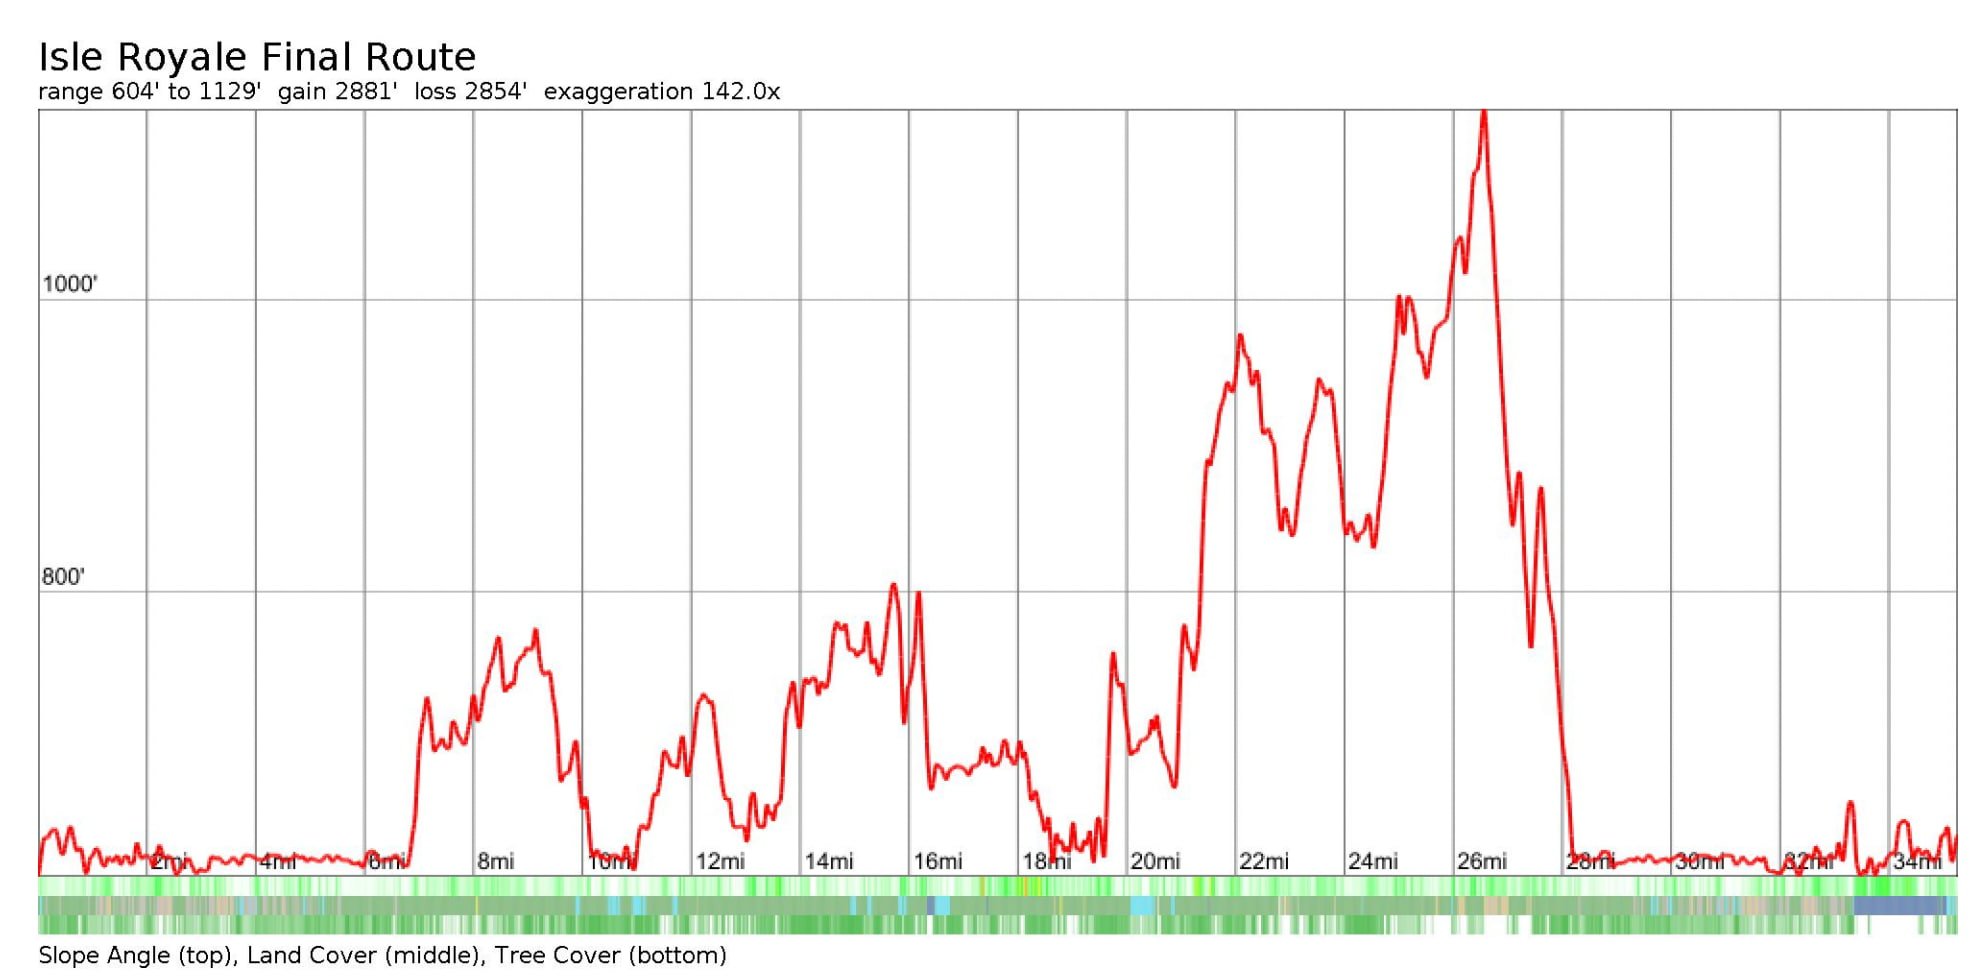
ISLE ROYALE HIKE ELEVATION PROFILE
Here’s a look at the hike elevation gain profile from an Isle Royale loop hike that starts and ends at Rock Harbor and goes as far east as McCargoe Cove.
6. HOW TO GET TO ISLE ROYALE
Isle Royale is the least visited American national park likely because it can be so hard simply to get to. But trust that it is TOTALLY worth it to make the effort – which is exactly why it’s the most revisited national park!
Isle Royale backpackers have the option to book passage on an Isle Royale ferry or fly to the island via seaplane. All transportation to Isle Royale takes off from either Minnesota or the upper peninsula of Michigan. So first you’ll need to decide what state you want to leave from, and if you want to take a seaplane or Isle Royale ferry.
A seaplane is definitely the fastest way to get to and from Isle Royale, however travelers will have stricter restrictions on weight limits and service is disrupted easier by weather. Seaplanes also tend to be the more expensive way to get to Isle Royale, but if you’re looking to maximize as much time as possible then taking an Isle Royale sea plane may be your best choice.
If you choose an Isle Royale ferry, you have a few options. Keep in mind that Isle Royale ferries only carry passengers, luggage, and canoes/kayaks, so your car will be staying on the mainland either in Michigan or Minnesota.
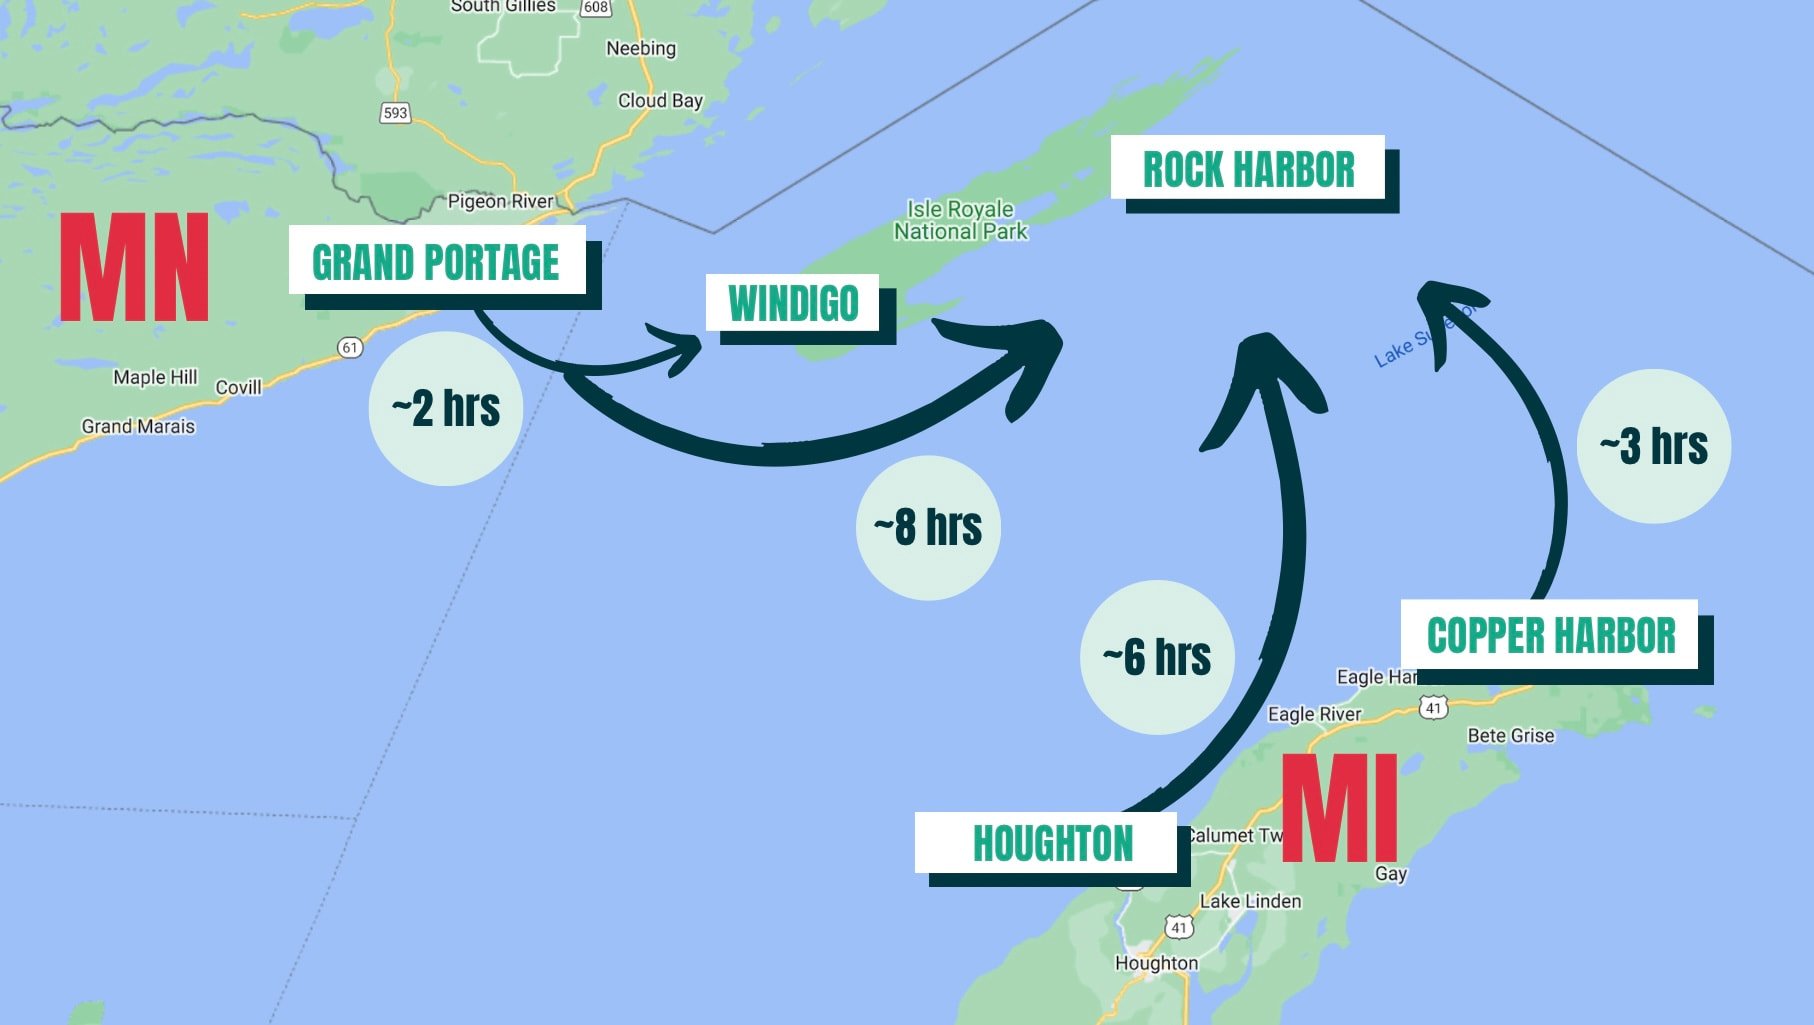
There are four Isle Royale ferries that service the island:
Michigan Isle Royale ferries
Ranger III - operates between Houghton, MI and Rock Harbor (~6hrs)
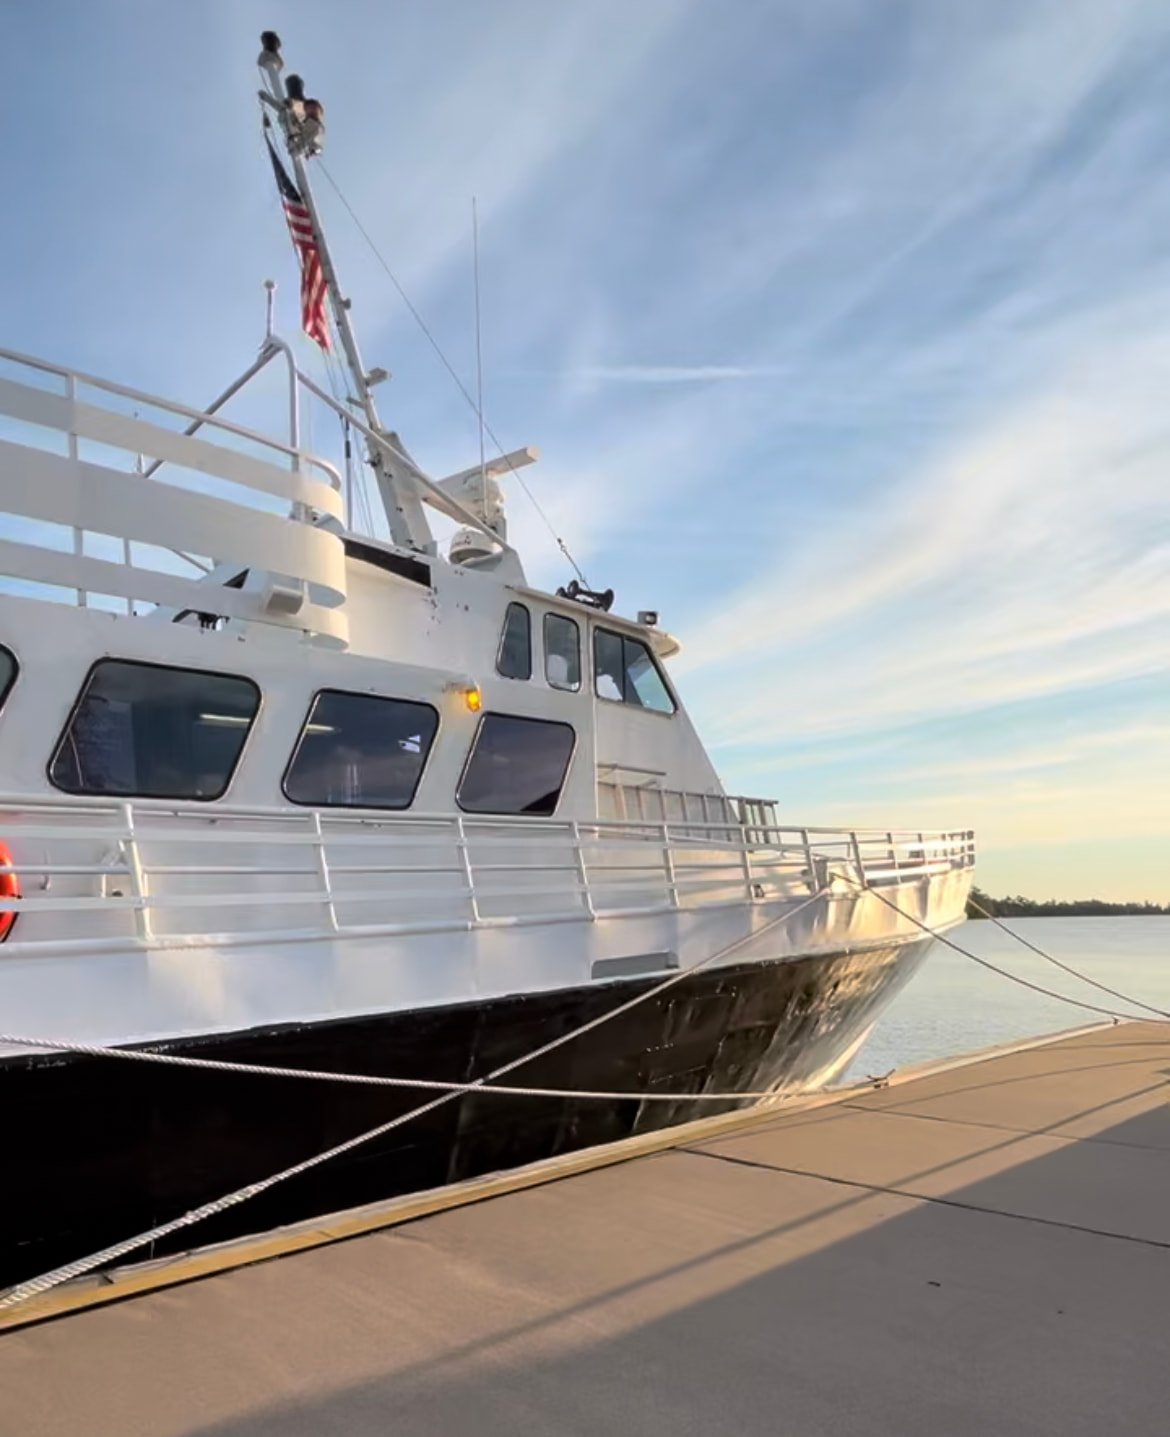
Queen IV - operates between Copper Harbor, MI and Rock Harbor (~3hrs)
Minnesota Isle Royale ferries
Sea Hunter III - operates between Grand Portage, MN to Windigo (~1.5hrs)
Voyageur II - operates between Grand Portage, MN and both Windigo and Rock Harbor (~2hrs)
Below you can see a map of the different ports from which the Isle Royale ferries depart to (and return from) the island.
We opted to take the Queen IV Isle Royale ferry from Copper Harbor to Rock Harbor, but you could also decide to catch a ferry to Windigo. However, the tricky thing with the latter option is that Windigo has less ferry options than Rock Harbor. Windigo is on the far west side of Isle Royale and is considered to be less touristy than Rock Harbor (but honestly, Isle Royale is so remote it never really felt super crowded).
Another option if you want to start your hike from Windigo would be to take a water taxi from Rock Harbor to Windigo. It really just depends on how much time and money you want to spend getting around the island.
8. ITINERARY FOR BACKPACKING ISLE ROYALE
Here is a breakdown of our 7-day itinerary for backpacking Isle Royale. We took a zero day on the last day (other than some day hikes) so we could enjoy the tourist amenities at Rock Harbor – aka a victory meal at Rock Harbor Lodge and showers! Planning this zero day also made us feel less stressed, since we didn’t need to rush the last day of our trip to make sure we caught the Queen IV ferry by 2:15pm.
We couldn’t access the Mount Franklin Trail when we arrived due to the Mt. Franklin wildfire that was being suppressed at the time.
Honestly, you could cut the rest and zero days and/or do higher mileage days to shave a few days off, but we highly recommend savoring all the time you can on Isle Royale!
Also, remember, there are no campground reservations. Campgrounds are just Isle Royale’s management plan to reduce impacts from backpackers and protect such a unique wilderness.
7-DAY ITINERARY OVERVIEW
Day 1 - Rock Harbor to Three Mile Campground (~2.8mi)
Day 2 - Three Mile Campground to Moskey Basin (~9.25mi)
Day 3 - Moskey Basin to McCargoe Cove (~10.4mi)
Day 4 - McCargoe Cove to E. Chickenbone Lake Campground (~2.5mi)
Day 5 - E. Chickenbone Lake Campground to Daisy Farm Campground (~8mi)
Day 6 - Daisy Farm Campground to Rock Harbor Campground (~6.6mi)
Day 7 - Victory and rest day in Rock Harbor!
DAY 1 - HIKE ~2.8 MILES FROM ROCK HARBOR TO THREE MILE CAMPGROUND

Kellie from Team Alpine (right) and her friend Deborah at Rock Harbor
As soon as we stepped off the ferry, we were greeted by Isle Royale park rangers. All guests are welcomed with an entertaining speech from park rangers, explaining the guidelines and sheer wilderness of Isle Royale. Backpackers were instructed to line up to submit our itineraries to a ranger, pay park fees, and get our backpacking permits.
You are allowed to have a flexible itinerary, so if you decide you need to stop before your planned campground OR feel good enough to keep hiking to the next, you can. On your last day when you turn in your permit, you’ll also note any changes you made to your plan.
To our delight, there was also a “Berry Board” that showed the edible berries that visitors are allowed to forage in small amounts!

Our original plan was to hike to Daisy Farm campground, but a handful of factors made us pivot to a new plan. We overheard a lot of backpackers ahead of us planning to stay at Daisy Farm Campground that night, and with a nasty storm looming, we really wanted to secure a hut for the evening.
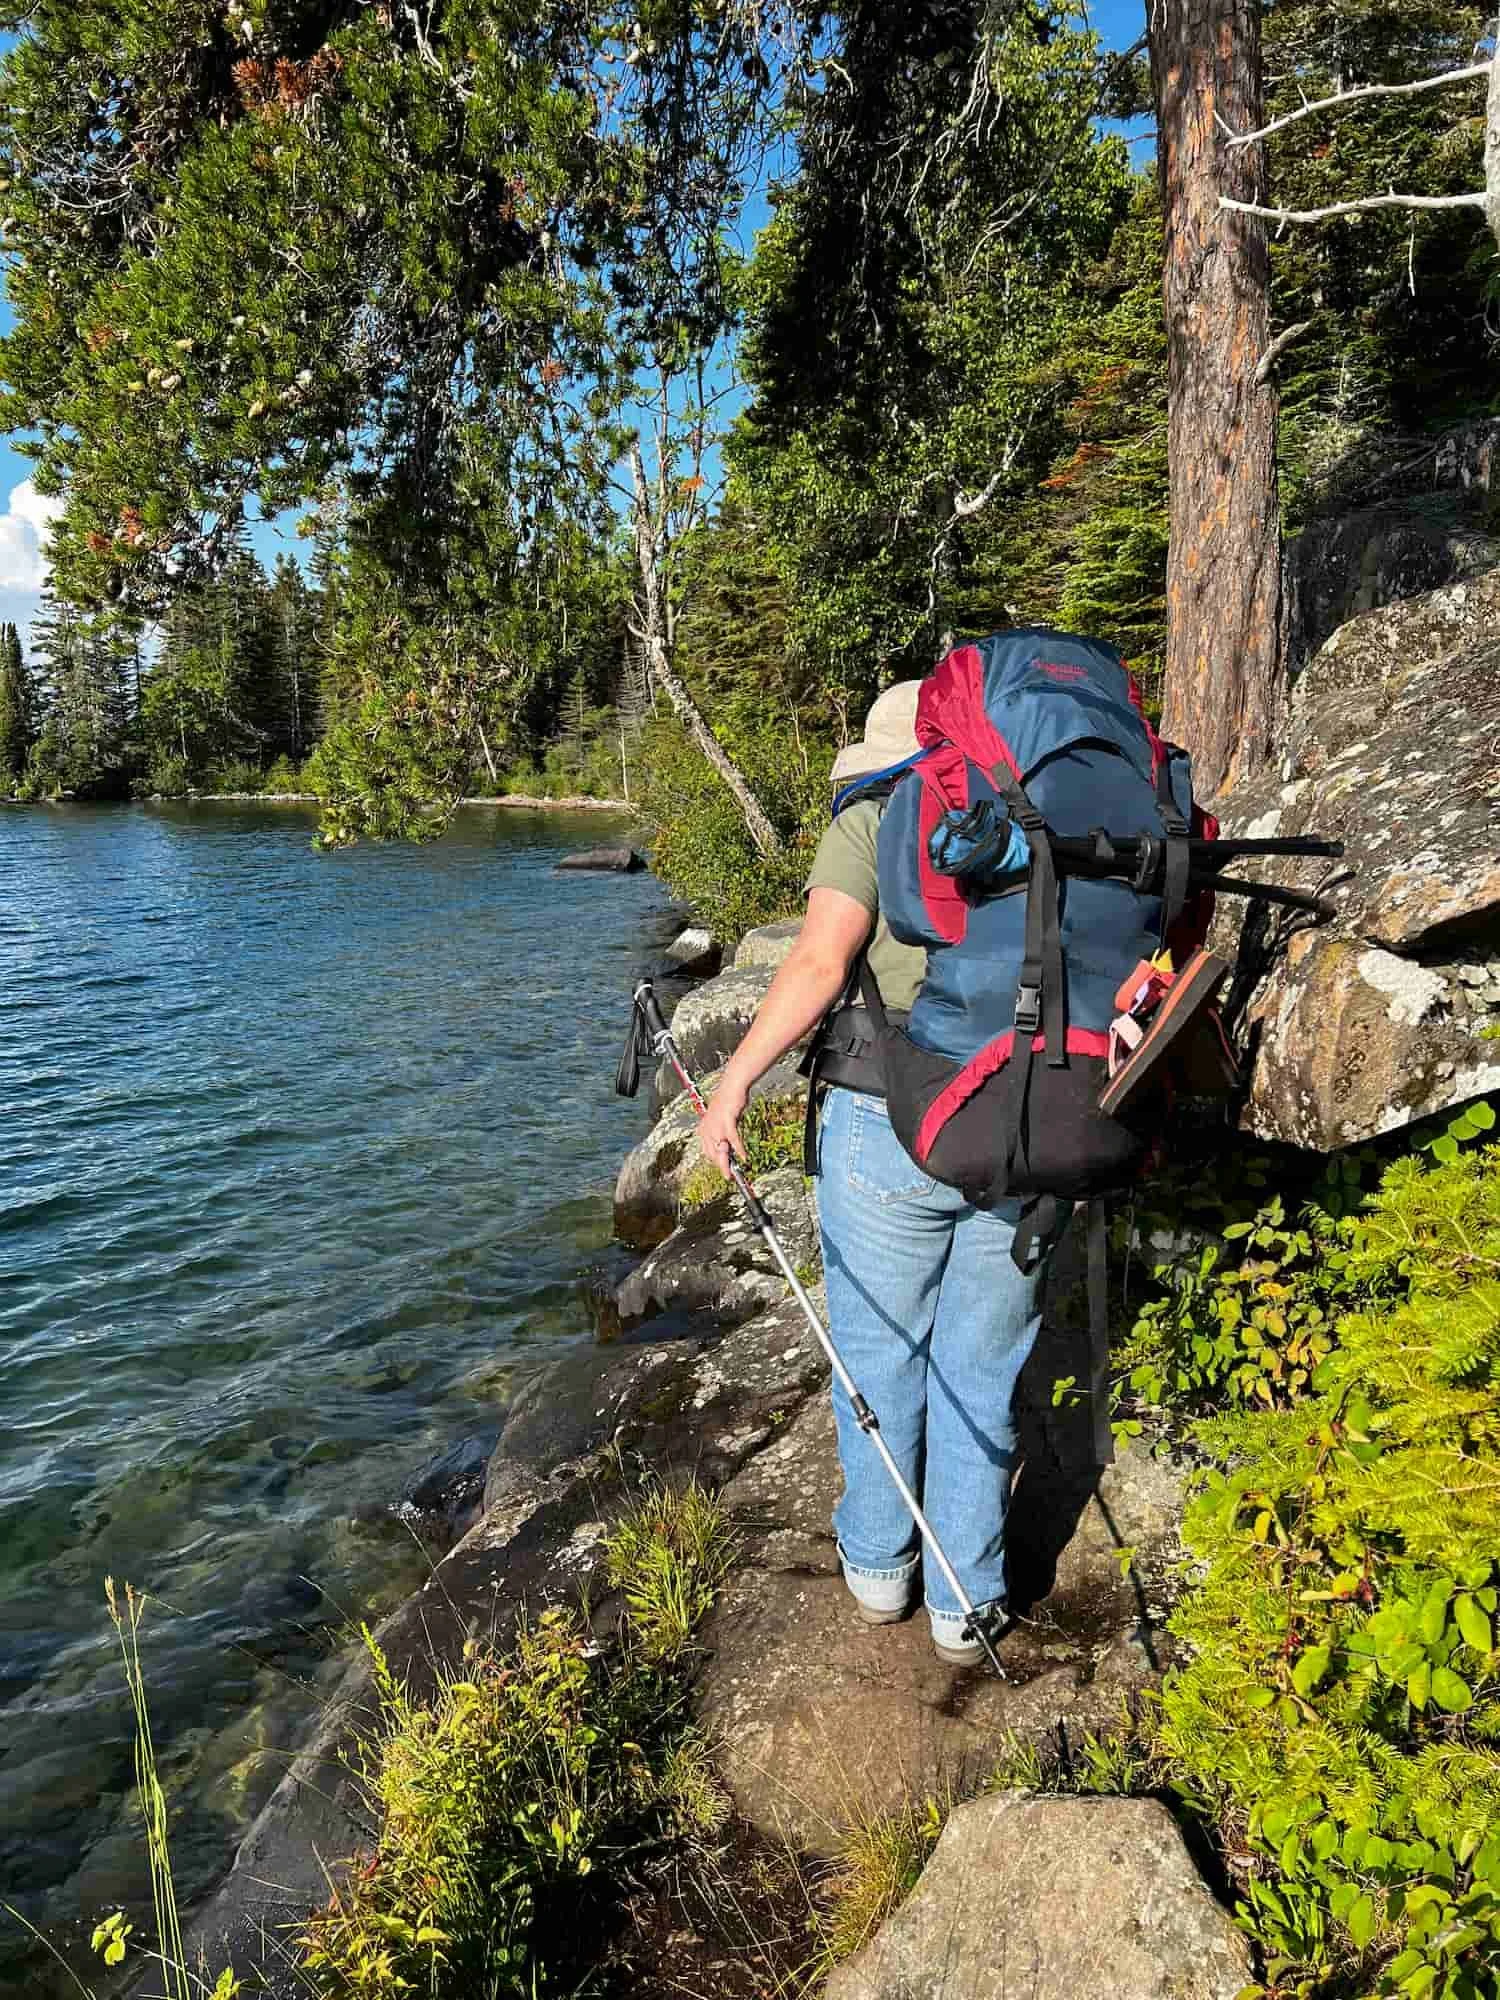
Hiking the Rock Harbor Trail with full packs on day 1 of a 7 day trip was no joke. Even the rangers advised all the backpackers not to underestimate Isle Royale trails just because they are lacking in elevation gain. The Rock Harbor Trail was by far the most difficult trail in our itinerary because of the huge twisted roots and giant lake beaten rocks.
The photo below shows an example of how rocky and rooty the Rock Harbor Trail is! Step carefully!

We decided to stay at the seemingly overlooked Three Mile Campground and were super glad we did! We secured a hut (and watched many backpackers on later ferries pass up empty huts in Three Mile Campground) and felt super safe during a pretty intense thunderstorm. We saw lots of fresh signs of moose, so we suspected the moose liked cutting through that campground to get into Lake Superior.

All the huts at Isle Royale were screened and well maintained, and all campgrounds had outhouses. It seriously felt luxurious for a backpacking trip!
DAY 2 - HIKE ~9.25 MILES FROM THREE MILE CAMPGROUND TO MOSKEY BASIN
When we stopped for a lunch break at Daisy Farm Campground on this section of the Rock Harbor Trail, we saw tents packed into overflow camping areas that were torn apart by the storm! This made us even happier with our decision to stop at Three Mile Campground. It was clear that Daisy Farm is one of the busier campgrounds on the eastern side of the island.
The Rock Harbor trail stays pretty close to the shore of Lake Superior, which meant the air was cool and we had near unlimited access to cold water we could filter.
By the time we made it to Moskey Basin there were no campsites, so it was time to ask to share a site. We had expected this would be inevitable since the park ranger welcome speech included “be prepared to have conversations about sharing sites.”
We ended up sharing a site with “Pokie & Gumby,” and thanked them for letting us camp in their spot by giving them some of our homemade mangonada fruit leather. During our seven days on the island, this was the only night we had to share a site.

Part of what makes hiking Isle Royale National Park so fun is that it kind of feels like an obstacle course! Scrambling up rocks and balancing on long stretches of boardwalk weaving through marshy lowlands really added an extra level of adventure.
During sunset we watched and listened to loons on Lake Superior.
DAY 3 - HIKE ~10 MILES FROM MOSKEY BASIN TO MCCARGOE COVE
We made sure to stock up on water from Lake Superior in the morning. We learned from park advisories that Chickenbone Lake already had a toxic algae bloom, and we heard from other hikers that Lake Richie had also developed one.
From Moskey Basin, we took the Lake Richie Trail up to the Greenstone Ridge, then down the Indian Portage trail to McCargoe Cove. The terrain was much easier than that of the Rock Harbor Trail, but had the most elevation changes of all our days. Getting up to the Greenstone Ridge junction was a lot of uphill, and getting down to McCargoe Cove was all downhill.
At Chippewa Harbor/Indian Portage Trail junction with Lake Richie Trail there were more moose antlers to take photos with!

Since this was our longest day and had the most elevation changes, we jumped at the chance to rest on some trail building materials. We had to be careful not to rest for too long, because a nap was so tempting! (Fun fact: a ranger told us that all these trail building materials at Isle Royale have to get airdropped in, then trail crews have to CARRY these massive boards to their final destination!)

The final stretch of this section was lined with delicious thimbleberries which were exactly the morale boost we needed to get us to camp! They were so bountiful we didn’t even have to stop to snack on them.
All the huts were claimed but so we set up our tent in a group tent site, but ended up having the site to ourselves.
DAY 4 - HIKE ~2.5 MILES FROM MCCARGOE COVE TO EAST CHICKENBONE LAKE CAMPGROUND
Even though McCargoe Cove campground was “full,” it barely felt like it! We planned this day as a recovery day, so we spent most of the day in McCargoe Cove.

We soaked our sore feet in the chilly waters of Lake Superior, and soothed our muscles with some sunbathing on the dock. Most other campers packed up and left early, but anglers that had come in on their own private boats hung around the dock.

We packed up in the afternoon and started our hike to East Chickenbone Lake. On the East Chickenbone Lake trail, we encountered our first beaver dams!

We took the East Chickenbone Lake Trail to the East Chickenbone Lake campground, near the Greenstone Ridge junction. We thought this day would be our easiest day of hiking, but between hiking all uphill for 2.5 miles, carrying two days worth of water, and some fatigue… this actually turned out to be the most grueling stretch for us.
We set up our tent in a group site, and once again had it all to ourselves.
DAY 5 - HIKE ~8 MILES FROM EAST CHICKENBONE LAKE CAMPGROUND TO DAISY FARM CAMPGROUND
This section was mostly the Greenstone Ridge Trail and definitely the hottest part of the trail we hiked. We hiked to Mount Ojibway so we could climb the fire tower, then took the Mount Ojibway Trail to Daisy Farm.
At one point on this section of trail we came across a bunch of downed trees that were felled every which way. Beavers. Once we dipped under and hurdled over the trees, we crossed over another beaver dam.

The Mount Ojibway Fire Tower offered panoramic views of Isle Royale and Lake Superior. Funny enough, your phone might even connect to Canadian cell towers here! There were also several other scenic lookout points along the Greenstone Ridge.
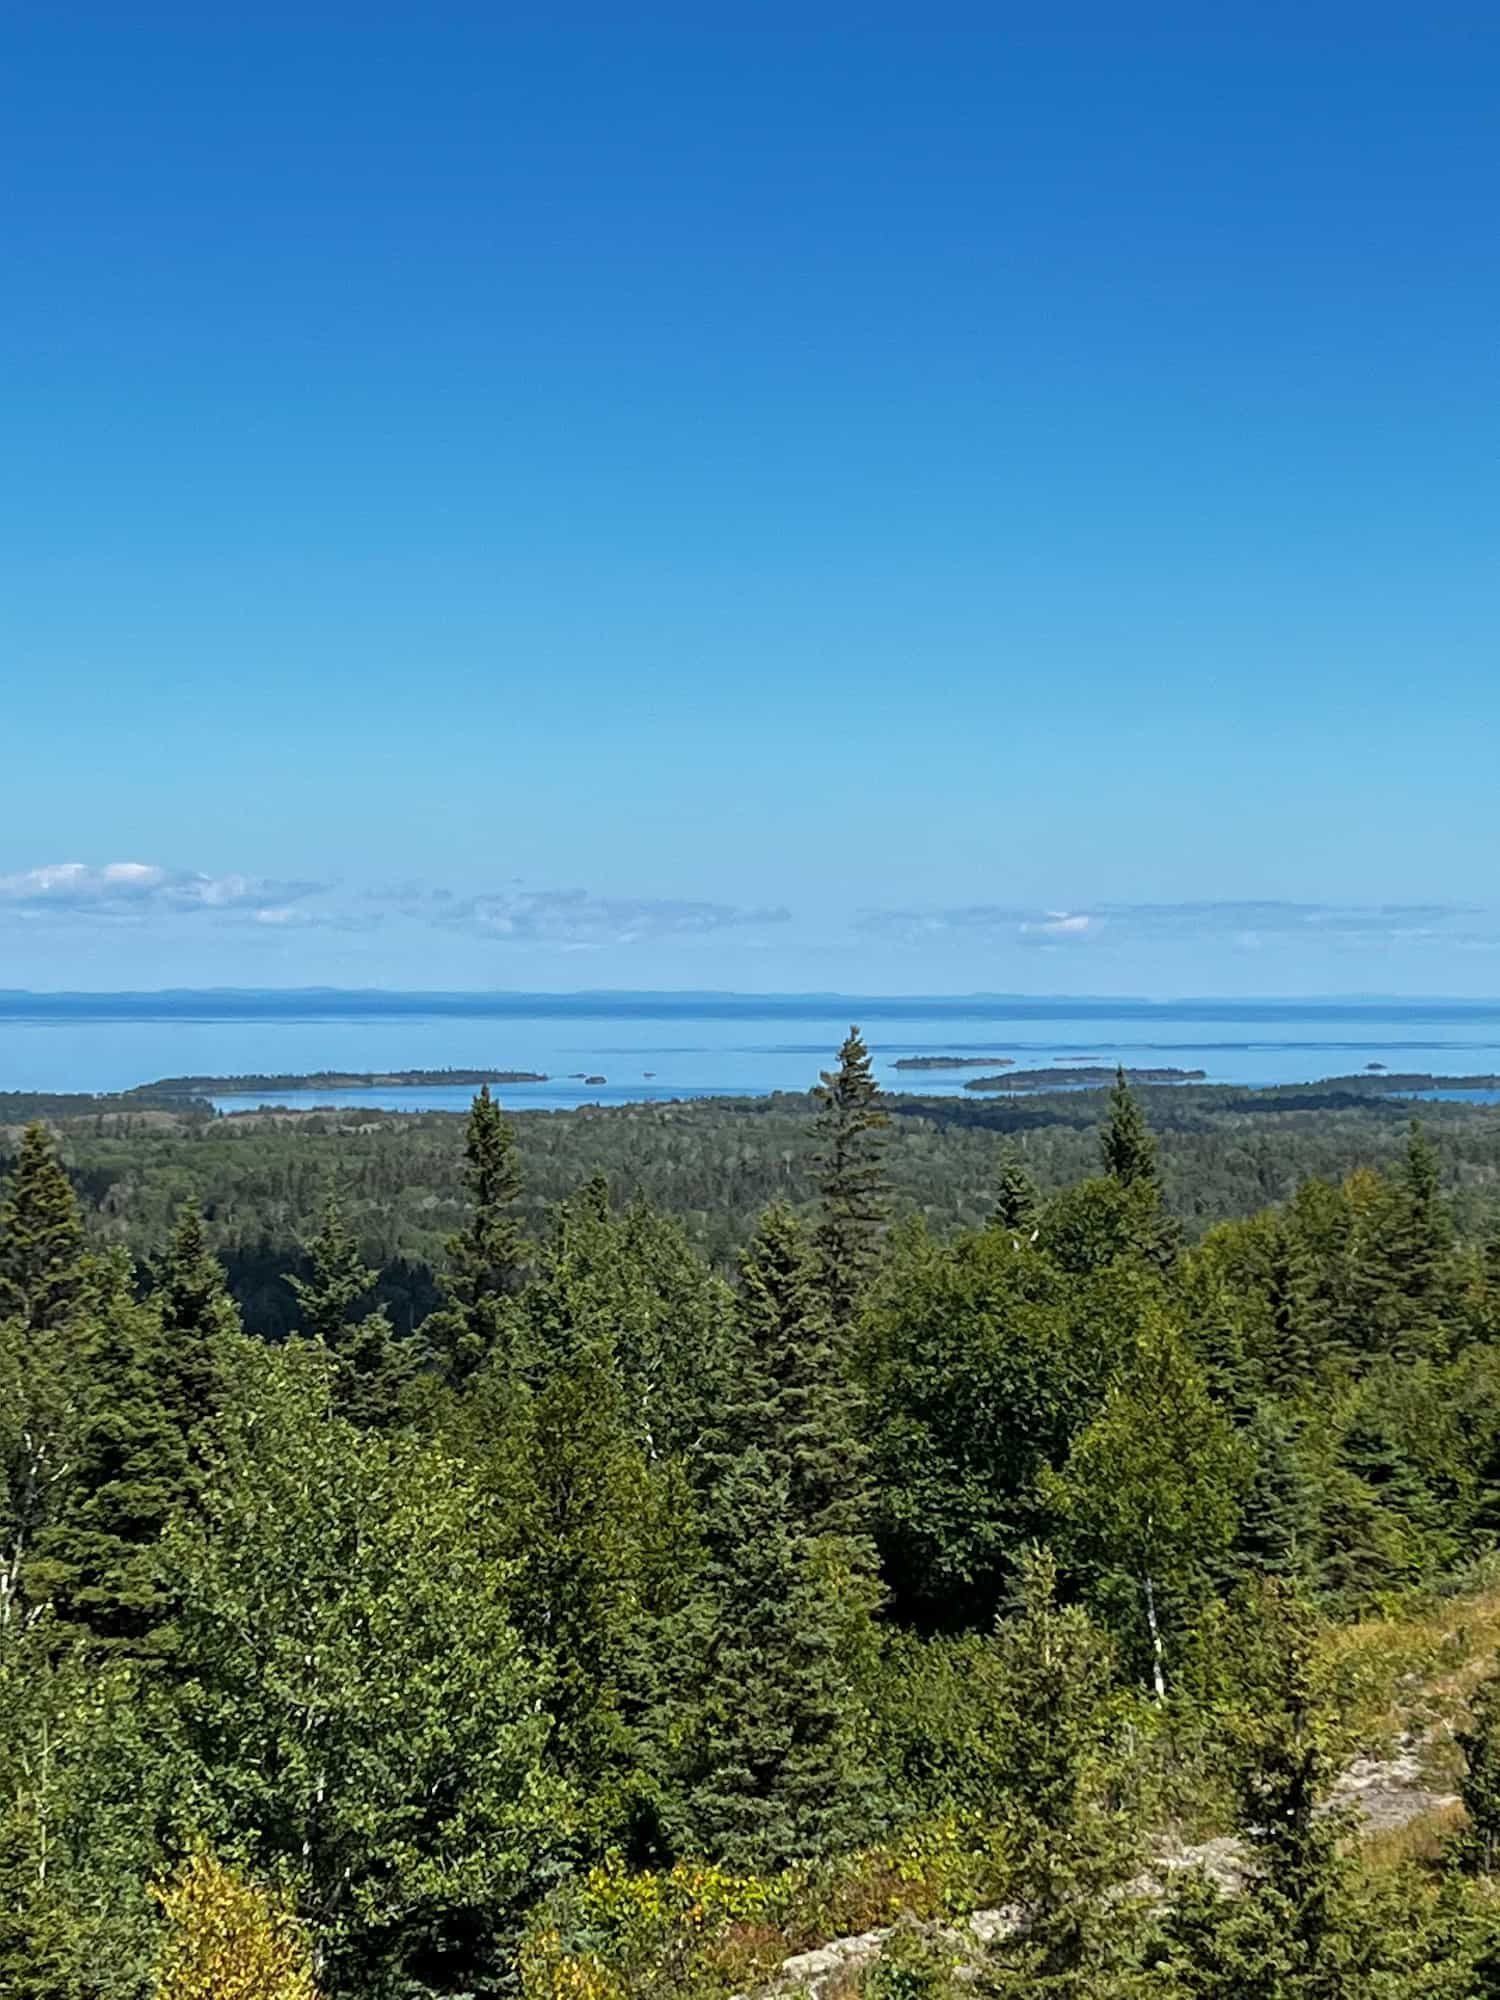
Although the views were spectacular, we were definitely missing the cool breezes and water from the Lake Superior shoreline trails.
You could cut the distance just a little by skipping Mount Ojibway and taking the Daisy Farm Trail to Daisy Farm Campground. Or you could push yourself for a ~10.5 mile day to make it to Three Mile Campground if you wanted to avoid the crowds at Daisy Farm. We were able to get to Daisy Farm early enough to secure a hut.
At Daisy Farm Campground we saw moose calf prints (and heard that a momma and baby moose had made appearances) and watched a playful otter steal bait from anglers at the dock. Even the busiest campground was bustling with wildlife.

We spent the rest of our day sunbathing and soaking our sore bodies in the cold waters of Lake Superior again! This campground still felt pretty secluded with plenty of wilderness for everyone to enjoy. At any given time on the Daisy Farm dock, we saw maybe 10 people max.

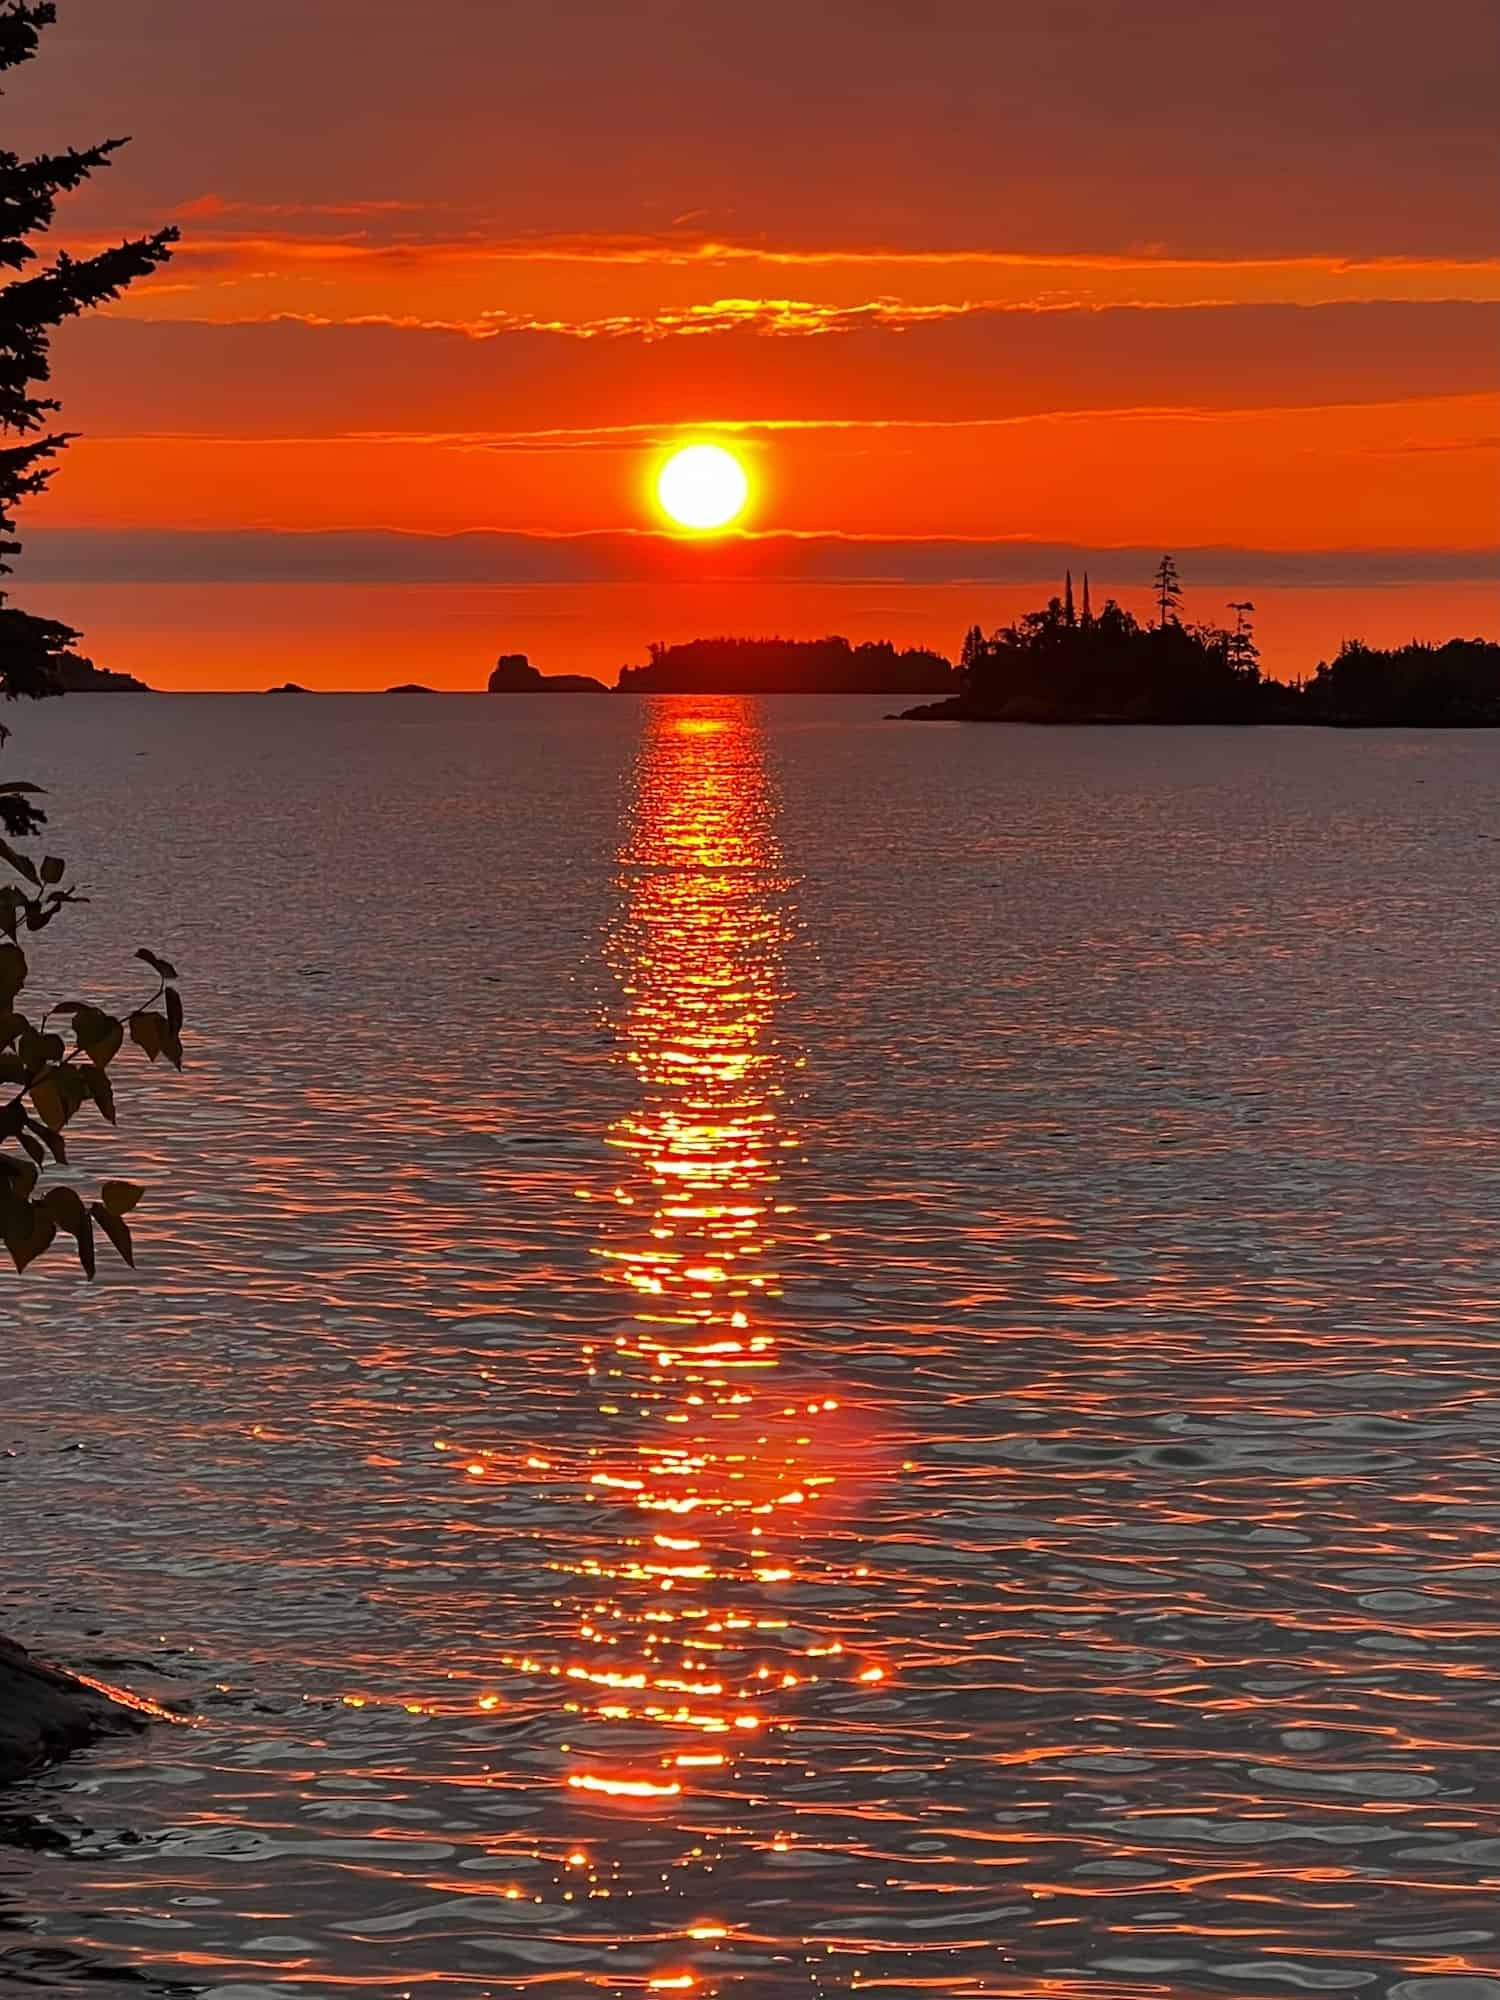
We ended the evening watching the sunset with some hot tea on the dock.

DAY 6 - HIKE ~6.6 MILES FROM DAISY FARM CAMPGROUND TO ROCK HARBOR CAMPGROUND
The sunrises on this side of the island were technicolor!
We took Rock Harbor Trail and stopped at Three Mile Campground for lunch.

If you skipped Mount Ojibway or want to also hike Mount Franklin, you could take the Mount Ojibway Trail to the Greenstone Ridge Trail, then down the Mount Franklin Trail. Just note that the Mount Franklin area had a wildfire in 2022 and may be fire damaged.
We stopped to check out Suzy’s Cave, an inland sea arch formed by wave action some 4,000 years ago when lake levels were higher. It was a cool respite to take a snack break. We rested on the cold rocks then took the Tobin Harbor Trail to Rock Harbor Trail.


Tobin Harbor Trail turned out to be much easier terrain than Rock Harbor Trail. Had the trail not been closed for wildfires when we arrived, we would have taken this trail on the first day!
We were able to secure a hut at Rock Harbor Campground, and we paired our last backpacking dinner with a victory ice cream from the Trading Post!

DAY 7 - VICTORY/TOURISTY DAY IN ROCK HARBOR
On our last day we treated ourselves to a victory pizza from the grill for lunch!

We spent our last day taking day hikes along Tobin Harbor Trail (our last-ditch efforts to see a moose, but no luck this time). But Tobin Harbor Trail WAS packed with really cool fungi!

We also got to use this final day for souvenir shopping in the gift shop and taking hot showers at Rock Harbor. We were sure the other ferry passengers would appreciate us showering, and it was great to get to clean up before our two-day drive home. You could even do your laundry at Rock Harbor before catching your ferry if you wanted!
Before we knew it, it was time to board the Queen IV and begin our long journey home.
Backpacking Isle Royale National Park was an incredible experience and completely different from so many other backpacking trips we’ve been on. Are you adding this trip to your backpacking bucket list?
9. IMPORTANT ISLE ROYALE SAFETY TIPS
When planning your Isle Royale hiking trip, pay particular attention to these hazards and be prepared.
TOXIC ALGAL BLOOMS
Harmful algal blooms seem to be becoming more common in the interior lakes of Isle Royale, and purifying DOES NOT remove toxins from the water. Avoid drinking, swimming, and fishing in water that has a cloudy blue cast or looks like “pea soup.”
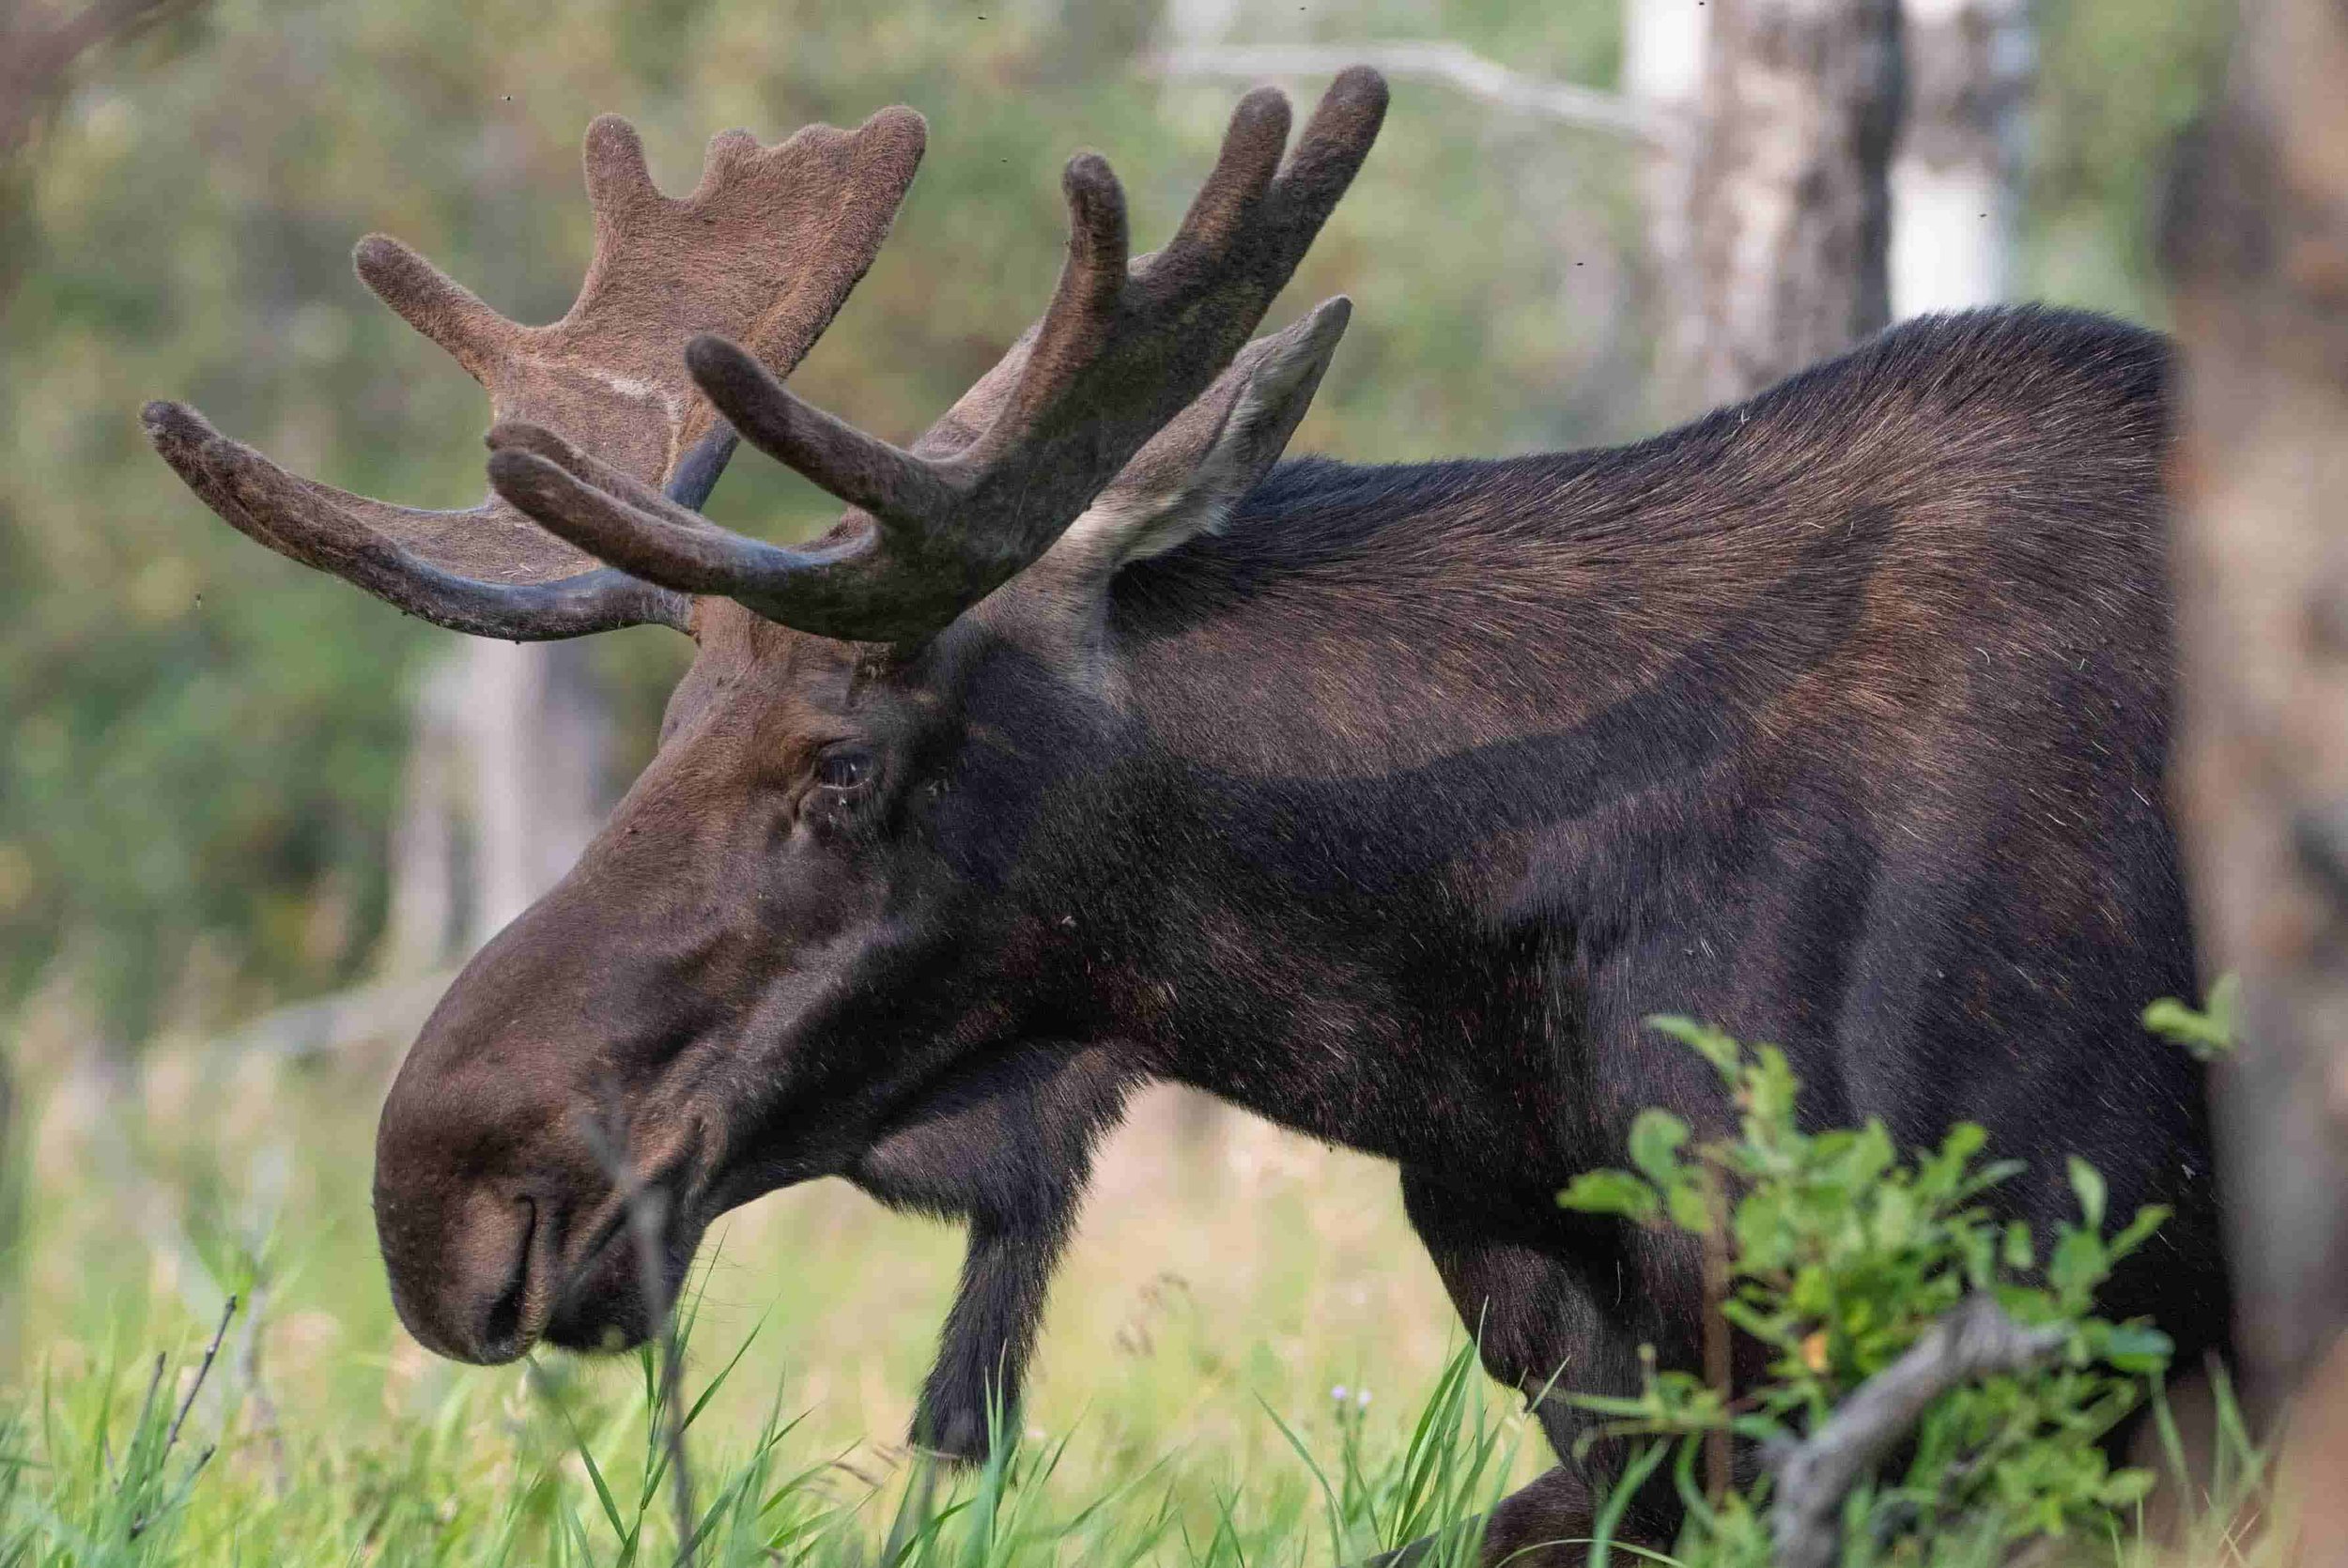
MOOSE
Moose are large and potentially dangerous animals, so you should know what to do if you encounter a moose. If you see a moose, step behind a tree, and wait for the moose to move on.
Throughout the spring and summer, female moose are protective of their young. Never get between a cow and her calf.
During fall rut, male moose are often aggressive. Always give them plenty of space because they can kick in any direction or charge.
10. WHAT TO BRING ON YOUR ISLE ROYALE HIKE
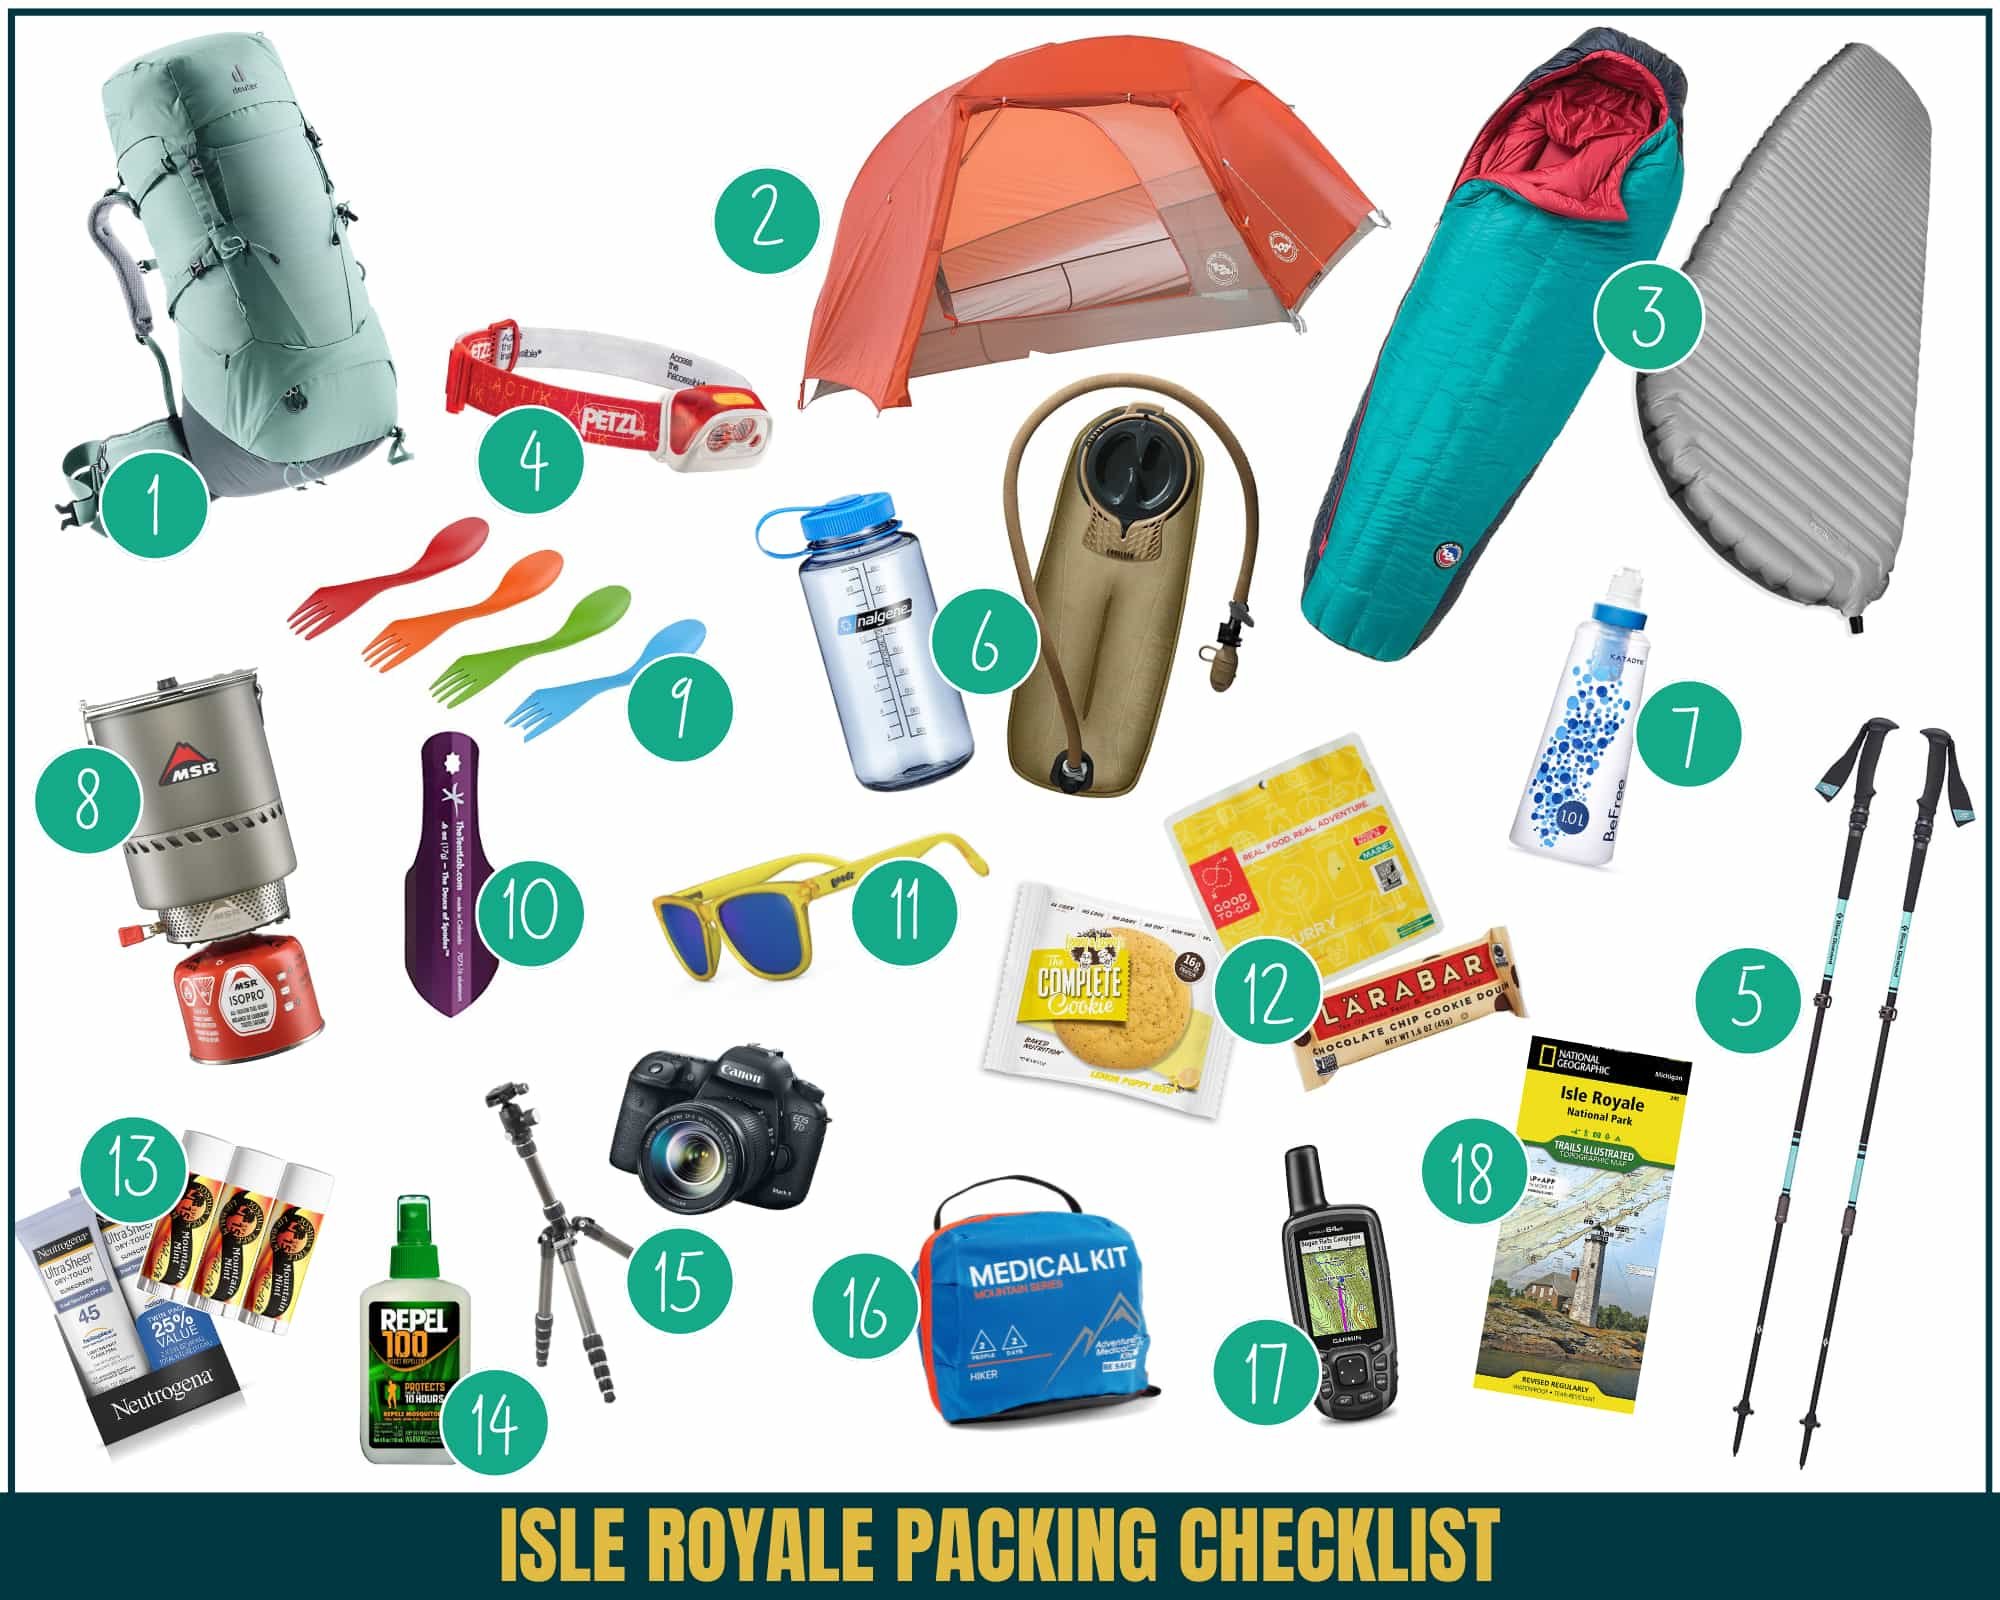
Here are several of the crucial items to remember to pack on your Isle Royale backpacking trip, but this is not a comprehensive list. Also, be sure to check the weather and pack appropriate clothing!
*Please note that this list contains affiliate links.
The Therm-A-Rest NeoAir XTherm sleeping pad is my favorite sleeping pad. It's lightweight and easy to pack. It's super comfortable (no body parts touch the ground), and it's warm!
Good To-Go Dinners are usually my dehydrated meal choice to bring on backpacking trips. The ingredients are great, and they are super delicious. My favorites are the Thai Curry and the Herbed Mushroom Risotto!
15) Camera: Don't forget to pack a camera or a phone to capture your hike! You can check out our post on Outdoor Adventure Photography Gear if you want details on the cameras we recommend for outdoor photography, but you also can't go wrong these days with your phone camera either.
IMPORTANT! Be sure to bring a credit/debit card!
The National Park Service on Isle Royale has gone cashless, so if you need to pay for your permit or fees, you will need a card. It is highly encouraged to pay your fees in advance though, before you get to the island. Vendors (restaurants and gift shops) run by third parties may accept cash, but bringing a credit or debit card is really a good idea, just in case.
Keep in mind that this is not a full gear list for backpacking Isle Royale, just some of the most important things. For a complete checklist of gear to pack, check out my printable backpacking packing list here.
DOWNLOAD OUR BACKPACKING PACKING CHECKLIST:
Never leave any crucial items behind before you head out on a backpacking trip! I’ve written down all the essentials here for you so that you’ll never forget anything vital. PLUS, I love to spoil my readers with a little bit extra as well, so I’ve included a list of 20+ of my favorite backpacking food snacks and meals inside of this list for inspiration.
So are you adding Isle Royale to your backpacking bucket list now? Or have you already visited this least-visited national park? :) Let us know in the comments!
LOOKING FOR MORE NATIONAL PARK ADVENTURES?
If you’re looking for more adventures in the national parks, check out our resources below:
ESSENTIAL HIKING & BACKPACKING RESOURCES
Also be sure to check out these essential hiking & backpacking resources!
Cheers,
Allison - She Dreams of Alpine


How to Get a Mt. Whitney Permit: Understanding the Permit & Lottery Process for Day Hiking and Backpacking the Whitney Area | Mount Whitney is the tallest peak in the lower 48 states, which makes it a very popular peak to hike and climb. Due to its popularity, there is a very structured permit process, and this post covers everything you need to know about grabbing Mount Whitney permits so you can plan your hike up this epic California peak. | shedreamsofalpine.com