38 Miles Backpacking Lyell Canyon in Tuolumne to Devil's Postpile in Mammoth Lakes California

It's funny when you plan out a backpacking trip, you search the internet for details to make an overall plan and trip itinerary. You get your daily mileage and ascent all scheduled out, and you start to think that only bad weather can throw a wrench in your plan. However, over time, I've learned that I should always anticipate about +5 extra miles to what I read online. That was definitely the case with this trail from Lyell Canyon to Devil's Postpile. All my research (reading online trip reports) led me to believe this trail would be about 31 miles and only 4,100 feet of total gain, and so that seemed like an easy 10 miles per day trip. We were slightly surprised when we found that the trail was actually about 38 miles and 5,000' of gain, and had to make up some extra miles in day 2 and day 3.
It still was an excellent trip, and very doable in 3 days. The trail was beautiful, probably one of my favorites to date, and there was something about being in the backcountry of Tuolumne and the Ansel Adams Wilderness that felt so intimate... John Muir's "Range of Light".
High Level Trip Details
~37.6 Miles Point to Point
~5,000 total elevation gain for trip
Trailhead elevation (8601’)
Exit elevation (7570’)
Highest Point on the trail (Donohue Pass 11,031’)
Reliable water source along whole route
When to go?
Personally, September is my favorite time of the year to backpack or hike peaks in the Sierra Nevada. The weather is perfect and there are less mosquitos (which can be really bad when it is warm)
You could also plan to go in July and August, but just expect that getting permits will be more competitive, and the weather a bit warmer (with a chance of relentless mosquitos)
June and October are hit or miss in the Sierra Nevada. If we had a big snow year in California, there may be too much snow on the trail in June. Alternatively, in October, we start to get our first snowfalls of the season.
How to get there?
Shuttle Bus: Our group took two cars and shuttled ourselves, but if you have a smaller group or don't want to shuttle with two cars then you will either need to make sure your trip is planned when the shuttle bus is running, or arrange for alternative transportation. You can find more details on the shuttle here: https://www.nps.gov/depo/planyourvisit/reds-meadow-and-devils-postpile-shuttle-information.htm
If you’re ending your trip in Mammoth Lakes, consider spending some time in the cool mountaiin town and explore many of the fun things to do in Mammoth Lakes in the summertime.
Permit Information
Permits are required for this trail and can be obtained up to 24 weeks in advance. This is likely the most complicated part about preparing for this trip, so just make a schedule and read the resources below.
There are a lot of people trying to get permits for use of the John Muir Trail, and this particular trail goes over Donohue Pass which Yosemite has limited its quota to 45 people per day crossing this pass from an approved trailhead.
Want specifics?
Figure out a timeframe you'd like to do your trip. See my notes on when to go above. It’s best if you are sort of flexible on dates. For instance, entering on a weekday instead of a weekend.
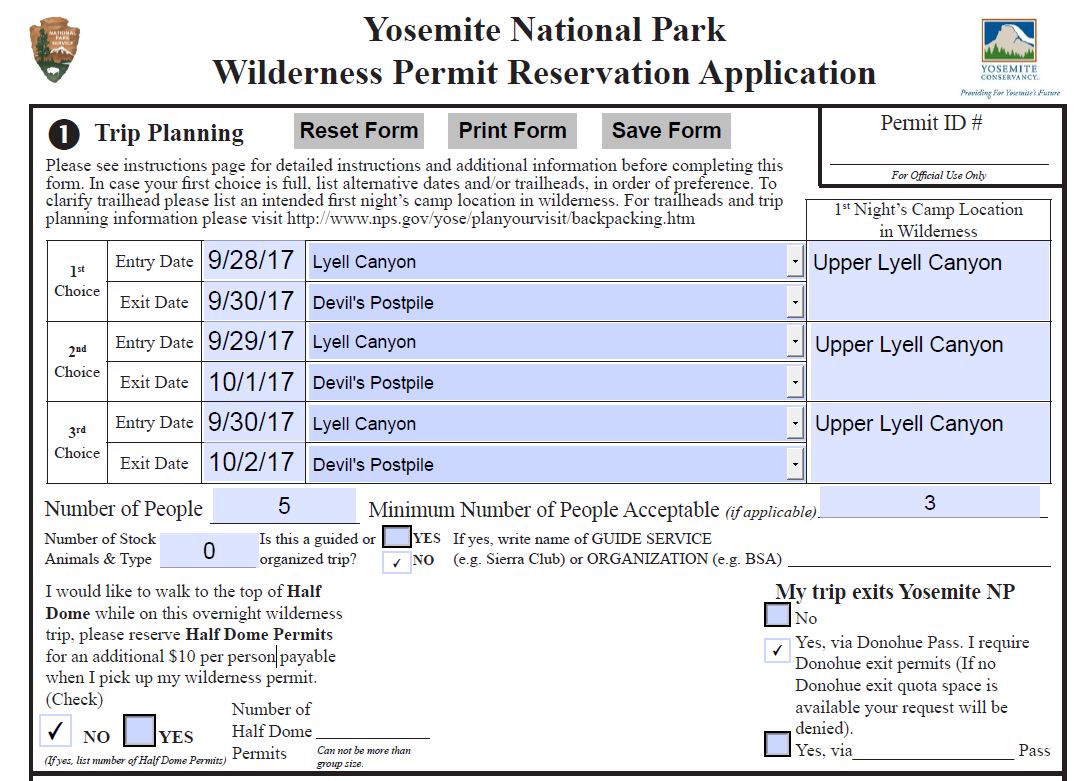
Fill out your permit request application. I kept a saved copy of this on my desktop and then just updated it when I was ready to submit. It took me about 3 weeks before I got an approved permit. You can see how I filled out my permit in the picture above. Here is the template for the permit application: https://www.nps.gov/yose/planyourvisit/upload/wildpermitform.pdf
"If you are flexible on the start date for your trip, you can now submit one application for a range of dates up to 3 weeks long. Your reservation application will be placed in each day’s daily lottery for the date range you provide. You will be notified of lottery results each day via email. If denied, your application will roll to the next day’s lottery. The application will be removed from the rolling lottery if 1) your request is granted 2) is manually canceled by applicant or 3) the date range has expired. Once expired, you may reapply with a new application and date range. In exceedingly high demand, JMT reservations are difficult to obtain. It is not unusual to be denied multiple days or weeks in a row. Do not submit multiple applications.”
You should fax in your reservation request to (209) 372-0739 on the 169th day before your trip or before 7:30 AM on the 168th day before your trip. Faxes are processed before phone calls. Permits are selected by lottery. I used an online service to do my faxing (because who has fax machines these days?!), here is the link: http://www.gotfreefax.com/
Confirmed reservations cost $5 plus $5 per person (there's no charge for applying if you don't receive a reservation).
Reserved permits are held until 10 am on the day of your trip. If you will arrive later than 10 am on the day of your trip, call to hold your permit for a late arrival: 209-372-0308 (this number is for cancellations and late arrivals only). Otherwise, your permit reservation will be canceled.
More details about the JMT permitting: https://www.nps.gov/yose/planyourvisit/jmtfaq.htm
Below is a map of our trail with both of our campsites from the trip. You can go to the map and download gpx file, if desired.
Below you can see the elevation profiles for each day of our trip. On the first day we only went about 9 miles because we didn't realize that our trip would be longer than 31 total miles. We ended up making up extra mileage on day 2 and 3, which were both about 14 mile days.

The 1st day of our trip, about 9 miles and 700 ft. of elevation gain

The 2nd day of our trip, about 14 miles and 3,400 ft. of elevation gain

The 3rd day of our trip, about 14 miles and 900 ft. of elevation gain
We drove up to Mammoth Lakes after work the night before our permit entry and camped at New Shady Rest Campground in Mammoth Lakes, California.
Day 1 - 9 Miles, 700 ft., Tuolumne Wilderness Center to Upper Lyell Canyon
In the morning of our entry date we left New Shady Rest Campground around 6:45am and grabbed coffee and breakfast burritos at my favorite coffee shop in Mammoth Lakes, Stellar Brew (only a couple minutes away from the campground). We left Stellar Brew around 7:30am to drive to Devil’s Postpile to drop off one of our cars (about 35 minute drive from Stellar Brew). If you have a National Parks pass, bring it! Between the 5 of us, we had 3 park passes, which we were able to use at the entrances of Devil’s Postpile and Tuolumne. During the shuttle bus operating season (ends Sept. 11), backpackers must use the overnight hiker parking just outside the monument boundary. There is a 1/4 mile walk from there to the trailhead. However, if you are like us and are hiking after shuttle bus operating season, you can drive and park your car right up in the monument. We left a parks pass on the dashboard with a note saying “Please don’t tow, Backpacking” just in case.
From Devils Postpile, we all piled into one car and then drove our second car to Tuolumne Meadows Wilderness Center (about 1 hour 30 minute drive), to pick up our permits before 10am. If you’re going to be later than that, make sure to call the Ranger station (Details in permit section).
We got there around 9:30am. We finished getting everything ready and weighed our packs with a small scale that I have. Below are the results of our pack weights (from left to right in photo below).
Allison: 33 lbs.
Curran: 42 lbs. (over prepared? Ha!)
Patricia: 30 lbs.
Rudy: 35 lbs.
Jacob: 33 lbs.
The Trailhead is right beside the Tuolumne Wilderness Center, and we got started around 11am.


We were hardly even an hour into the trip before we were stopping to take photos of all the gorgeous rivers and scenery along the trail. The waters were crystal clear along the whole trail. Tempting to want to jump in, but we knew it would be very cold!


The first day on the trail was easy, which we had anticipated. From Tuolumne to Upper Lyell Canyon there is minimum elevation gain, which is perfect for getting accustomed to carrying a 30+ lb pack on your back all day. I find it always takes me about a day to get more used to the aches and pains the weight of a pack inevitably entails.


At about 9.3 miles, we found a nice clearing for camp. We hadn’t realized that the mileage for the whole trip was longer than 31 miles at this point, or else we would have continued on to a higher campsite (possibly the “footbridge”, detailed on Nat Geo map, link at bottom of post). We spent our evening getting cozy at camp and filling up our camelbaks with water for the next day (the river was very close to our campsite). Since we were only at 9,000 feet elevation and had some time to kill, we also made a campfire in an existing campfire ring.
Life was simple, dinner was delicious, and the night was cold.

Day 2- 14 miles, 3,400 ft., Upper Lyell Canyon up to Donohue Pass and Camping at Garnet Lake
Day 2 was probably our longest, but most beautiful day of the whole trip.


We woke with the sunrise (around 6:30am) the next morning to begin Day 2 of our trip. We knew beforehand that this would be likely be the biggest leg of our trip (mileage and elevation gain). We had planned to make camp at Garnet Lake the second night.


From the start of our day, our hike was mostly uphill. Having spent the last two nights at elevation though (and thus well acclimated), we were making good pace along the trail. This stretch of the trail was the most epic and beautiful. We trudged on toward Donohue Pass, the high point of our whole trip.

We reached the pass around noon, and to our surprise, it wasn’t very windy and we had the view all to ourselves. So we took a lunch break here and admired our view. I couldn’t help but think of my poor co-workers back home who were still at work. I was living the dream, and in good company too! Ironically, we had 3 bars LTE service at the top of the pass, and while normally I like to unplug when I’m backpacking, I sent a couple photos to Michael, who couldn’t come on the trip since he broke his clavicle recently.
You can see the Minarets in the distance from the top of the Pass. Epicness.. pure epicness.


At the top of the pass, as I was counting the mileage on my nat geo map to Garnet Lake and looking at my gps for the amount of mileage we had already covered, I realized that my original estimation had been wrong and that instead of 10 miles for day 2, we would have to travel about 14 miles instead. That may not seem like a lot extra at first, but when you are carrying a heavy pack all day, 14 miles can be much more tiring than 10 miles. We were ambitious though, so we accepted the challenge (did we have a choice really though? We had to exit the park on Saturday, ha!).


I honestly felt like I was hiking in Switzerland for a lot of the hike. Epic mountains and green grasses!
Around mile 9 for the day (mile 18 for the whole trip), the soles of Curran’s boots started to peel off! Both of them! Luckily, he had packed some supplies we could use to temporarily repair the boots. He filled the soles with second skin glue and taped them up with climbing tape (haha!). However, he didn’t want to hike on them right away, so he ended up hiking in his Sanuk’s that he had brought along for camp. He ended up hiking 5 whole miles in his Sanuks!

By the end of the day we were all getting pretty tired, but the beauty was relentless, so it’s sort of hard to complain. We passed a bunch of lakes, 1000 Island Lakes being one of the bigger ones. I’m not sure I counted 1000 islands, but I guess 100 Island lake would just sound kind of lame…


When we finally got to Garnet Lake, there were signs around the entrance saying there was no camping along the front of the lake near the trail. We instead had to hike about a half mile down the side of the lake to camp instead. We found a gorgeous spot though, lakeside with mountain views. Can’t be beat.


We didn’t have as much time to relax on night 2 since we made it to camp just shy of sunset, but we made camp again, filtered water for day three and made dinner together and enjoyed the lakeside sunset. Dinner that night was the best dinner we have all had in our lives (as is usually the case at the end of a long day). I’ve never had better tasting Ramen before in my life (or maybe it was my last backpacking trip??).
Day 3- 14 miles, 900 ft., Garnet Lake to Devil's Postpile in Mammoth Lakes
Again on day 3 we woke up with the sun, but this time we were prepared ahead of time for another 14 mile day. Day 3 had minimal ascent though, only about 900 feet at the beginning, and then the rest of the trail descended into Mammoth.

There were a bunch of uprooted, fallen trees along the trail. Massive things. We also saw a couple deer on our way down.


We were pretty focused on day 3 to get our mileage finished. Most of us were planning to drive all the way back home that Saturday, so I didn’t get as many photos and we didn’t take as many stops. You can see Mammoth mountain in the distance in the photo below.
It was really cool being in the Ansel Adam Wilderness backcountry. I can remember all the times I’ve sat in Mammoth looking out into it and wondering what it would be like to hike out there, and now here I was, doing just that. It will be fun going back there and looking out and knowing that I’ve hiked through that area.

Its sort of funny because the true Devil’s Postpile Monument is slightly off the trail from the main trail, but we were all so tired by the end, we couldn’t be bothered to go another 0.5 miles more. I think it was easier for us to skip because most of us have already seen it before, or we live really close to where we could easily go back and see it on our next visit, but if you don’t live in California, I definitely recommend making the extra effort to see it. The basalt columns are really cool! You can see a few of them in the picture below, but the main monument is even better.

The trip went perfectly to be honest. I loved the group that ended up coming on the trip, we all got along really well and had a lot of laughs. The weather was pretty much perfect, and the trail went above and beyond in meeting my expectations. The Sierra Nevada have yet to disappoint me.

I felt like I was right where I belonged, I had everything I needed, life simplified. I love that feeling. Oh, and Curran’s shoes and tape job made it through to the end!

We drove our car at Devil’s Postpile back to our second car in Tuolumne and then stuffed our faces with delicious food at Woah Nellie Delli (http://www.whoanelliedeli.com/), which is located at the Mobil Gas station on the way up to Tuolumne on Tioga Pass. The food there is excellent.
If you are still interested, I also made a short little video of our trip. Nothing Fancy, just sort of like a short home video.
Below are some additional resources for planning your trip:
The trip report I found most useful (they have a cool little map, although the mileage didn’t match mine and the map I had): http://www.highsierratrails.com/tuolumne_to_postpile/overview.html#here
Wilderness Conditions: https://www.nps.gov/yose/planyourvisit/wildcond.htm
More Current Conditions Details: https://www.nps.gov/yose/planyourvisit/conditions.htm#CP_JUMP_469992
Weather in Tuolumne: http://forecast.weather.gov/MapClick.php?lon=-119.35666&lat=37.87522#.Wb1aw62ZPNJ
More information on Yosemite's Backpacking Page: https://www.nps.gov/yose/planyourvisit/backpacking.htm
If you have general questions about Yosemite wilderness, call 209-379-0826 (Monday through Friday, 9:00 a.m. to 4:30 p.m.)
I used my GPS (detailed on my favorite gear page), but also had a physical map. The map ended up being really useful, and had a lot of great detail about the trail. Link to the map I bought below:
AND FINALLY, a packing list :) If you're into not forgetting things.

I really hope you get to experience this trail. It was probably one of the most beautiful trails I’ve done to date. If you have any other questions, please leave a comment below and I’ll do my best to answer them.
Happy Hiking,
Allison